


Hardware components | ||||||
 |
| × | 1 | |||
 |
| × | 1 | |||
Software apps and online services | ||||||
| ||||||
Are you an extroverted type of person that likes to party every now and then? No? Ok, this one is for my fellow introverts: Do you know when you're just sad and depressed, so you put on sad music to get even more miserable and depressed?
Either way, both types involve listening to music, which includes speakers of course. Now comes the lame engineering part: A Speaker is just an audio amplifier, it's whatever sound you're playing but on steroids; and audio amplifier means Infineon's MERUS™ HAT featuring the MA12070P class D audio amplifier. If you have a Raspberry Pi Zero W lying around just waiting to get mounted by the perfect HAT, then you're right where you need to be because this Protip takes you from unboxing the MERUS™ HAT to streaming your music from a device on your speakers through the MERUS™ HAT.
Let's (literally) get this Party started!
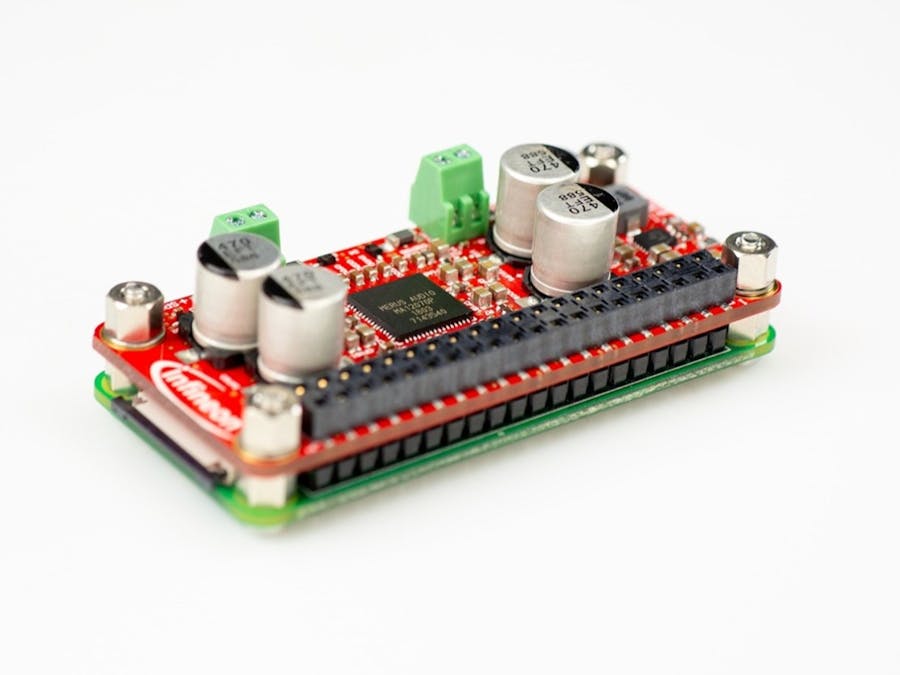
Crash Course: MERUS™ HATThe MERUS™ HAT is an audio power amplifier evaluation board that brings the Infineon multilevel technology to Raspberry Pi users and makers. It is intended for loudspeaker building and wireless music streaming with minimum size and consumption, great power efficiency, and HD audio quality. At the core of the MERUS™ HAT lies the MA12070P class D multilevel amplifier, which can provide up to 40 W instantaneous peak power from the official Raspberry Pi supply, and up to 48 kHz/24-bit music playback. Furthermore, there is no need for extra power supplies, as the MERUS™ audio amp is powered directly from the same supply as the Raspberry Pi Zero W.
It is meant for the MERUS™ HAT to be used and controlled by a Raspberry Pi Zero or Raspberry Pi Zero W. The application diagram below shows the simplified connection scheme. The HAT is equipped with a built-in boost converter, which takes the 5 V (2.5 A) from the Raspberry Pi and converts it to the 20 V required by the MA12070P amplifier. It runs in slave mode so the control and communication are handled by the Raspberry Pi, which is implemented in the software drivers. As shown, most applications will require a host controller such as a phone or computer over a wireless network.
The MA12070P uses the I²S protocol for digital audio input and the I²C communication protocol for full register map control.
Below you can also find a pinout concept of the MERUS™ HAT:
There are different Operating Systems designed for the Raspberry Pi, but they all have pretty much the same approach:
- Download the OS on your PC
- Flash it on a MicroSD Card
- Insert the MicroSD Card into the Raspberry Pi and Configure the OS from your PC browser
The first step is going to be downloading your desired OS to run on the Raspberry Pi, choose wisely:
If you visit our GitHub repository for the MERUS™ HAT you can also find other compatible Operating Systems, but any OS of the 3 mentioned above will do just fine. Plus, their Setup is relatively similar to each other.
As an example, the VolumioOS will be used to demonstrate the step-by-step guide for you. Please go ahead and click here to go to the official Volumio website. Scroll a bit down and you should see something like this:
Click on "DOWNLOAD" and wait for the download to finish.
Finished? Wow, that was fast, are you using NASA's internet or something?
Anyway, extract the.zip file and use any OS Image Flasher you like, a famous one is balenaEtcher, which is also used here to flash the OS on your MicroSD card. Insert the MicroSD card into your PC and run your OS Image Flasher:
Click on "Flash!" and Wait for it to finish then safely remove the SD card from your PC.
Now, onto the Raspberry Pi. Mount the MERUS™ HAT on top of the Raspberry Pi and insert the SD card into the Raspberry Pi and power it on via a MicroUSB cable. Wait for approx. 2 mins and open up your WiFi Settings and you should see Volumio pop up as a Network.
Connect to it and if you're asked for a password, the default password is volumio2.
Wait for about a minute then another Network will be available with the name "Volumio" in it which you should also connect to.
After that open up your browser and if it doesn't redirect you to the Volumio configuration wizard automatically, then type in http://volumio.local/.
This should direct you to the initial configuration menu. Go through it and follow the instructions in the Volumio GUI to finish your configuration. This menu will appear automatically the first time you boot the Raspberry Pi.
- Select your preferred language then press next to name the device
- Create an account if you want to, but it's not necessary, and press next
- To stay with the name Volumio would be highly recommended
- Next up is the output selection. Please make sure the "I2S DAC" option is OFF and select "snd_rpi_merus_amp" as the output device
- Continue to the network settings, select the network you want to connect your Raspberry Pi and press next
- Then you can configure your Music
After the setup is finished, Volumio will open up, where you have additional settings for your Raspberry Pi. Then You want to go to"Settings" on the left-hand side of the screen and press on "Playbackoptions" and double check that I2S DAC is off and that "snd_rpi_merus_amp" is selected as your output device, after that press "Save". Better Save than Sorry! :
In the Volume Options section select "Software" as the mixer type so that the protection mechanisms of the MERUS™ HAT can work properly. Optionally you can also select your desired Startup Volume, which is set to 15 here, to not allow loudsurprises at startup. Once again click on "Save":
In the Audio resampling section turn on the audio resampling option. Select "24" as the target bit depth and "native" as the target sample rate. Press "Save":
After changing the settings of Volumio like above, type "<your_raspberry_pi_ip_address>/DEV" or "volumio.local/DEV" on your host machine's web browser and press "ENABLE" under the SSH section:
NOTE: There will be no output warning or message after enabling the SSH option.
Next up, find the IP Address from the Network Settings on Volumio. Then open up your machine terminal and type:
ssh volumio@<your_raspberry_pi_ip_address>type in username: volumio and password: volumio.
or you can download PuTTY and log in through SSH into the Raspberry Pi with its address as the hostname address. Click "open" and "yes". Then login with "volumio" as username and password.
After successfully ssh-ing to the Raspberry Pi type:
aplay -ljust to make sure that the sound card is indeed the one from the MERUS™ HAT. You should get something like this:
Everything looking good? Yes? Go ahead and type:
alsamixeron the command line to access the MA12070P control mixer to set the protection limiter level of the device:
Usually, a -15dB setting will be a good starting point for 4-Ohm nominal impedance speakers. It's strongly recommended to go through the user's manual, where this topic is covered, to correctly configure the limiter threshold level. Press escape to exit the mixer and disconnect the power supply from your Raspberry Pi to turn it off.
Below are the recommended limiter thresholds:
Finally, your passive loudspeakers can be connected to the terminal blocks of each channel. With regard to cable length, the MERUS™ HAT supports up to 60 cm length, however, in most of its applications cables up to 5 m can be used.
Please make sure you got the polarity right as shown below:
Now turn the Raspberry Pi on once again, and Let'sget down, let's get down to business.
Open your browser and type in http://volumio.local/. You can choose to play from many Radio stations or you can also head over to "Plugins" on the left-hand side of Volumio and e.g install SoundCloud or Spotify to also stream your music to the MERUS™ HAT :
TIP: While it's obvious that you can alter the volume through the bottom right virtual sliding bar, you may also do it through alsamixer. Navigate to the 2nd page of the mixer till "SoftMaster" appears and press "UP", "DOWN", "+" or "-" on your keyboard to raise or lower the volume respectively.
Be careful, don'tunderestimate the power of the MERUS™, we don't wanna wake up the neighbors!
You can also play your own sound files or music from your iPhone via AirPlay. Just make sure your ShairPort-Sync is active. To do that through Volumio, navigate to Settings->Sources scroll down a bit and you'll find it under FunctionalitiesControl:
On your iPhone, open AirPlay, wait for Volumio to pop up, and select it:
"This is the end, hold your breath and count to ten..."
So, this is where we part ways, hope you enjoyed this article don't forget to check out other projects from Infineon and Volumio, and also if you want to learn about Linux drivers and kernel building with the MERUS™ HAT click here.
Stay safe and enjoy the music!


Comments
Please log in or sign up to comment.