Hello everyone my name is Rohan Barnwal and I have made a device for the shopkeepers that prevents them from COVID19 called as Covi-Prevento.
So why I have made this:-So as we all know that COVID19 pandemic is going on So one day I noticed that a lot of people were coming to a shop, out of which very few people were wearing masks, then I thought what would happen if any one was COVID positive And it is not possible for every shopkeeper to afford the security guard that can measure the temperature of the visitors at all times with the Infrared Temperature Gun. So that's why I built this device which has an Infrared Temperature Sensor as well as nodemcu in it.
Working:-So the first of all the person who comes has to put his finger on Infrared Temperature sensor And if that person's temperature is high then he will send us a message that "Please be careful" And if that person's temperature is normal, then device will send us a message that "There Is No Problem".
here the some photos of my device
the temperature of any place varies so you have to set your temperature according to your surroundings I have given the place on the code you can check it To check the temperature reading of your surrounding all you need is to open Serial Monitor of your Arduino IDE .
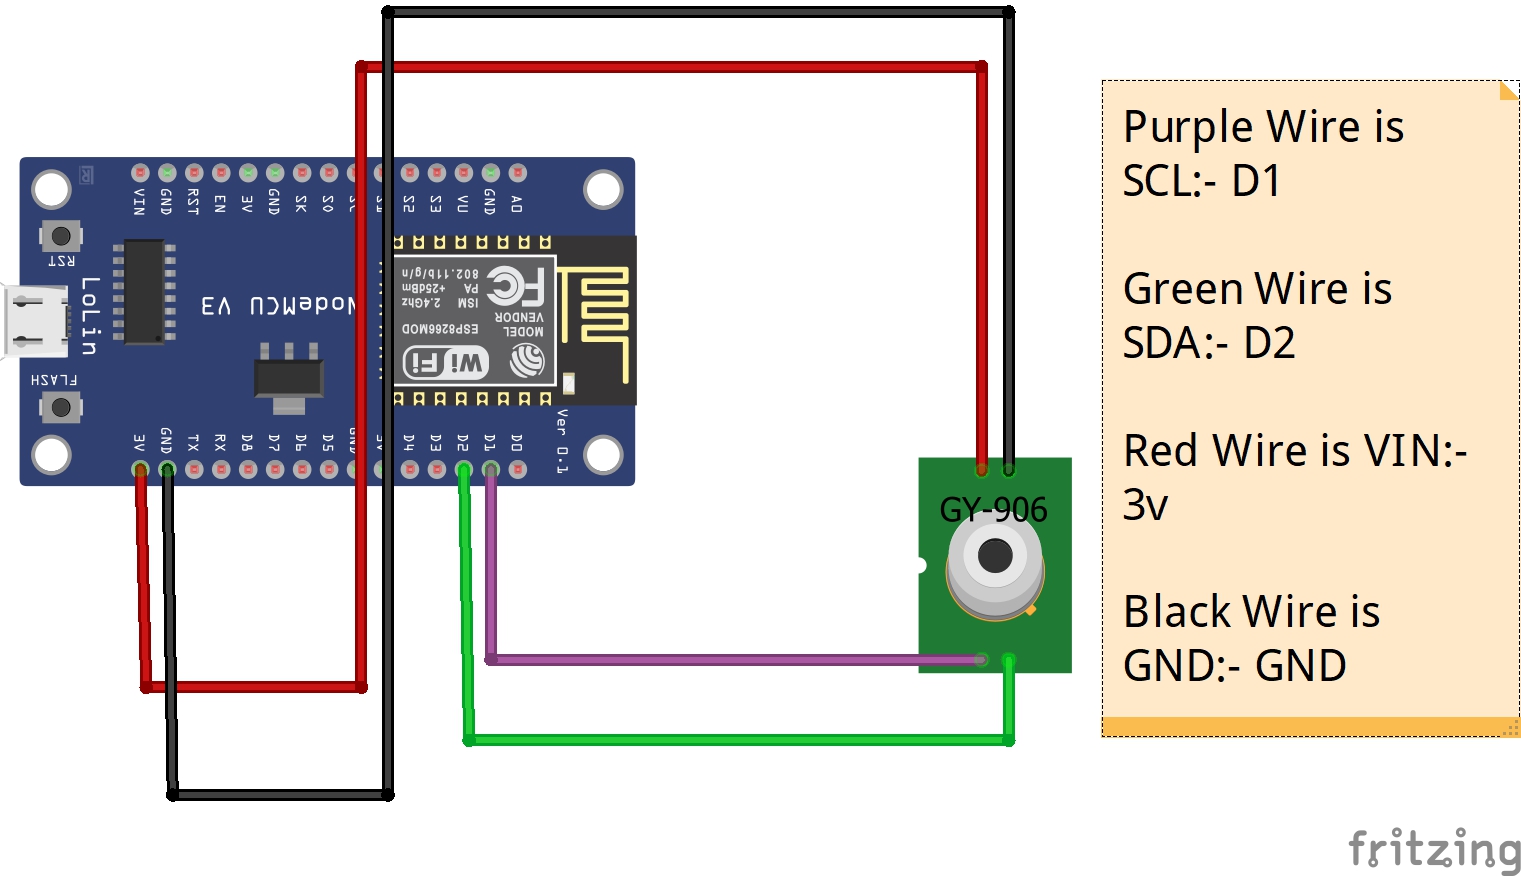
So the Infrared Temperature Sensor have 4 pins namely GND VIN SCL and SDA
The GND and VIN pins goes to the 3.3volt Pin and G pin of the NodeMCU and the SCL and SDA pins goes to the D1 and D2 of the NodeMCU Don't worry if you have any problem you can check the Connections and I have setup this all in a breadboard as you can see BreadBoard prevents from any kind of problem
is a new platform that allows you to quickly build interfaces for controlling and monitoring your hardware projects from your iOS and Android device. After downloading the Blynk app, you can create a project dashboard and arrange buttons, sliders, graphs, and other widgets onto the screen.
These are the following steps to setup the app:-
First of all you have to Login or you have to Create A New Account or you can Login with Facebook then
You will see a page like this you have to select New Project for creating a fresh app with the widget.
Now you have to name your project then you have to choose the device you have to choose NodeMCU here and don't change the Connection Type then select Theme you can choose DARK or LIGHT and then click on Create Project
then you'll get a pop-up "Auth Token Was Sent To: " it will be sent to your registered email then click on OK
then you'll see a screen like this you can see the title and now you have to swipe left to right and you'll see something like this
You'll see a option as Notification select it !!!!
it will look like this and also you can see a play icon just click on that
you'll see something like this and also a "!" on the board vector it means that your device is not connected with your hotspot So now you have to make some change in your code
In the "Char Auth" you have to add your authorization code which was sent to your email Id then in "Char SSID" you have to name your Wi-Fi name you can check it to your settings in the Personal Wi-Fi Hotspot option and in next field you will see the option as Hotspot Password so copy the password and paste it to "Char Pass"
About Bill Of Material (BOM):-1. NodeMCU:- $4.72
2. Infrared Temperature Sensor (MLX90614):- $10.81
3. BreadBoard:- $1.28
4. Male To Female Wires:-$ 1.32
Total:-18.13


Comments