


Hardware components | ||||||
_ztBMuBhMHo.jpg?auto=compress%2Cformat&w=48&h=48&fit=fill&bg=ffffff) |
| × | 1 | |||
 |
| × | 1 | |||
 |
| × | 1 | |||
 |
| × | 1 | |||
| × | 1 | ||||
 |
| × | 1 | |||
Software apps and online services | ||||||
 |
| |||||
Sensors are widely used in almost every field. Sensors give another dimension to your project and can be used in infinite applications. So, I decided to make this tutorial to help those new to sensors. I hope this will help you understand better. Let begin!
Firstly, there are different type of sensors which can record different type of data. All sensors work differently e.g. light sensors, ultrasonic sensor, gas sensor, humidity sensors etc.
Although all sensors work differently but when it come to interfacing these sensors with a micro controller (Arduino Uno in our case) the process is pretty much the same.
So let us understand how a sensor works?Sensor record the physical data by changing the voltage at their output pin in response to different physical condition. Lets understand this with an example.
Consider a light sensor (LDR). When it's in a dark environment the output voltage is low but when we place it in a brighter environment it's output voltage increases.
Now, this change in voltage is noted by micro controller and it can programmed to respond accordingly.
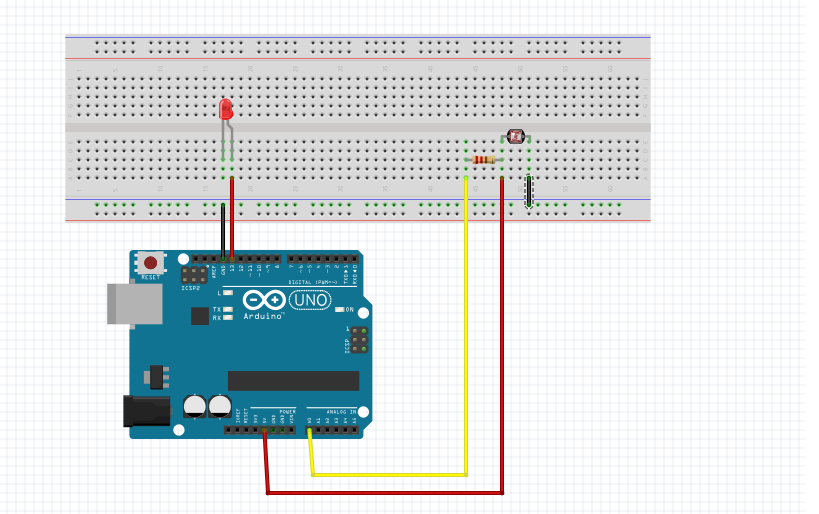
In this tutorial we will be interfacing a LDR with Arduino Uno.
ConnectionsArduino Uno has a set of Analog input pins which can are used to take analog input signals from a sensor.
Remember there are two types of signals:
1. Digital Signals: These signals have only two values i.e. 1 or 0 (on or off).
2. Analog Signals: These signals have values in a range. In the case of Arduino it scales the value in the range from 0 to 255.
So, we will connect our LDR with A0 pin of the Arduino Uno.
For better understanding we will control an LED on the basis of the sensor data.
Connect the LED to D13 (digital pin 13) of Arduino UNO.
Note that here we are connecting our LED to pin 13 which has an inbuilt resistor. So we don't need to connect an external resistor but if we use any other pin then you will have to connect an external resistor to protect you LED.
So sensors simply records the data and sends it to then Arduino Uno which generates signals to control the LED. Now, let us see the code.
- CODE
- -------------------------------------------------------------------------------------
int sensor1Value = 0;
void setup()
{
// Declare the ledPin13 as an OUTPUT:
pinMode(13, OUTPUT);
}
void loop() {
// analogRead(A0) Reads the value from the sensor connected at A0andstoresitinsensorValue
sensor1Value = analogRead(A0);
// nowwesetupaconditionandcheck the value of sensor
if(sensor1Value <200)
{
//If the value is less than 200 then turn the LEDs ondigitalWrite(13, HIGH);
delay(500);
}
else
//If the value is greater than or equal to 200 then turn LEDs off.{
digitalWrite(13, LOW);
delay(500);
}
}
--------------------------------------------------------------------------------------
That's it!
I hope this tutorial will be helpful to you and it made sensors clear.
Just plug in your Arduino, make those connections and you are good to go!


Comments
Please log in or sign up to comment.