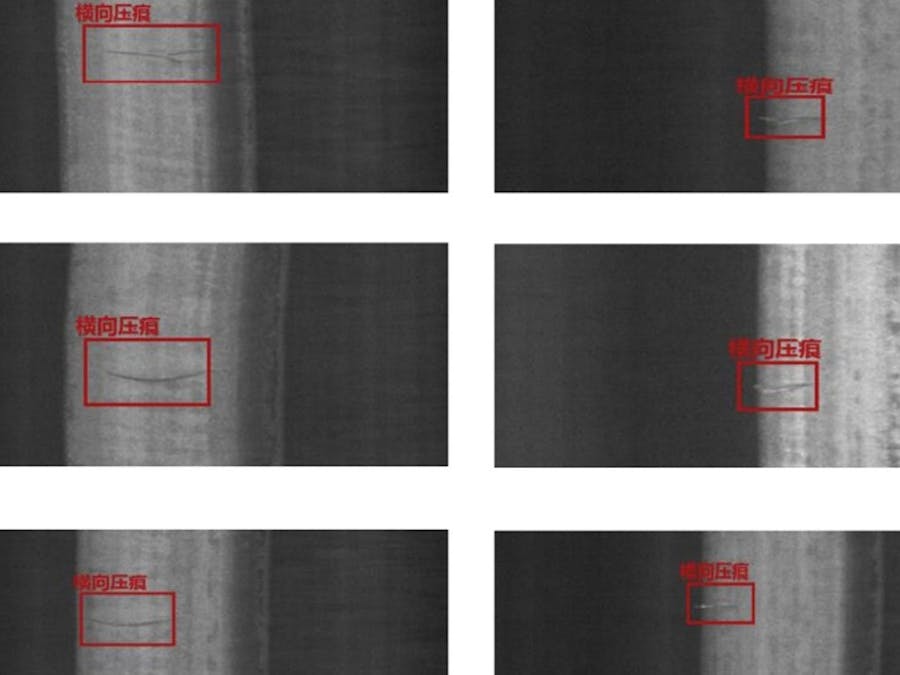
In this project, the steel plate surface defect detection based on yolov3 should be realized on the FPGA edge device KRIA kV260 of AMD Xilinx. Image of steel plate to be tested H264 video, through display, can display the steel plate image and frame the defect location and defect category in HDMI.
Method:Firstly, we completed the urban target detection on kv260, including pedestrian, bicycle and car target detection. The algorithm uses yolov3 to deal with urban road conditions H264 video stream. By quantizing yolov3, the processing speed of 60 frames can be achieved on kv260. Then we change the model and replace it with our yolov3 based steel plate surface defect detection algorithm to convert the steel plate image to H264 video stream, it is expected to get the detection result. However, the compiled model has some problems and cannot work normally. The problems reported are as follows:
Later, we will try to quantify the model first, and then put it into the quantizer of Vitis AI to see whether the problem can be solved.
And the new yolox is used for target detection.
precondition:Linux host PC with Vitis AI installed
Understand Vitis AI workflow
Kv260 is connected to the Internet and the host
Overall project:Modifications for smart-camera applications
1. Connecting device, network cable, UART, power supply, HDMI
2. Open mobaxtermand connect to com
3. Check ifconfig, the first IP, and connect with SSH
4. Internal files can be viewed and operated on the connection.
5. The virtual machine needs to call Vitis AI docker to compile the model.
6. Kv260 is mainly used to modify the parameters of the model.
Steps 1-4 will not be described in detail later, but steps 5-6 will be mainly discussed
5. Model compilation in Vitis AI docker:1、in vmware
cd Vitis-AI
2、run docker
./docker_run.sh xilinx/vitis-ai-cpu:latest
./docker_run.sh xilinx/vitis-ai-cpu:1.4.916
(vitis ai 1.4)
3、conda activate vitis-ai-caffe
4、cd models/
cd AI-Model-Zoo/
5、download models
python3 downloader.py
choose :dk yolov3
6、Sudo unzip yolov3
cd dk_yolov3_cityscapes_256_512_0.9_5.46G_2.0
7、in quantized ,add arch.json,
sudo touch arch.json
sudo vim arch.json
{
"fingerprint":"0x1000020F6014406"
}
Sudo chmod 777 arch.json
8、Sudo chmod 777 quantized
9、turn into quantized
vai_c_caffe -p ./deploy.prototxt -c deploy.caffemodel -a arch.json -o yolov3_cityscape
If environment is pytorch
1、1. Finally, three algorithm files are required on the board of kv260 (MD5 files are not required)
(1)deploy. xmodel
Compile the quantized model in the docker of Vitis AI, as shown in the next Vitis AI compilation (the GPU model in ai-module-zoo can be used, and the fingerprint information can be found in the guide of kv260)
(2)Prototext can be downloaded from the kv260 version of ai-module-zoo and renamed (the same as the output of the previous step)
(3)label.json
You must write it yourself. You can refer to the original version of the board
Download from the board's own SSD (kv260 board), and find the JSON of the model
)
Copy into kv260's folder (with the same name as the model)
2、Three files of the application part on the board of kv260:
Copy these JSON
Modify the value of preprocess to indicate no preprocessing📷
Change name, change pretreatment need_ preprocess📷
After modification of three documents
Paste into new Yolo folder
Run smart camSudo xmutil listapps
Display board firmware📷
sudo xmutil unloadapp
sudo xmutil loadapp kv260-smartcam
You can generate MP4 files later, or use the camera directlyhttps://xilinx.github.io/kria-apps-docs/main/build/html/docs/smartcamera/docs/app_deployment.html
The results are as follows:
1. Open docker and activate the pytorch environment
2. Download PTH file of RESNET
3. Download the folder of Imagenet📷
The appearance of the file after preparation (without quantify_result)
4. Modify data_ Dir (folder of Imagenet) and model_ Dir (folder of PTH file)
It is recommended to modify the current folder location. (select relative position)📷
5. Copy in GitHub's website: resnet18_quant.py
6 .quantification
Quantization, calibration using a subset of validation data (200 images).
python resnet18_quant.py --quant_mode calib --subset_len 200
This scheme adopts the deep learning method based on artificial intelligence to detect and identify the surface defects of steel plate. This scheme has the following advantages:
1) Convolution neural network based on multi-scale receptive field is used to classify steel plate surface defects, effectively improving the detection accuracy and generalization ability of deep learning method for defects of different scales:
2) Aiming at the problems that periodic defects have no fixed form and are easy to cause serious quality accidents early, a defect detection method based on long-term and short-term memory network is introduced to detect periodic defects (roll marks); 3) The semi supervised learning method based on Countermeasure generation network is introduced to effectively improve the defect detection accuracy at the initial stage of system deployment and shorten the online time of the system:📷
Schematic diagram of convolutional neural network
Generally, the defect detection method usually extracts the defect area first and classifies the defects This system adopts the classification priority network. Firstly, the original image is classified, and then the corresponding feature map is selected according to the classification results to calculate the defect location, which effectively solves the problem of integrity and location of defect detection.
Schematic diagram of classified priority network
Results:📷
Through the above steps 1 ~ 6, the detection model is quantified to generate XModel. When it is displayed through HDMI, the following problems occur
We have tried many times and failed to solve the above problem.
Later, we will try to quantify the model first, and then put it into the quantizer of Vitis AI to see whether the problem can be solved. And the new yolox is used for target detection. We are very sorry that we didn't arrange the time reasonably and didn't complete the envisaged goal on time. We think kv260 is a good platform to realize artificial intelligence on FPGA, and we will invest more time to study it in the future.
Finally, thank you very much for Xilinx and hackster.io give this precious opportunity!


Comments
Please log in or sign up to comment.