


Hardware components | ||||||
| × | 1 | ||||
| × | 2 | ||||
| × | 1 | ||||
 |
| × | 1 | |||
 |
| × | 4 | |||
 |
| × | 1 | |||
| × | 1 | ||||
 |
| × | 1 | |||
 |
| × | 1 | |||
This is an old project of mine, which I never finished completely. The Junk Drawer Competition is an excellent opportunity to finally bring the project home. A lot of the text in this story is from 6 years ago, but I've edited it a lot.
Charillino in a nutshellCarillon, a glockenspiel with large church bells, usually including automation. Netduino, the original µC board for this project. Charity. From these words I came up with the name charillino. I'm still going to include charity in some way. The final microcontroller board (µC) will have IoT capabilities and people will be able to select tunes from a web site, while the project raises money for charity.
The instrument consists of 25 aluminium keys, or bars, from a glockenspiel I've trashed. I'm a music teacher and I simply have too much of them. The 25 bars are laid in a semicircle on a 400 * 800 mm board, a writing shelf from a Lundia bookshelf set. Two mallets strike the bars. One mallet is attached on a micro servo, which performs the vertical strike. The micro servo is attached to a bigger servo, which turns it horizontally, allowing the mallet to strike at any of the bars. The bars are actually laid along two semicircles overlapping each other, optimizing the striking point for each mallet. One mallet hits mainly the lower end of bars, starting from G5. The other mallet strikes the higher end up to G7.
Underneath each bar there's a hole in the board, and an aluminium tube sticking out below the board. The tube works as a resonator for the sound, amplifying it.
A µC board controls the servos, making them play melodies.
Robotify the projectThis is the biggest change, when adapting the project to the Junk Drawer Contest. I got a lovely Christmas elf from one of my pupils. I used thick iron thread to make a seat for the elf. He has long sloppy legs, and I tied the feet to the mallets, hoping they could dampen the tremendous vibration, something I haven't been able to get rid of yet. It worked almost.
I could go for midi, but a midi parser is too complicated and usually requires the whole file to be read into RAM before the first note can sound. Instead I went with a structure like this:
...
{ 67, 1765, 1 },
{ 79, 1765, 0 },
{ 72, 2353, 1 },
{ 91, 2353, 0 },
{ 76, 2941, 1 },
{ 90, 2941, 0 },
{ 84, 3529, 1 },
{ 91, 3529, 0 },
...
The first number is the midi number of the tone. The second number is a time stamp in milliseconds, the third number is which mallet is striking, 1 for bass, 0 for discant. The data structure might change in the future, if I want to add velocity as a parameter, to be able to vary the dynamics in the music. There's no noteoff events, because the Charillino just strikes the bars without damping them afterwards.
In its simplest form, the program reads one line, waits for machine clock to pass the timestamp, then the right mallet turns to the right glockenspiel bar and strikes it.
But there's more to it. If the right bar is far from the previous strike, it takes time to move there, so it's better if the mallet moves there in advance. Then again, badly written arrangements might cause the two mallets to collide, if one moves too early to its next bar. Badly written arrangements might cause any kind of problems.
I decided to depend on well written arrangements. And I will take care of moving mallets to the next bar in advance, if possible.
Writing the music in MusescoreMusescore is perhaps the most popular free sheet music editor.
A simple two stave score will work fine:
In this example, the full range of the Charillino is used. The highest bar is G7, the lowest bar is G5.
Note that the sheet music shows a range G3 to G5, not G5 to G7. Glockenspiel sheet music is usually transposed in this way. I decided to use the same convention. I don't even change the instrument sound from the default piano to glockenspiel, when I write the music. A piano sound two octaves lower than the glockenspiel reveals easier faults in the arrangement, while a glockenspiel too easily get away with wrong notes and bad arrangements.
These notes are to be transfered to the datastructure shown in the listing earlier. Here we can use the plugin system in Musescore. There's a plugin for colouring the notes according to a particular colour scheme. I used that script, skipped the colouring thing, but instead, for each note, had the script write the midi number for the note and the time for the event. Luckily there's a function returning the time in milliseconds, withzillions of decimals. The crucial line in the plugin is this:
console.log(note.pitch + ", " + Math.round(cur.time)+ ", " + staf);cur is a cursor object, which points to an element in the score. It could be a rest, a chord or something else. I read the time from the cursor object and round it to a millisecond (no one will notice a sub-millisecond error). A chord consists of one or several notes. The plugin goes through nested loops, the outermost going through all staves, the next going through all chords found in one stave, and the innermost going through all notes in one chord. So, the pitch or midi number of the tone can be read from the note object, while the time is read from the cursor object. And the stave number (which transfers to the mallet number) in my code is held in the staf variable. Running this plugin will cause a listing in a console window in the plugin tool (which has to be open in Musescore). The listing looks like this:
Debug: 79, 11176, 0
Debug: 91, 11765, 0
Debug: 90, 12353, 0
Debug: 91, 12941, 0
Debug: 81, 14118, 0
Debug: 83, 14706, 0
Debug: 88, 15294, 0
Debug: 83, 15882, 0
Note that all notes from one stave come first, before it's turn for the next stave notes. From here I copy the text and paste it to a spreadsheet in Libreoffice, where I sort them according to the timestamp. I also add the curly brackets to fit into a C program as a struct array. Then I copy-paste it from Libreoffice to Arduino IDE, to the charillino_tunes.h tab.
The sheet in Libreoffice:
When I copy the data from the console in Musescore, I paste it in cell A7. The important data goes to the B, C and D columns. After sorting everything according to column C (the timestamp), I create the code in column E, which I copy directly to the charillino_tunes.h file in the Arduino IDE project. For a new tune, I delete the content in column A, paste the new data in A7 and sort it again (column A now shows how long the new listing is). The E column updates itself nicely, I just have to extend it if the new tune is longer than the previous.
I really should learn Javascript and do the sorting in the Musescore plugin.
The program flowIn its simplest form, the program will flow as follows:
Have some 10 tunes stored as structs in the charillino_tunes.h file. One tune with only 10 notes might look like this:
struct Tunes
{
uint8_t pitch;
uint32_t timestamp;
uint8_t stave;
};

Tunes tune01[] =
{
  { 76, 0, 1 },
  { 91, 0, 0 },
  { 81, 588, 1 },
  { 88, 588, 0 },
  { 84, 1176, 1 },
  { 86, 1176, 0 },
  { 67, 1765, 1 },
  { 79, 1765, 0 },
  { 72, 2353, 1 },
  { 91, 2353, 0 },
  { 76, 9999999, 1 }
};
First we define the Tunes struct for one note event. Then we define one tune as an array of note events. The last element has a timestamp of 9999999, as a marker of end of the tune (the key and stave numbers are irrelevant). I can name one tune array however I want. In the main program, I have one tunes array of pointers to these tunes:
Tunes *tunes[] =
{
   tune01,
   mice_in_the_bellows,
   the_skewed_flywheel,
   merry_go_round_pickford,
   my_sway,
   NULL
};
When the program starts, and everything has been setup, a pointer points to the first element in this tune list. The tune is played. A five second delay happens and the next tune starts. When the NULL element is reached, the pointer goes back to the first element.
When one tune is playing, one mallet waits for next movement to happen. First the mallet moves horizontally to the right bar. Then, 200 ms later, it strikes the key. The program flow for playing one tune goes like this:
- Read the first note event for each mallet and create timestamps for the horizontal movement 200 ms earlier.
- Record the start time for the tune. Note that the first timestamp for a note strike might be 0, so the timestamp for the first horizontal movement might be -200 ms, but this causes no problems, because the main clock is the millis(), always being a value over 1000.
- Wait until next timestamp. If it is for a horizontal movement, do the movement and wait again. If it is for striking, do the strike, search for next event, create a timestamp for the horizontal movement. This step loops until the tune has played. So the next timestamp can be either mallet, and it can be either for the horizontal movement or for the strike.
- When one tune has reached its end, wait 5 s and pick next tune, looping eventually back to first tune in the list.
The horizontal movement takes the mallet to a position some 30 mm above the bar. The strike moves the mallet rapidly to some 5 mm above the bar. The flexible stem of the mallet causes the mallet to strike the bar once, if everything is calibrated perfectly. The mallet stays at this position until the next horizontal movement happens, which simultaneously raises the mallet from 5 mm to 30 mm.
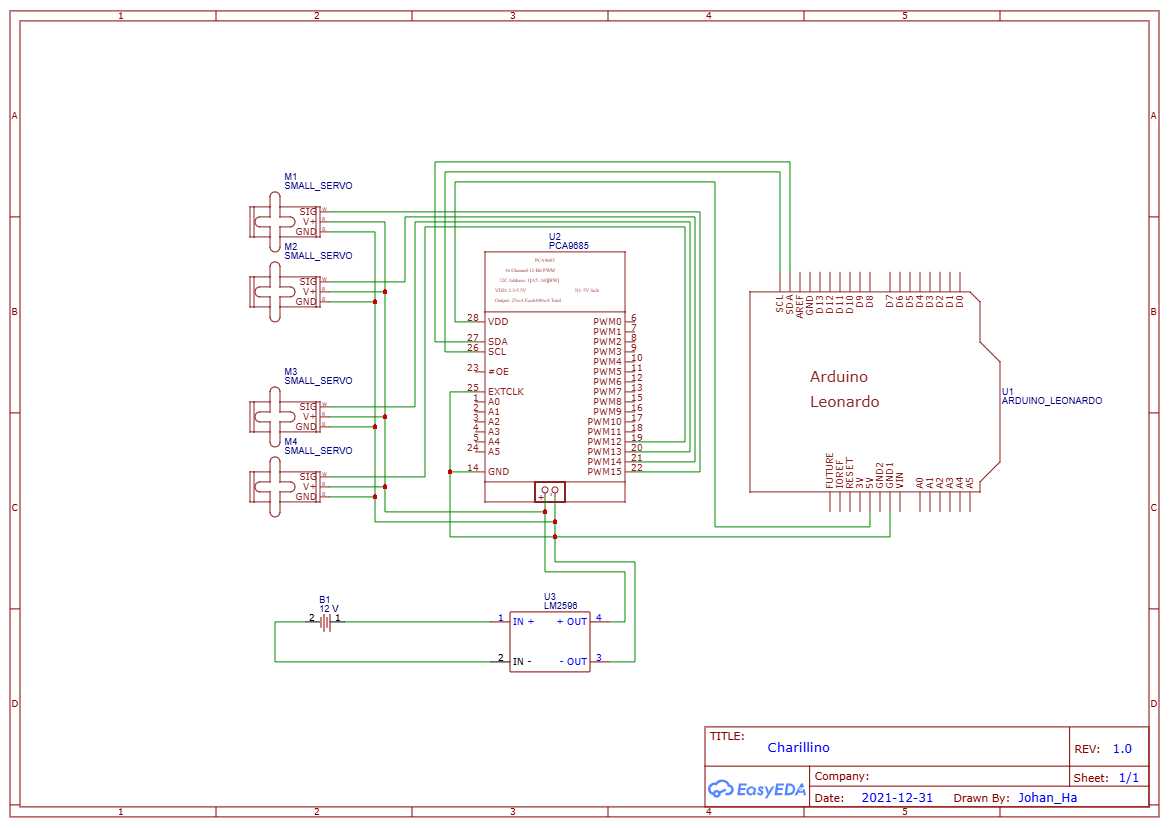
The electronicsThe schematic shows how I designed it in 2021. The Arduino Leonardo shown in the schematics happens to have the same form factor as the Netduino, the original µC board in this project. I toasted one Netduino. I had another one, but got tired of the.NET thing - wrong programming language, a mastodon IDE. So I've now switched to a Seeeduino XIAO, switching it later to some ESP32 board, if I go IoT. I originally chose a 12 V power source and an LM2596 to take the power down to 5V. At that time I often used a 12V lead battery for most projects.
This is a simple setup, which can be improved with switches and potentiometers, and maybe a display. I won't go into that in this project.
Junk used in this project- The Lundia bookshelf. I still have a lot of Lundia parts in the attic. For each new project, I check what I have there.
- The glockenspiel I kind of trashed for this project. It wasn't actually junk, but having 15 glockenspiels, one is more or less junk.
- The elf. I got it as a Christmas present from a pupil of mine. It's not junk per se, but I couldn't find any use of it, it didin't fit my home decorations. And my wife hated it anyway.
- The wire for the elf. I had some thick aluminium wire of my own, lying in one of my many junk drawers, but it couldn't hold the weight. So I used some rusty 4 mm iron wire from school, from a junk corner full of metal pieces to be used in school projects. It was a kind of a trade, because I had earlier donated my old iron flag pole to our school.
- The µC board, the PCA9685, the temporary prototyping board, all are stuff found in one of my many junk drawers. Again, not junk per se, but gems among junk. We all know our junk drawers are full of gems, don't we?
- Actually the servos have turned into junk already. Because of earlier tests with too heavy mallets, some teeth have worn out on the vertical servos and I have had to open them and turn the cogwheels to new positions to avoid the worn out teeth. When that happens next time, I need to replace the servos. Too bad that metal gears are too noisy for instruments.
One strike consists of moving the vertical servo from an upper position to a lower position. Depending on what servo is used and how strong the torque and the inertial torque of the mallet is, these angle values can't possibly be set in advance without testing. If the mallet hits too hard, it will stick to the bar, causing an ugly short metallic sound, or the mallet will hit twice before settling at the 5 mm height. If it hits too softly, the bar won't even be hit every time. We want a clear, single hit, causing a sustained sound of the vibrating bar.
A special program for calibrating is needed. The result will be a lookup table consisting of the optimal angles for the upper position and lower position for each key and for each mallet. To take it to the next level, we could try to include fortissimo and pianissimo by varying the upper position.
My calibrating programThe calibrating program works by typing letters on the computer. The µC receives letter commands through the serial USB and sends back listings of the angle values. This is the command list:
- 'a': Move to the previous key.
- 'f': Move to the next key.
- '1': Strike the key with present parameters.
- '3': Play three consecutive keys up to the present key to compare them.
- 's': Lower the horizontal angle of mallet one unit.
- 'd': Raise the horizontal angle of mallet one unit.
- 'w': Lower the upper position angle of the striking mallet one unit.
- 'e': Raise the upper position angle of the striking mallet one unit.
- 'x': Lower the lower position angle of the striking mallet one unit.
- 'c': Raise the lower position angle of the striking mallet one unit.
Typing two letters for the angles will change the angle ten units. The number values for the angles are not in degrees, but somewhere in the range 100 to 400. It's all about the special kind of PWM a servo motor needs. I guess the conventional way to control servo motors is servo.write(a); where a is an angle in degrees, in the range 0 - 180. Here I use instead numbers telling how many parts of totally 4096 the pulse is on, of a 50 Hz or 20 ms cycle.
After each input, both arrays of all 27 tones are printed on the serial. If the µC hangs up, which happens now and then, I always have the latest changes on the computer screen. From there, I can copy-paste the arrays into my sketch in Arduino IDE and recompile. When everything is calibrated, I copy-paste the same arrays into the actual tunes playing program.
Videos of a working charillinoSorry for the dark lights in the following videos, but Finnish elves don't like bright lights.
How it was supposed to sound:
I could have faked a success with that video, couldn't I? But here's how it actually sounded:
Ok, it could have gone better. But it's a working charillino. It plays all 17 tunes in the playlist and then starts over. But fails to produce a recognisable tune. The mallets lose accuracy. So, will I trash the whole project? NO! I just need to improve the dynamics of the servos and the mallets. The servos might need a higher voltage, or more amps to gain precision, have to check that. The servos might need deacceleration, the kind you see stepper motors do on a 3D printer. The operating frequency of the servos could perhaps be adjusted to work against the frequency of the oscillating mallets. The servos might have to be turned off for a short while after each strike to avoid the continuous oscillation. The mallets might need a new design to minimize the vibrations. The elf might need bigger shoes.
The mandatory BOMAlthough this project is along the outline of the Junk Drawer Competition, a few things can have a price tag. I picked the prices from a Finnish provider, since I live in Finland.
- The Seeduino XIAO 8.47 €
- SG90 Servos 4 * 7.28 €
- Proto board 7.26 €
- PCA9685 35.65 €
- Jumper wires 1 €
This adds up to 81.50 €. But bare in mind that this whole project really is more about use whatever you already have.
What happens next?My charillino will participate in the Junk Drawer Competition as it is!
My pupils have written some beautiful glockenspiel tunes, which my charillino will perform as soon as school starts on tuesday 7th, after the Christmas break. Until then I'll fix a few things:
- The timing schedule of the mallets. The mallet must perform the horizontal movement and the preparing vertical movement immediately after one strike, not immediately before next strike, as it does now.
- The mallet stems must be wrapped in thin plastic foam, which will eat most of the energy, that now causes the vibration. If that doesn't help, I need a new, hollow mallet design, so I can fill the stems with plastic foam.
- Right now I suspect a voltage drop at the servos. I have to check if the servos can handle 6.2 V from a lead battery, which surely won't drop voltage because of four lousy hobby servos. A good tool for monitoring the power supply would be handy.
Short history of the project
As I mentioned, the charillino goes way back, and has been ̶a̶b̶a̶n̶d̶o̶n̶e̶d̶ put on hold a few times. This is my first test with an orchestra glockenspiel and two servos back in 2017:
After that test, I decided to build a completely new instrument with the bars laid in a semi circle.
And here is the charillino in 2021 performing quite well:
Here I have an Arduino Leonardo reading midi from my laptop and Musescore. Even though the mallets appear to perform rather good, they were too heavy and the servo cogwheels lost a few teeth. My latest approach with 3D printed mallets is more promising.

Comments
Please log in or sign up to comment.