


Hardware components | ||||||
_ztBMuBhMHo.jpg?auto=compress%2Cformat&w=48&h=48&fit=fill&bg=ffffff) |
| × | 1 | |||
 |
| × | 14 | |||
 |
| × | 1 | |||
 |
| × | 1 | |||
Software apps and online services | ||||||
 |
| |||||
_4YUDWziWQ8.png?auto=compress%2Cformat&w=48&h=48&fit=fill&bg=ffffff) |
| |||||
Hand tools and fabrication machines | ||||||
 |
| |||||
 |
| |||||
Great question! Well, This is a project based on the seven-segment display but with amazing addons. The normal seven-segment display usually has a fixed color to represent the numbers or outputs, But in my moodiest display, The whole setup is on a PCB. The PCB has 14 LEDs representing 7 segments in pair of two. The PCB also has an input header pin and an output header pin. In a nutshell, The project is about WS2812B aka Neopixel LEDs with a specific connection on the PCB. This isn't rocket science. 😅😂
Whydidyoudecidetomakeit?
Yay! That's my favorite question ever. The reason to make the Moodiest Display is that I always wanted to have a digital Numerical clock on my workbench but it must include the following features-
- Portable and easy to connect.
- Can display RGB colors or their combination.
- Can work as a backlight too for shooting photos and videos 😅
- can be configured to display any other requirements too.
Because I loved the Neopixels and I knew to use them, I decided to try them for this project. I wanted to use these to
- display the live Instagram followers on my workbench.
- Also, in Party times these LEDs work great by showing animated effects (ex: The FastLed)
- A new feature will include music reactive output.
FromwheredidyougotthePCBs?
Cool! I always love to credit all those who helped me in getting this project successful and So, The secret is that I got these PCBs manufactured from Lion Circuits. They provide IPC Grade Class 2 PCBs with automated manufacturing capabilities and testings. They are the ones with encrypted user details facility and NDA secured system. I would highly recommend them for
- Amazing PCB quality and capabilities.
- 100% satisfied After sales
- On-time shipments worldwide
- PCBA and Component procurement with Mouser, Arrow, and Digikey under one roof.
o, You can head on to Lion Circuits and get your Hassle-free PCB fabricated in India with assured quality.
Howdoesitwork?
Operating these displays is not a worry! I will explain how you can use these displays with ease.
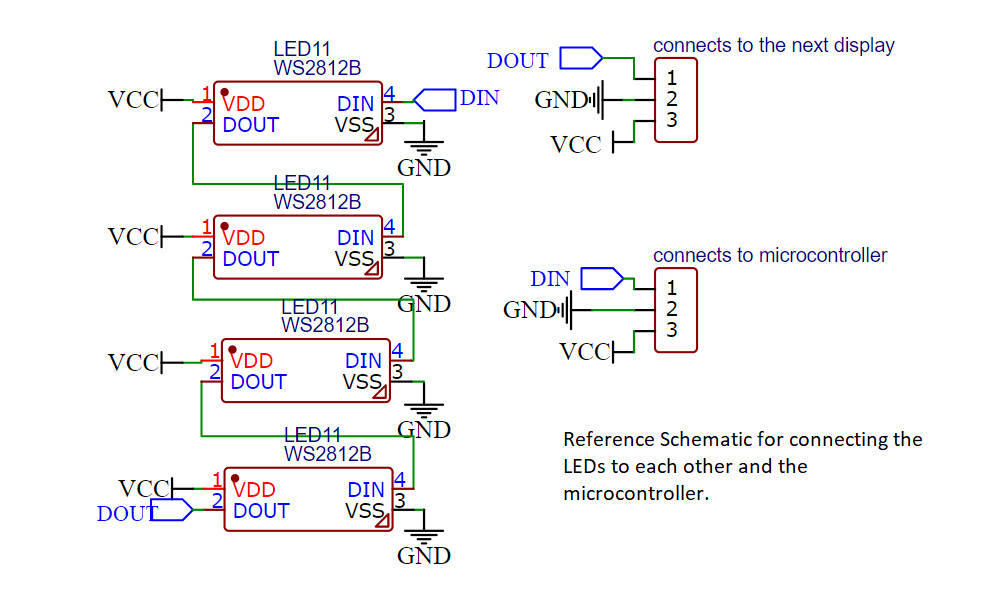
At first, see, how these displays can be cascaded together to form a daisy chain and run on a single Data Pin. The Data IN header is recommended to be a Male header and the Data OUT header is recommended to be a Female header for easy connection. Still, you can use wires and connect these at different corners of your home or living area.
We would need a micro-controller to run these displays, You can use an ESP32 or ESP8266 to control the displays over the air or use an Arduino board to control the displays over the wire. So, define the data Pin as D7 or D5 (As in my case), 5v, and GND for the power supply.
I used a specific, ESP8266 Web interface from the WS2812fx library to test my displays. I have shared the photos here that you can consider building the code for further application according to your needs.
To know different codes, check my Instructables Step 6 and Step 7.
ConclusionI hope you loved the project! Have any doubts? Then comment below and I will be happy to solve them out at the earliest. Any doubt or suggestion is welcomed anytime and anywhere!
If you wish to buy these Moodiest Display, head on to Tindie
If you would like to support me, head on to Buymeacoffee
You can connect with me on, Instagram
Thanks! for your eyes here. Stay tuned for my upcoming projects and Stay safe.

_Ujn5WoVOOu.png?auto=compress%2Cformat&w=40&h=40&fit=fillmax&bg=fff&dpr=2)

_3u05Tpwasz.png?auto=compress%2Cformat&w=40&h=40&fit=fillmax&bg=fff&dpr=2)
Comments
Please log in or sign up to comment.