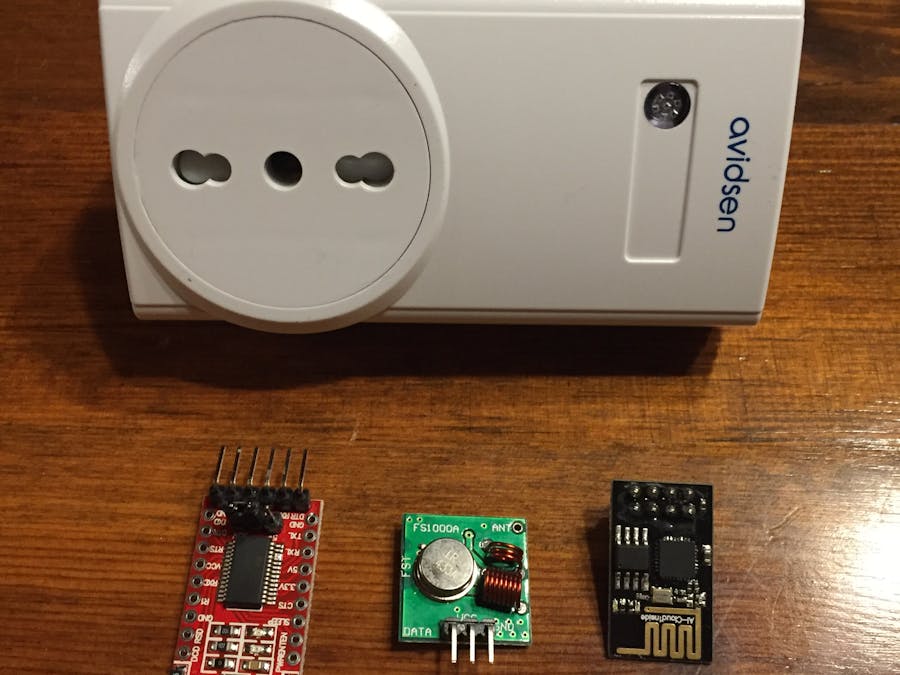
This is a tutorial to show you how to check remote-controlled sockets with Blynk using an ESP8266 - 01 and and RF 433 Mhz module.
Hardware needed:
- FT232RL FTDI USB
- ESP8266-01
- RF 433 Mhz module
- USB to connect the FT232RL to your Mac/PC
- Breadboard
- Wires
Software needed:
- Arduino IDE: https://www.arduino.cc/en/main/software
- Most recent BLYNK library: https://github.com/blynkkk/blynk-library/releases
- ESP8266 blynk library: https://github.com/esp8266/Arduino
- RC-switch library https://github.com/sui77/rc-switch
- Blynk app on iphone or android
Right click on the Arduino IDE software in your Finder, not the shortcut. Next, click "Show Package Contents". Then click "Contents", then "Java", then "libraries".
Step 3: Prepare the code for the ArduinoCopy the BareMinimum code with the code below and save. Leave this window open. We will come back to it later.
/**********************************************************
 Download latest Blynk library here:
 https://github.com/blynkkk/blynk-library/releases/latest
      Created: 4th Dec 2017 by Manfredk
    Last Modified: 12th Jan 2018 by Manfredk
*********************************************************
FT232RL to ESP8266:       IMPORTANT: set to 3.3v!!
DTR -> -
RX -> TX
TX -> RX
Vcc -> Vcc & CH_PD & RST
CTS -> -
GND -> GND & GPIO0
**************************
Module RF to ESP8266:
DATA -> GPIO2
Vcc -> Vcc
GND -> GND
**********************************************************/
#include <RCSwitch.h>
#include <ESP8266WiFi.h>
#include <BlynkSimpleEsp8266.h>
#define BLYNK_PRINT Serial
char auth[] = "tokenByBlink"; //token
char ssid[] = "NameWifi";  // Wifi
char pass[] = "Password";
RCSwitch mySwitch = RCSwitch();
WidgetTerminal terminal(V0); // Virtual Pin  0
void setup() {
 WiFi.persistent(false); // Debug console
 //Serial.begin(9600);   // Baud Rate 9600 (NL)
 mySwitch.enableTransmit(2); //RF on GPIO2
 Blynk.begin(auth, ssid, pass);
 Blynk.connect();
 // You can also specify server:
 //Blynk.begin(auth, ssid, pass, "blynk-cloud.com", 8442);
 //Blynk.begin(auth, ssid, pass, IPAddress(xxx,xxx,x,xxx), 8442);
 terminal.flush();
 terminal.println(F("Blynk v" BLYNK_VERSION ": Ready!")); // Version Blynk (v0.5.0)
 terminal.println(F("-------------"));
 terminal.println(F("Hi"));   //Say hi!
 terminal.println(F("What shall we do today?"));
 terminal.flush();
}
BLYNK_WRITE(V0) {
  if (String("Turn on A") == param.asStr()) {    //A ON
   mySwitch.setPulseLength(312); // my wavelength
   mySwitch.send("000101000100010101010001"); // binary for my A ON socket
   terminal.println("A is ON!");   //
 }
 else if (String("Turn off A") == param.asStr()) {      // A OFF
  mySwitch.setPulseLength(313); //optional
  mySwitch.send("000101000100010101010100"); // binary for my A OFF
  terminal.println("A is OFF!");
 }
 else if (String("Turn on B") == param.asStr()) {     // B ON
  mySwitch.setPulseLength(314); //optional
  mySwitch.send("000101000101000101010001"); //B ON
  terminal.println("B is ON!");
}
 else if (String("Turn off B") == param.asStr()) {     // B OFF
   mySwitch.setPulseLength(313); //optional
   mySwitch.send("000101000101000101010100"); //B OFF
   terminal.println("B is OFF!");
}
 else if (String("All on") == param.asStr()) {     // A &B ON
   mySwitch.setPulseLength(312); //optional
   mySwitch.send("000101000100010101010001"); // A ON
   mySwitch.setPulseLength(314); //optional
   mySwitch.send("000101000101000101010001"); // B ON
   terminal.println("All is ON!");
}
else if (String("All off") == param.asStr()) {     // AB OFF
  mySwitch.setPulseLength(313); //optional
  mySwitch.send("000101000100010101010100"); // A OFF
  mySwitch.send("000101000101000101010100"); // B OFF
  terminal.println("All is turn OFF!");
}
 else if (String("Hi") == param.asStr()) {
   terminal.println(" Hi lozzi'!");
}
else {
   // Risposta
   terminal.print("You said:");
   terminal.write(param.getBuffer(), param.getLength());
   terminal.println();
   terminal.println("unrecognized command");
 }
 terminal.flush(); //Sta senz pensiè
}
BLYNK_WRITE(1) {  //Pin V1
 if (param.asInt() == 1 ) {    // Button on -> socket on
    mySwitch.setPulseLength(312); //optional
    mySwitch.send("000101000100010101010001"); // Binary A ON
    // or mySwitch.sendTriState("0FF0F0FFFF0F");
    // or mySwitch.switchOn("10010", "10000");
    }
if (param.asInt() == 0) {
   mySwitch.setPulseLength(313); //optional
   mySwitch.send("000101000100010101010100"); //Button off -> socket OFF (same button)
   }
}
 BLYNK_WRITE(3) {
   if (param.asInt() == 1 ) { //Pin V3
      mySwitch.setPulseLength(314); //optional
      mySwitch.send("000101000101000101010001"); //Binary B ON
   }
   if (param.asInt() == 0 ) {
      mySwitch.setPulseLength(313); //optional
      mySwitch.send("000101000101000101010100");   //B OFF
   }
}
void loop()
{
 Blynk.run();
 /* You can inject your own code or combine it with other sketches.
    Check other examples on how to communicate with Blynk.
    to avoid delay() function!*/
}
Make you power the ESP8266 with 3.3V! 5V kills it, be careful!
FT232RL (FTDI) to ESP8266:
- RX ---> TX
- TX ---> RX
- Vcc ---> Vcc & CH_PD (Pin Enable) & RST
- GND ---> GND & GPIO0
Module RF to ESP8266:
- DATA ---> GPIO2
- Vcc ---> Vcc
- GND ---> GND
Set:
- Board: "Generic ESP8266 Module"
- Port:/dev/cu.usbserial-xxxxxxx
- Reset method: "ck"
- Upload speed: "115200"
Step 1: Disconnect the ESP8266 GP0 pin from ground.
Step 2: Open your Blynk app on your phone.
Step 3: First, create an account (or by Facebook), create a new project, and hit the gear button. Next, press the auth and send it by email to yourself. Go to the "char auth[ ] = "tokenByBlink";" line of your code. Replace the "tokenByBlink" with your new auth characters.
Step 4: Select Terminal Widget and buttons;
- gp1 (not in sketch) is linked to blu led on ESP board.
- Terminal is V0.
- V1 (Virtual 1) is linked to socket A. Select Switch.
Step 5: Go to the "Blynk.begin(auth, wifi, "xxxx", "xxx");" line of your code. Replace the first "xxx" with your Wifi SSID, and the second xxx with your Wifi password.
Step 6: Click the upload button.
Step 7: Click 'play' on Blynk.
NOTES:If you have some problem or questions comment below!
Have fun!
Credits:
- RC Switch
- Blynk


Comments
Please log in or sign up to comment.