


Hardware components | ||||||
_ztBMuBhMHo.jpg?auto=compress%2Cformat&w=48&h=48&fit=fill&bg=ffffff) |
| × | 1 | |||
| × | 1 | ||||
| × | 1 | ||||
| × | 1 | ||||
| × | 1 | ||||
Software apps and online services | ||||||
 |
| |||||
Hand tools and fabrication machines | ||||||
 |
| |||||
Project can be found here: https://www.NixieTester.com
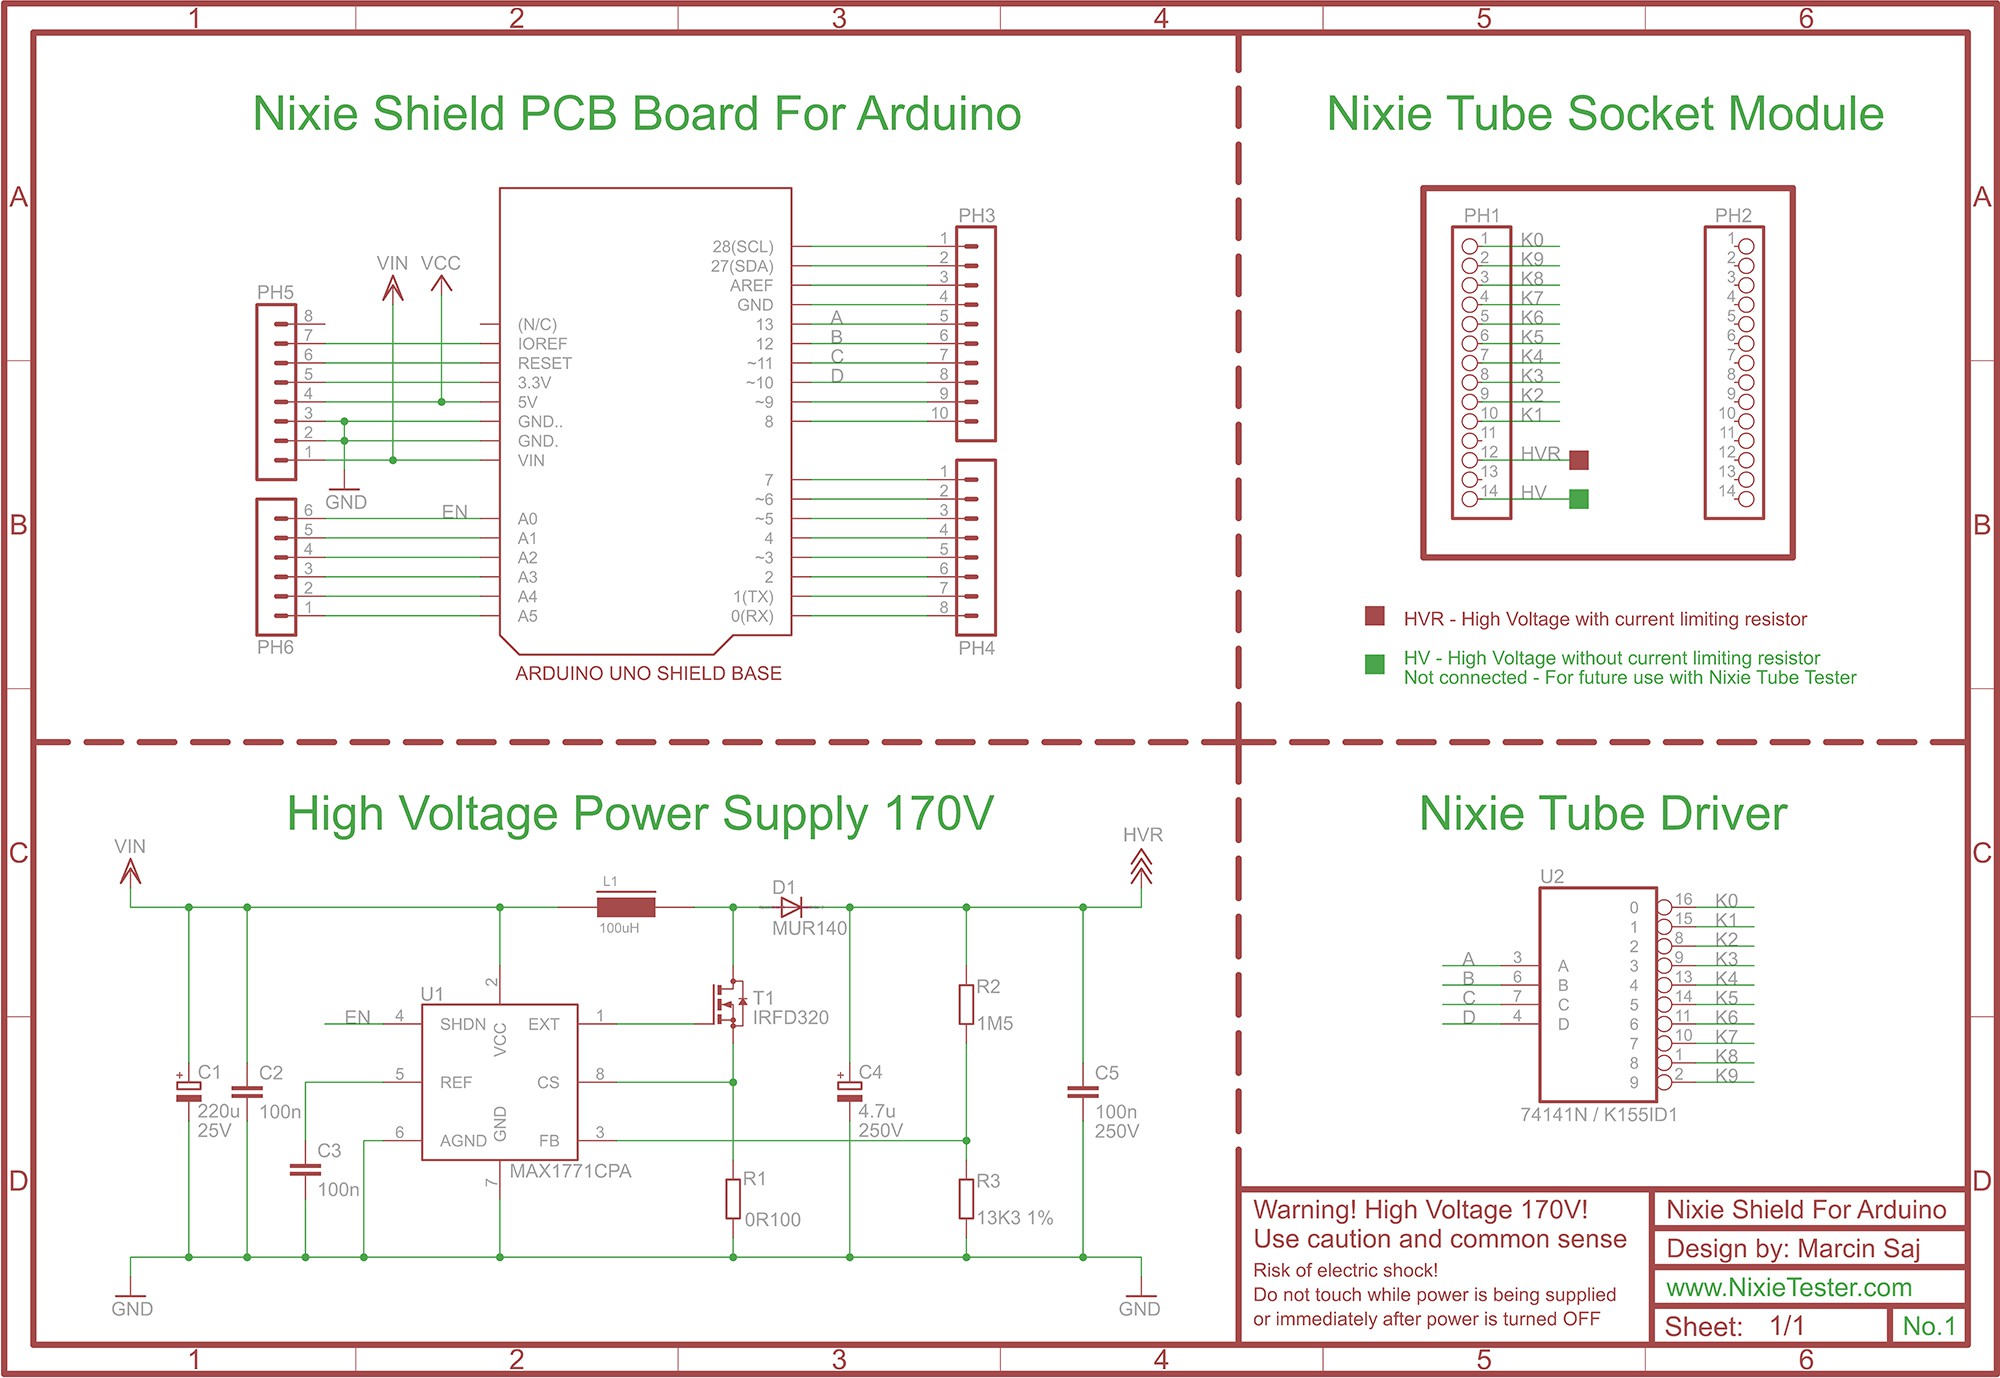
The Nixie Shield is a modular circuit board that piggybacks onto your Arduino to install it with extra functionality. Shields have the same form-factor as the standard Arduino. The Nixie Shield allows an Arduino board to connect any Nixie tube you want to use in your projects.
Nixie ShieldFor better understanding on what the Nixie Tube Shield is about, please take a look on the video below.
With Nixie Tube Shield for Arduino you can bring to life any Nixie tubes and use with your projects!
To use the shield, mount it on top of an Arduino board, then mount any nixie socket (with nixie tube) on top of the nixie shield. To upload sketches to the nixie "sandwich", connect it to your computer with a USB cable as you normally would. Once the sketch has been uploaded, you need connect 12V external power supply and ... voila.
The Nixie Shield have extra functionality - external pins. All Arduino pins are available for use with different modules, breadboards (connected by jumper cables). You can use these pins with your projects.
- One tube clock
- Nixie tube tester
- Thermometer
- Counter
- Reminder
- Unread Mail Count / Notifier
... and more.
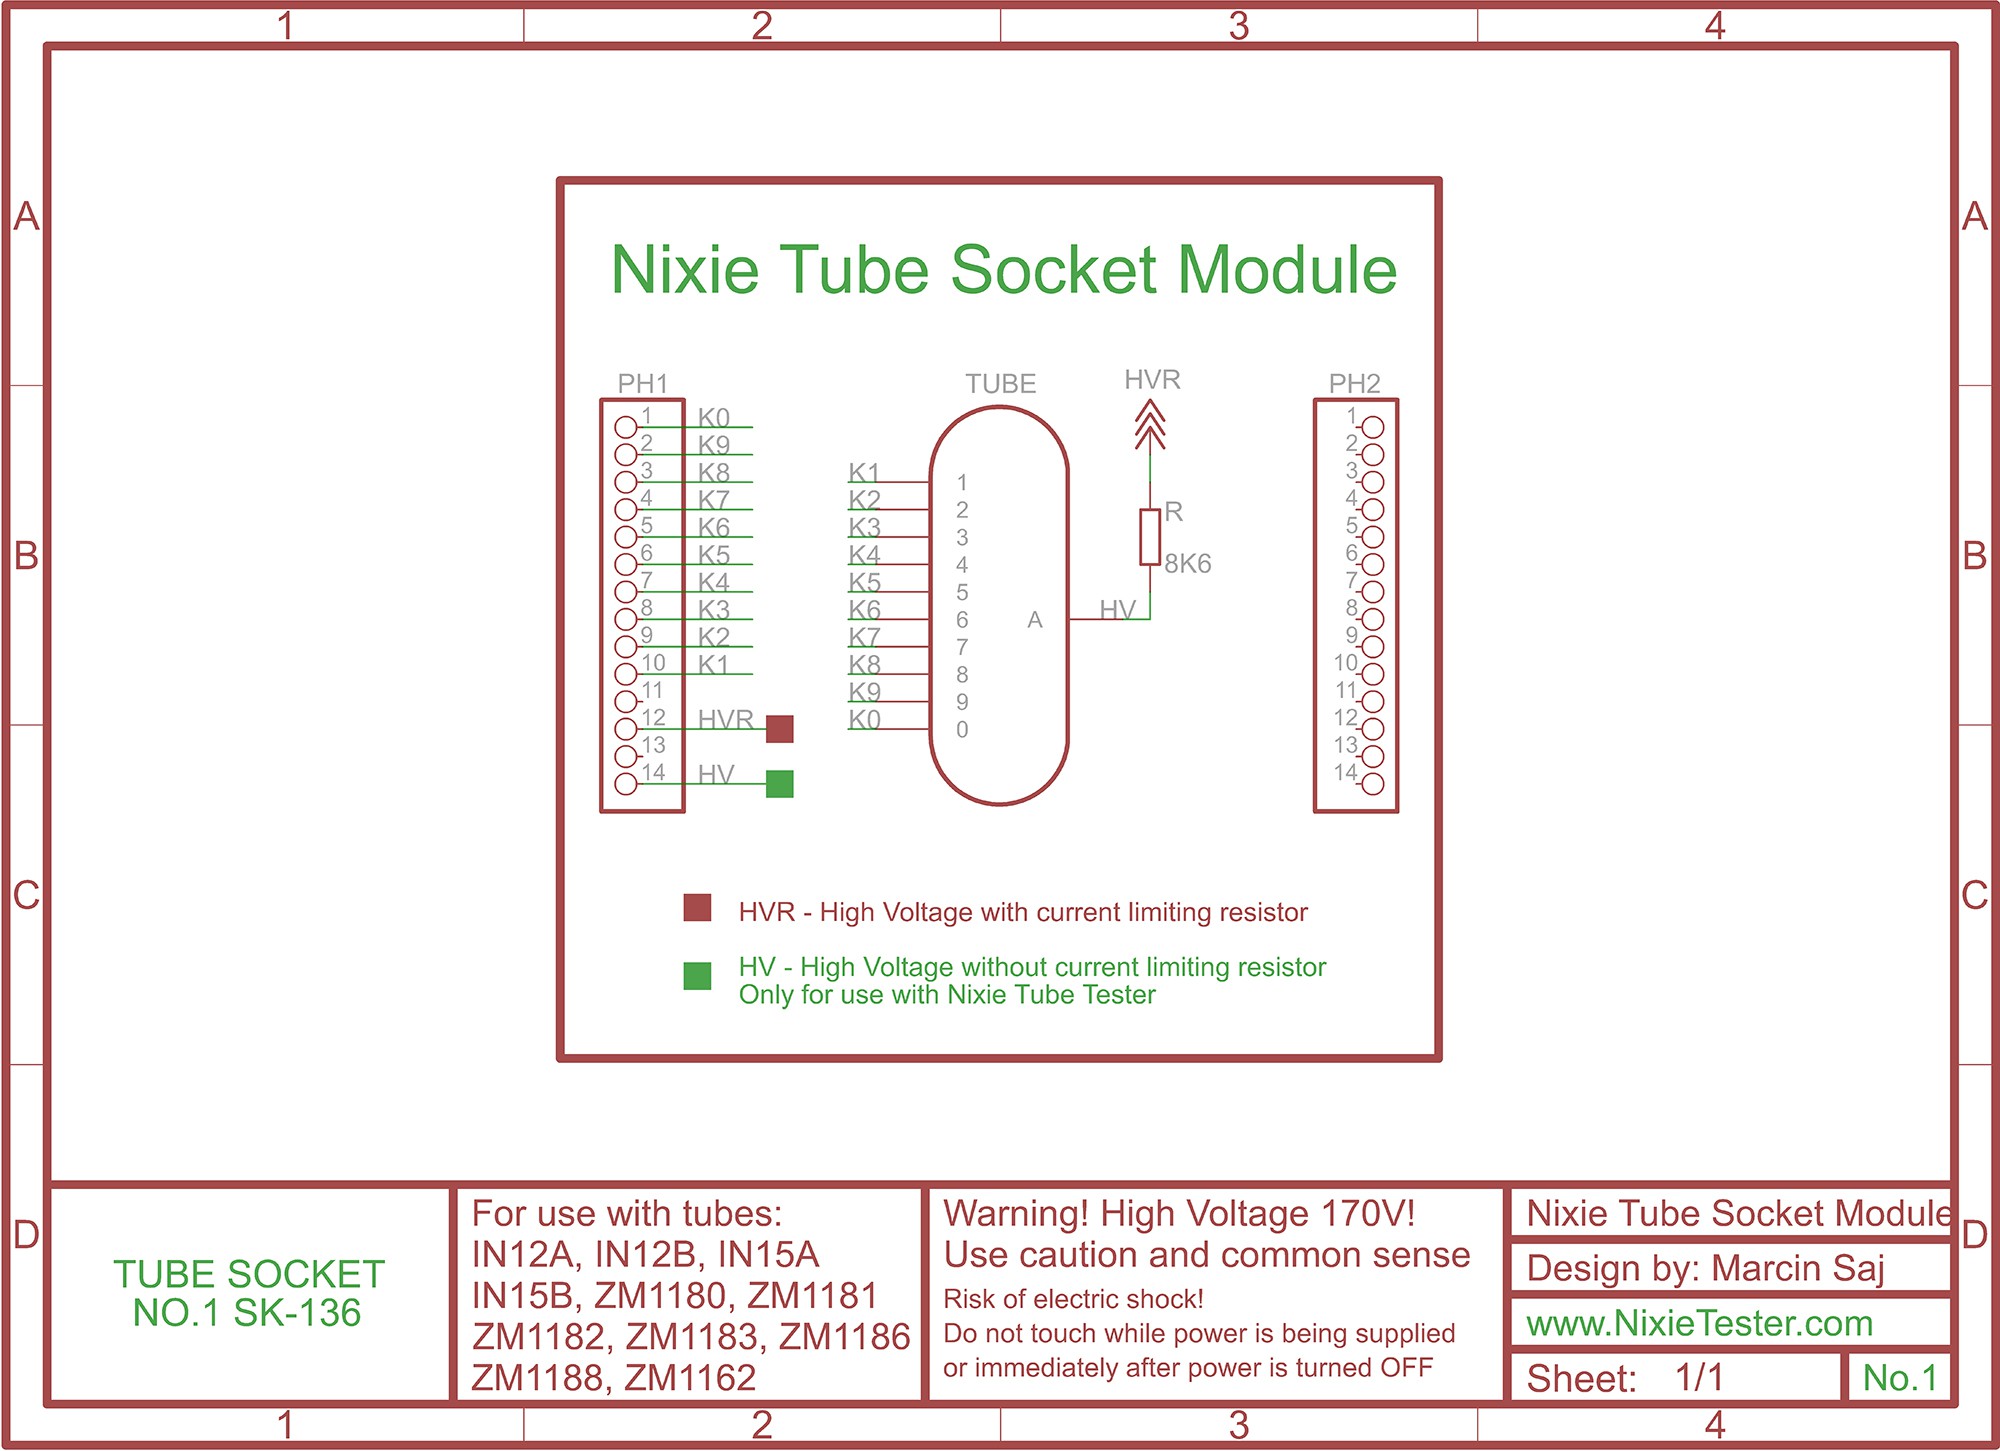
Nixie Tube Sockets- Educational value - You can always learn something new
- Because it's fun to build
- Easy to assemble
- Without SMD components
Driving Nixie tube by Arduino is very simple. The Nixie Shield use only five Arduino pins. Take a look at the following code:
/*
  Nixie Shield Basic Example
  This example shows how to control a nixie tube with an Arduino using Nixie Shield
  Nixie Shield uses five digital outputs to drive nixie tube.
  Pin A0 as on/off line, 13,12,11,10 as an address of nixie tube cathode.
  This example code is in the public domain.
  http://www.nixietester.com
*/
const int EN = A0;          // A0 pin is attached to on/off line
const int A = 13;           // 13,12,11,10 pins are attached to address lines
const int B = 12;
const int C = 11;
const int D = 10;
void setup() {
  pinMode(EN, OUTPUT);      // declare pin A0 as output
  pinMode(A, OUTPUT);       // declare pins 13,12,11,10 as output
  pinMode(B, OUTPUT);
  pinMode(C, OUTPUT);
  pinMode(D, OUTPUT);
}
void loop() {
  delay (1000);
  digitalWrite(EN, LOW);    //turn on the tube
// set address of the tube cathode '0':
                            //   ___
  digitalWrite(A, LOW);     //  |   |
  digitalWrite(B, LOW);     //  |   |
  digitalWrite(C, LOW);     //  |   |
  digitalWrite(D, LOW);     //  |___|
  delay (1000);

// set address of the tube cathode '1':

  digitalWrite(A, HIGH);    //   /|
  digitalWrite(B, LOW);     //  / |
  digitalWrite(C, LOW);     //    |
  digitalWrite(D, LOW);     //    |
  delay (1000);
  digitalWrite(EN, HIGH);   //turn off the tube
}
More code examples you can find on GitHub: https://github.com/marcinsaj/Nixie-Shield-for-Arduino
Tube Socket Assembly Instruction V1: https://github.com/marcinsaj
Project continuation: https://igg.me/at/pro-nixietester***********************************************************************************
Project update - new sockets for Nixie Shield for ArduinoTotal 22 nixie sockets.
Project can be found here: https://www.NixieTester.com


Comments
Please log in or sign up to comment.