I started this project some time ago in order to get familiar with Arduino.
I will provide you the code and the wiring instructions, if you have all the components ready it shouldn't take more than 30 minutes. This is also the first time I'm writing a guide on Hackster, if you think I'm wrong on some aspects or if you think it can be improved please leave feedback in the comment section.
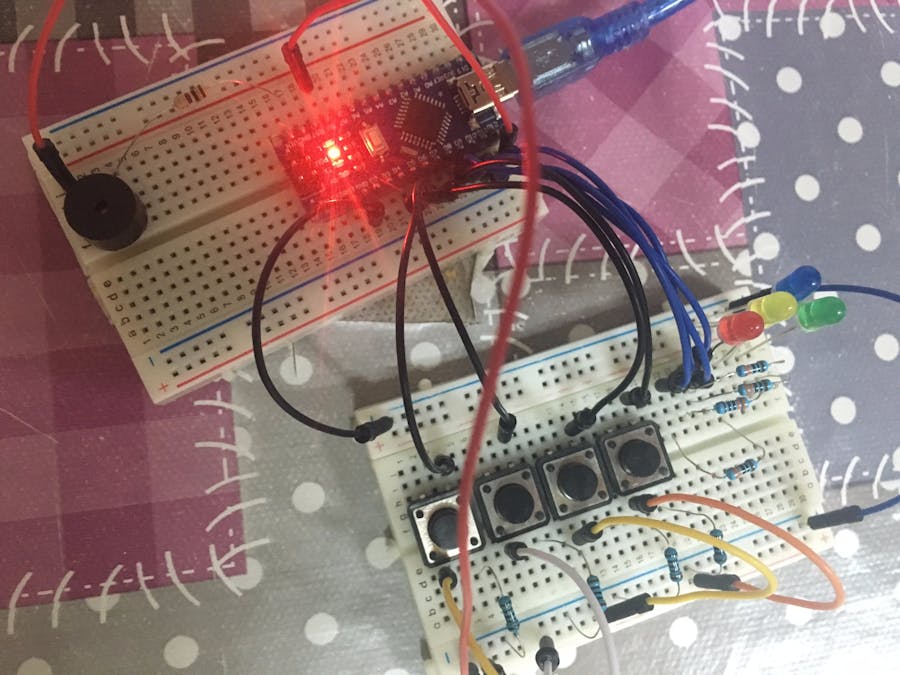
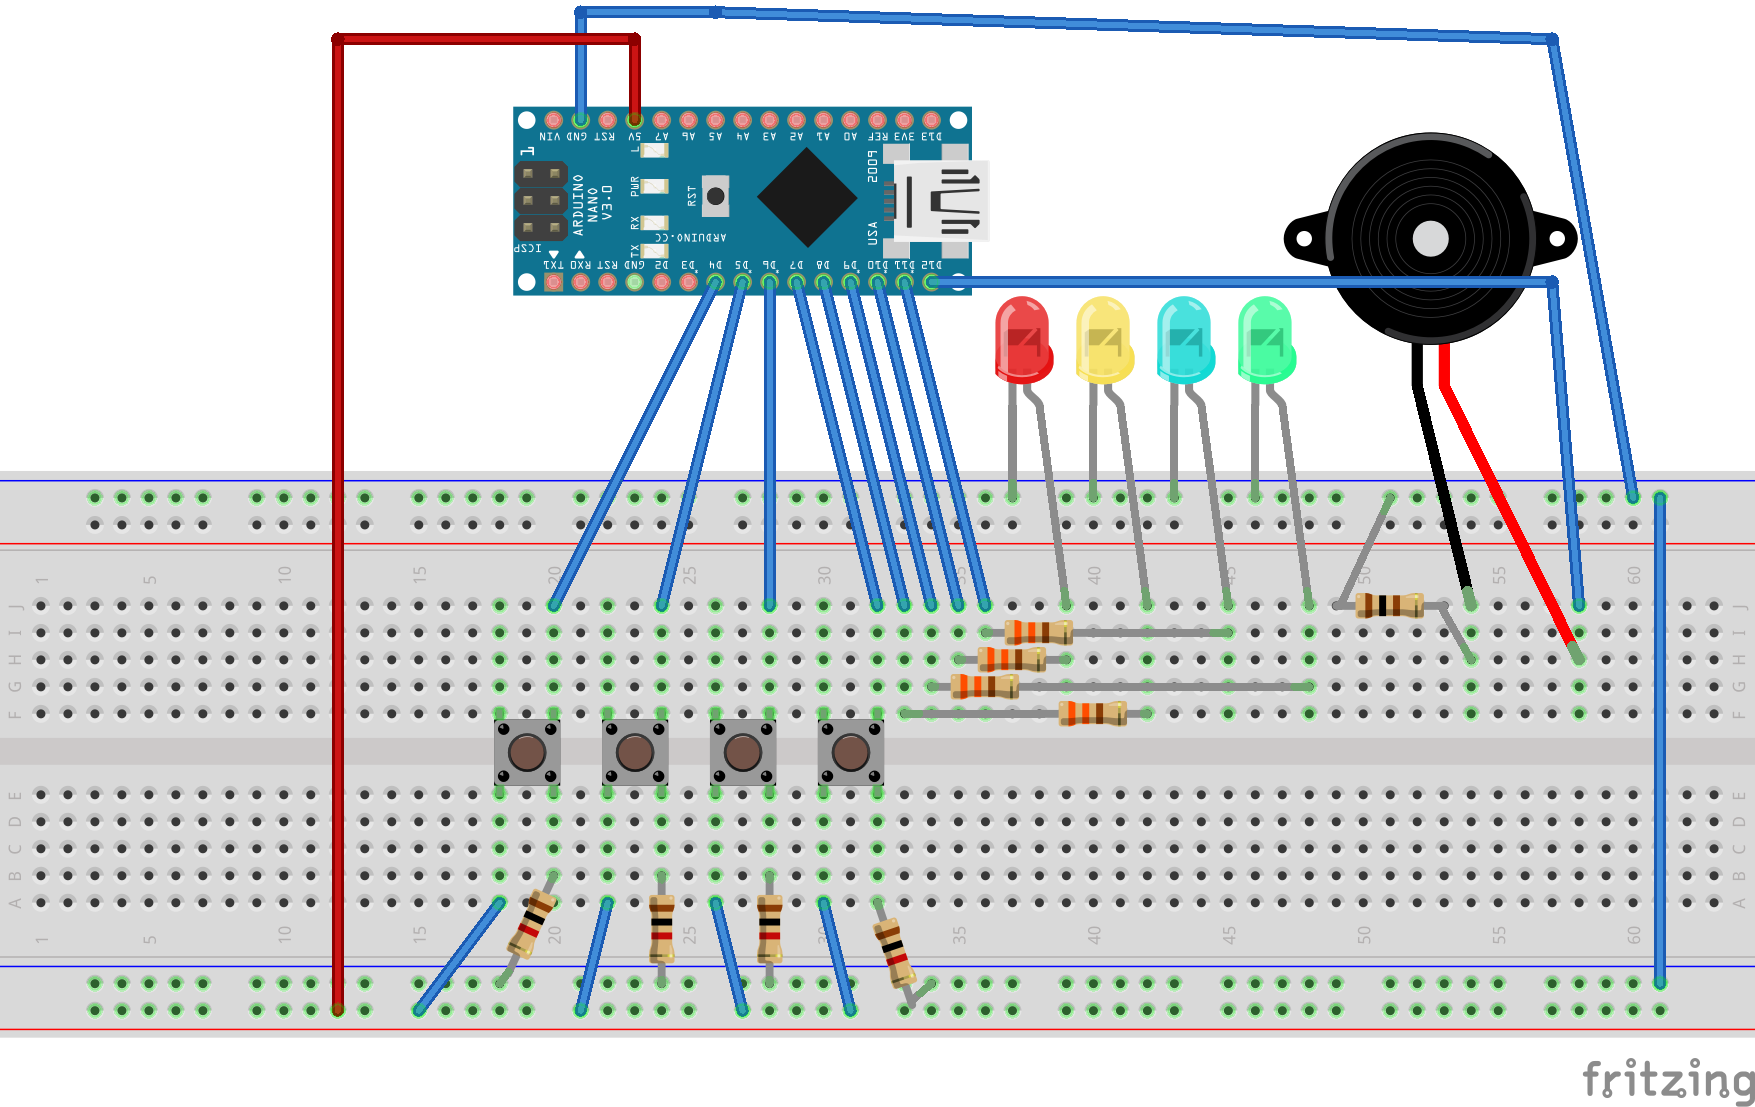
Wiring Instructions
I use 1k pulldown resistors for the buttons, 100 ohm resistor for the Piezzo Buzzer and 330 ohm resistors for the LEDs. Start by putting on the buttons and the LEDs first, then add the resistors and finally add the jumper wires.
You can then customize the tone frequencies or the level seed. In the setup function:
randomSeed(0);
If you replace 0 with 1 then all the levels will be randomized, if you change it back to 0 then the game will play like before the change. In the video I also added a reset button which connects the Arduino's RST pin to GND.
A video demonstrating the project. I recorded it some time ago.
Code
The code is written in C++ and it uses classes, if you see this for the first time, don't be afraid, they're like containers for functions and variables. If you want to learn more search for a C++ tutorial on classes.
Improving the Project
Feel free to improve this project however you like, you could perhaps use Arduino MKR1000 and make a wireless Simon Says game? That would be cool.
Create a new sketch in Arduino IDE, copy and paste the code and modify it to do your will :D
/* * Author: Denis Cosmin * Date: 19.09.2016 * Name: Simon Says * * To add a reset button connect: reset -> button <- pulldown resistor ground. * The buttons have 1k pulldown resitors. * The leds have a 220 ohm resistor. * * Will use the following numbers for colors, pins and notes * 0 - Yellow * 1 - Green * 2 - Red * 3 - Blue * *//* * The game class, handles everything. */classGame{private:intdebounce(intlast,intbuttonPin);voidplayNote(intnote,intnoteSpeed)const;voidflashLed(intled,intflashSpeed)const;public:staticconstintRED_PIN;staticconstintBLUE_PIN;staticconstintGREEN_PIN;staticconstintYELLOW_PIN;staticconstintMICROPHONE_PIN;staticconstintRED_BUTTON_PIN;staticconstintBLUE_BUTTON_PIN;staticconstintGREEN_BUTTON_PIN;staticconstintYELLOW_BUTTON_PIN;staticconstintRED_TONE;staticconstintBLUE_TONE;staticconstintGREEN_TONE;staticconstintYELLOW_TONE;staticconstintGAMEOVER_TONE;intgameLevel[200];intgameSpeed;intlastButtonValue;intcurrentLevel;intgameIsOver;doublegameDifficulty;enumcolor{YELLOW,GREEN,RED,BLUE};public:Game();Game(int);voidplayLevel();intuserInput();intgameOver();intgetNote(intnote)const;intpinToColorCode(int);intcolorCodeToPin(int);intreadButton(intbuttonPin);};/* Pin settings */staticconstintGame::MICROPHONE_PIN=12;staticconstintGame::BLUE_PIN=11;staticconstintGame::RED_PIN=10;staticconstintGame::GREEN_PIN=9;staticconstintGame::YELLOW_PIN=8;staticconstintGame::BLUE_BUTTON_PIN=7;staticconstintGame::RED_BUTTON_PIN=6;staticconstintGame::GREEN_BUTTON_PIN=5;staticconstintGame::YELLOW_BUTTON_PIN=4;/* Tone frequencies */staticconstintGame::RED_TONE=200;staticconstintGame::BLUE_TONE=400;staticconstintGame::YELLOW_TONE=600;staticconstintGame::GREEN_TONE=800;staticconstintGame::GAMEOVER_TONE=1000;// Construct and initialize the Game object.Game::Game(intdifficulty):gameSpeed(1000),lastButtonValue(-1),currentLevel(0),gameDifficulty(difficulty),gameIsOver(0){Serial.print("Constructing game object with difficulty: ");Serial.println(difficulty);pinMode(Game::MICROPHONE_PIN,OUTPUT);pinMode(Game::BLUE_PIN,OUTPUT);pinMode(Game::RED_PIN,OUTPUT);pinMode(Game::GREEN_PIN,OUTPUT);pinMode(Game::YELLOW_PIN,OUTPUT);}Game::Game():gameSpeed(1000),lastButtonValue(-1),currentLevel(0),gameDifficulty(10),gameIsOver(0){Serial.println("Constructing game object");pinMode(Game::MICROPHONE_PIN,OUTPUT);pinMode(Game::BLUE_PIN,OUTPUT);pinMode(Game::RED_PIN,OUTPUT);pinMode(Game::GREEN_PIN,OUTPUT);pinMode(Game::YELLOW_PIN,OUTPUT);}/* * Makes sure the button is pressed only once. */intGame::debounce(intlast,intbuttonPin){intcurrent=digitalRead(buttonPin);if(last!=current){delay(5);current=digitalRead(buttonPin);}returncurrent;}/* * Plays a note. * Receives the button number and plays the corresponding note. */voidGame::playNote(intnote,intnoteSpeed)const{Serial.print("playNote: Playing note: ");Serial.print(note);Serial.print(" with speed: ");Serial.println(noteSpeed);note=Game::getNote(note);tone(Game::MICROPHONE_PIN,note,noteSpeed);}/* * Returns the corresponding color code based on pin. */intGame::colorCodeToPin(intvalue){intret_val=-1;switch(value){caseRED:ret_val=Game::RED_PIN;break;caseGREEN:ret_val=Game::GREEN_PIN;break;caseBLUE:ret_val=Game::BLUE_PIN;break;caseYELLOW:ret_val=Game::YELLOW_PIN;break;default:Serial.println("colorCodeToPin: Invalid value!");delay(1000);exit(0);}returnret_val;}/* * Converts the button pin to a color code. */intGame::pinToColorCode(intvalue){intret_val=-1;switch(value){caseGame::RED_BUTTON_PIN:ret_val=RED;break;caseGame::GREEN_BUTTON_PIN:ret_val=GREEN;break;caseGame::BLUE_BUTTON_PIN:ret_val=BLUE;break;caseGame::YELLOW_BUTTON_PIN:ret_val=YELLOW;break;default:Serial.println("pinToColorCode: Invalid value!");delay(1000);exit(0);}returnret_val;}/* * The the corresponding note based on the color code it receives. */intGame::getNote(intnote)const{intreturn_value=-1;switch(note){caseYELLOW:return_value=Game::YELLOW_TONE;break;caseGREEN:return_value=Game::GREEN_TONE;break;caseRED:return_value=Game::RED_TONE;break;caseBLUE:return_value=Game::BLUE_TONE;break;case4:return_value=Game::GAMEOVER_TONE;break;default:Serial.println("playNote: Error! Invalid note!");delay(1000);exit(0);}returnreturn_value;}/* * Flashes a led. Receives the led code and sets it to the corresponding pin. */voidGame::flashLed(intled,intflashSpeed)const{Serial.print("flashLed: Flashing LED: ");Serial.print(led);Serial.print(" with speed: ");Serial.println(flashSpeed);led=Game::colorCodeToPin(led);digitalWrite(led,HIGH);delay(flashSpeed);digitalWrite(led,LOW);}/* * Plays the next level. */voidGame::playLevel(){Serial.print("playLevel: Playing on level: ");Serial.println(Game::currentLevel);Game::gameLevel[Game::currentLevel]=random(0,4);// Create a random move every time. 0 to 4 exclusive.++Game::currentLevel;intnextDificulty=Game::gameDifficulty*Game::currentLevel;if(Game::gameSpeed-nextDificulty>=10){Game::gameSpeed-=nextDificulty;// decrease the speed;}// Play all the movesfor(inti=0;i<Game::currentLevel;++i){Game::playNote(Game::gameLevel[i],Game::gameSpeed);Game::flashLed(Game::gameLevel[i],Game::gameSpeed);}}/* * Reads the button value and returns the following codes: * 0 - Yellow 1 - Green 2 - Red 3 - Blue */intGame::readButton(intbuttonPin){intcurrentButtonValue=Game::debounce(Game::lastButtonValue,buttonPin);intreturn_value=-1;if(lastButtonValue==LOW&¤tButtonValue>LOW){return_value=Game::pinToColorCode(buttonPin);}Game::lastButtonValue=currentButtonValue;if(return_value>=0){Serial.print("readButton: Received signal from button number: ");Serial.println(return_value);}returnreturn_value;}intGame::gameOver(){Serial.println("game_is_over: Checking if game is over!");if(Game::gameIsOver){Serial.println("game_is_over: Game is over!");}returnGame::gameIsOver;}/* * Gets the user button presses and checks them to see if they're good. */intGame::userInput(){for(inti=0;i<Game::currentLevel;++i){Serial.println("userInput: User is pressing.");intbuttonPressed=-1;while(true){buttonPressed=readButton(Game::RED_BUTTON_PIN);if(buttonPressed!=-1){break;}buttonPressed=readButton(Game::GREEN_BUTTON_PIN);if(buttonPressed!=-1){break;}buttonPressed=readButton(Game::YELLOW_BUTTON_PIN);if(buttonPressed!=-1){break;}buttonPressed=readButton(Game::BLUE_BUTTON_PIN);if(buttonPressed!=-1){break;}}if(buttonPressed!=gameLevel[i]){Game::playNote(4,100);// game over note, and game over note speed.Game::flashLed(buttonPressed,1000);return0;}Game::playNote(buttonPressed,Game::gameSpeed);Game::flashLed(buttonPressed,Game::gameSpeed);}delay(500);return1;}Gameg(50);// Constructs the game object.voidsetup(){Serial.begin(9600);randomSeed(0);}voidloop(){if(g.gameOver()){delay(1000);// Wait for serial to finish printing./* On Arduino exit(0) disables the interrupts and goes in an infinite loop. On your PC exit(0) closes the program and tries to clean up resources. */exit(0);}g.playLevel();if(g.userInput()==0){g.gameIsOver=1;}}


Comments
Please log in or sign up to comment.