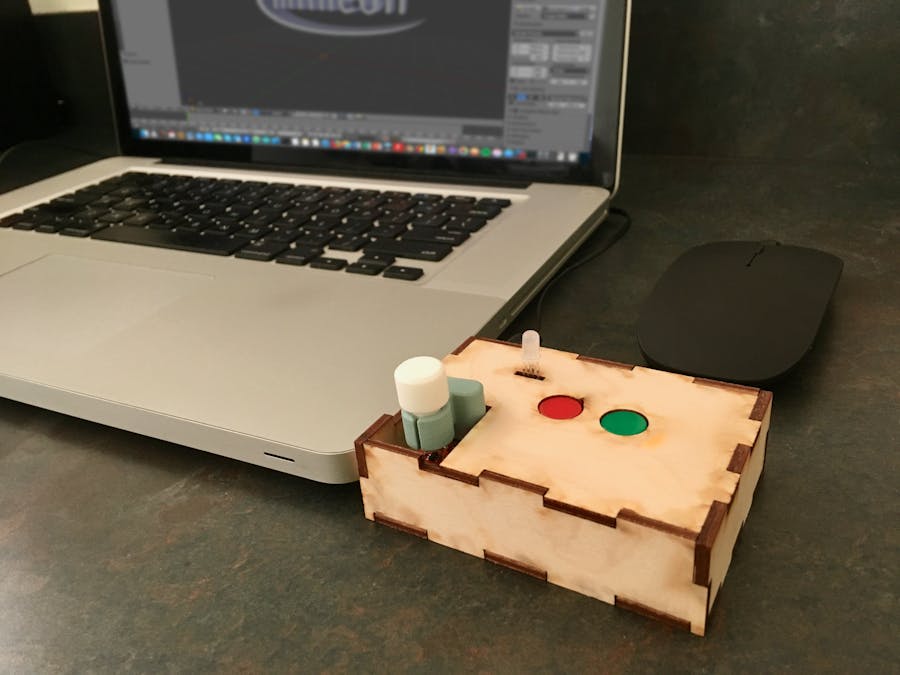
Xtend is a device that gives you the power to extend yourself into the virtual world. The keyboard and mouse do a good job with letting us control our virtual space, but there are problems. In reality, turning an object means a twist of the wrist or hand, there is no holding down the middle mouse button and maybe the shift key. Why should 3D designers be confined to these mechanical movements when orbiting around an object? Why should a camera man need to use keyboard combinations to rotate a camera arm? Why should gamers need to use certain keys to just turn their character around to see? All of these scenarios can be eliminated with Xtend.
How?Xtend uses the Infineon3D Magnetic Sensor and a Rotation Knob2Go. The 3D Magnetic Sensor 2Go board takes the measurement in all 3 dimensions from the magnetic sensor, converts it into spherical coordinates, and exports the data through a serial connection into an easy-to-interpret format for any third-party system. Utilizing the extra GPIO on the 2Go, Xtend also has a setof its own buttons and LEDs. These are used to extend the functions of Xtend.
A common use case for Xtend is in 3D design and modeling.One button will set the function to “Orbit” in say Blender 3D or Fusion 360, and other to “Pan”. When in orbit, turning the knob will be just like taking hold of the object turning it. Xtend will move the mouse for you. If your orbit command needs you to press a key and then do something with a mouse, Xtend can help you streamline it all into a natural knob turn.
The next sections will go through how to build yourself an Xtend and how to set it up for a 3D modeling use case. Please know that this setup can also be used for any other use case.
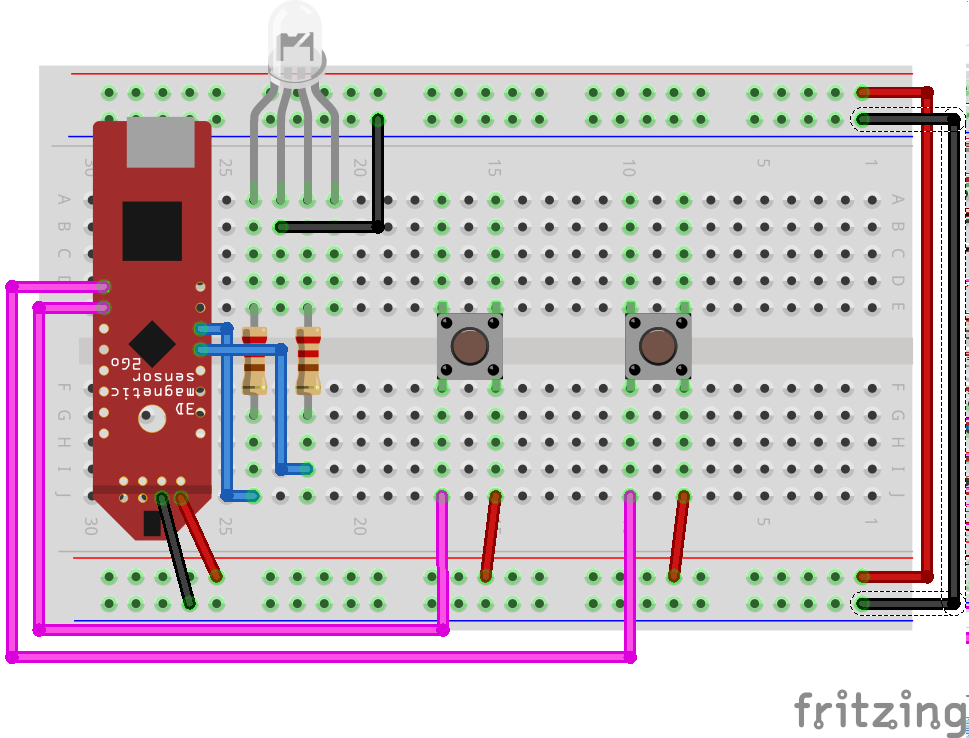
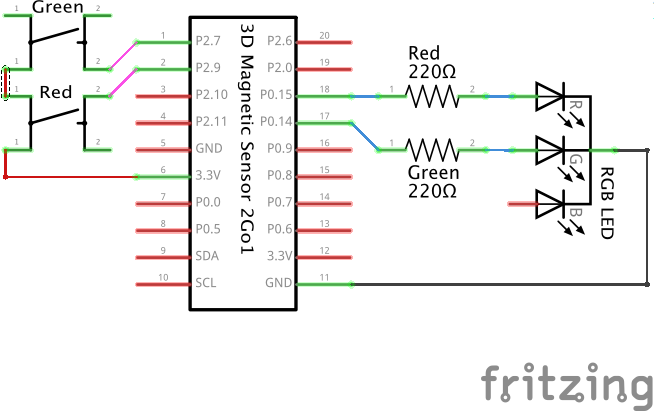
Hardware SetupUsing the Fritzing breadboard diagram in the Schematics section, assemble the circuit. A schematic is also provided. Soldering is required to attach wires to the 3D Magnetic Sensor 2Go board due to the lack of headers. A total of six wires for soldering is needed: four for GPIO and two for the power source.
There are three sets of 3.3v and GND pins. It doesn’t matter which one you pick, as long as they get to the breadboard’s power-bus.
After you have completed wiring, laser cut the case and assemble it. A DXF of Xtend’s casing is in the “Custom parts and enclosures”section. Assembly is very easy. Follow the 15 second animation to put together the case, using glue or an adhesive to solidify the connection between the pieces.
Place your completed circuit inside the case, making sure you can access the Micro USB port through the opening on the side, before putting the lid of the case on. It is recommended that you don’t glue shut the case so can open and access the components inside if you want to expand the functionality of Xtend on your own.
Once you have completed assembling the hardware, move on to setting up the software of Xtend!
P.S.: Attached to the schematics section is the 3D Magnetic Sensor 2Go FZPZ (Fritzing Part) file custom part file I created for the Breadboard schematic. Download it and use it in your designs!
Firmware (Software the Xtend Device)Getting the firmware into your Xtend device is fairly straight forward. The firmware for Xtend is written in Arduino. To upload the code, you need to install and launch the Arduino IDE. To upload code, the Arduino IDE needs to know what board to compile for and what Serial port the device is on. To add the Infineon XMC1100 board (the board Xtend is based on) to the Arduino IDE, follow these steps. The instructions will also explain how to acquire necessary drivers for connecting to the board. Once you have installed the Arduino IDE and the necessary board package, there is one more prerequisite needed: theTLE493D-W2B6-3DMagnetic-Sensor library. Full installation instructions can be found here.
Once added, you are now ready to upload the firmware to Xtend. Download the code (titled “Arduino Firmware”) from the Code section and open it in the Arduino IDE. Simply plug in Xtend into your computer with a Micro USB cord, select the correct board from Tools >> Boards, select your device from Tools >> ports, and compile/upload your code! A Java JDK is required to upload code to the XMC1100 board. If your computer does not already have one installed, a message will automatically show prompting you to install a Java JDK.
To test if your upload is successful, open the Serial Monitor by pressing the button located in the top right corner or by pressing Command/Ctrl + Shift + M. When the monitor opens, you should see a stream on numbers that may look like“00123.45”. You now have a working Xtend device!
If you are interested in writing your own Xtend interpreter, this diagram explains what the number mean:
To access the data, simply have your interpreter connect to your Xtend’s serial port at a baud rate of 9600 and “read-line” the data.
The next section shows how to setup an example interpreter for 3D modeling using Python!
Software (Xtend Interpreter for Computer Apps)An example interpreter for your Xtend device is in the Code section. The interpreter is written in Python 3 and uses several built-in modules, but it also uses a couple third party modules that needs to be installed. You are not expected to have these modules, so the following instructions will explain how to acquire them. To run the interpreter and also determine which modules you need, download the code from the Code section, open a Terminal/Command prompt window where you downloaded the code and run {python3Xtend\ -interpreter}. If you had all of the modules installed, this should run smoothly and a window prompting you to connect to your device will open.
The following instruction explain how to acquire all of the modules:
1.Python 3
- What is this: language that the example interpreter is based on
- A simple download and install from python.org
2. Pip (3)
- What is this: Module acquiring software for python
- Easiest way is to “securely download get-pip.py”
curl
python get-pip.py
3. PySerial
- What is this: a module that lets python access serial ports
- Now that you have pip, simply install it from there:
pip install pyserial
4. PyAutoGUI
- What is this: a module that lets python automate keyboard and mouse movements
- Same as PySerial, simply use the pip command to install PyAutoGui
- On Windows (pyautogui website)
pip install pyautogui
- On MacOS (pyautogui website)
pip install pyobj-core
pip install pyobjc
pip install pyautogui
- On Linux (pyautogui website)
pip install pythin3-xlib
sudo apt-get install scrot
sudo apt-get install python3-tk
sudo apt-get install python3-dev
sudo apt-get install pyautogui
Once you have acquired all of the modules, you are ready to use Xtend with Blender 3D for Fusion 360! Feel free to use this interpreter on your own. At the top of the code there is a python dictionary that holds the commands that the interpreter will run, you can add your own dictionary entry and create a new command. Simply put the name of your app as the key and create a two-object list with the desired PyAutoGUI key/mouse combination.
Mouse functions:LEFT, RIGHT, MIDDLE.
Differentiate regular characters from command keys by capitalizing them ("ctrl" would be "CTRL"). Separate commands with a “+”. The interpreter will automatically differentiate between a command-separating “+” and a command to press “+”.
DemoHere’s a demo video showing the interpreter connecting to a Xtend device and using an Xtend device in Blender 3D:
That’s it! You now have a Xtend device! Now you can design with more natural movements, play games with more natural gestures, and control machines with more natural precision! Because of the way Xtend exports its data, you can also create your own interpreter and utilize Xtend for your own application! Whether it be flying a drone, or driving a car remotely, Xtend is there to make the keyboard and mouse disappear!
Thank you for taking interest in this Project! Please leave feedback or your questions in the comments section.
Thanks!


_t9PF3orMPd.png?auto=compress%2Cformat&w=40&h=40&fit=fillmax&bg=fff&dpr=2)

Comments
Please log in or sign up to comment.