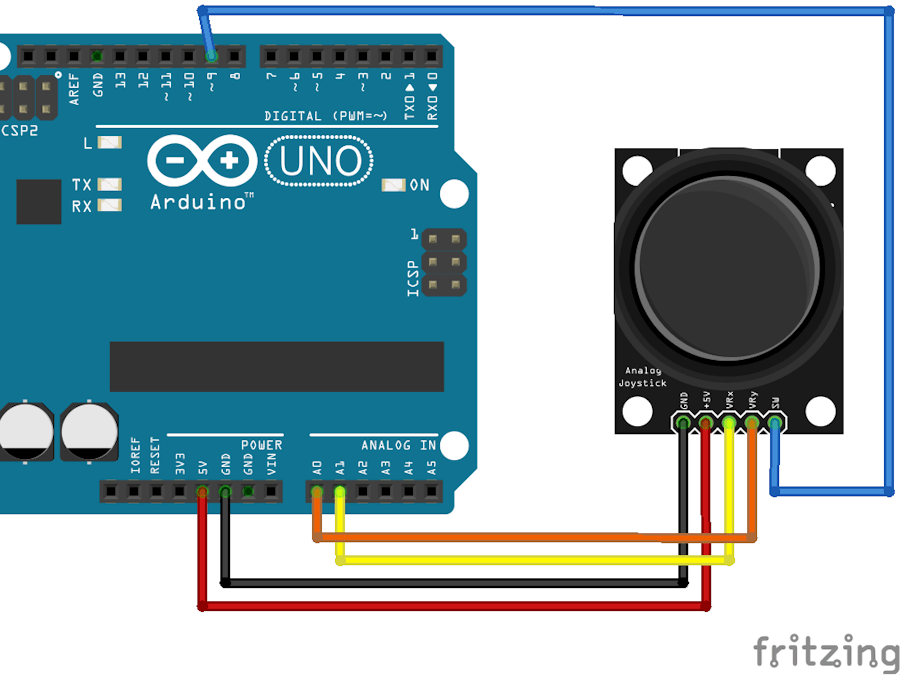
When you hear the word Thumb Joystick, the first thing that comes to mind is the game controllers. They are mainly used for playing games, although in DIY Electronics, there are a lot of fun things you can do with it. Like controlling a robot/a rover, controlling the movement of camera; these are just the tip of the iceberg.
Hardware OverviewThis is a joystick very similar to the ‘analog’ joysticks on PS2 (PlayStation 2) controllers. It is a self-centering spring loaded joystick, meaning when you release the joystick it will center itself. It also contains a comfortable cup-type knob/cap which gives the feel of a thumb-stick.
The goal of the joystick is to communicate motion in 2D (2-axis) to an Arduino. This is achieved by housing two independent 10K potentiometers (one per axis). These potentiometers are used as dual adjustable voltage dividers, providing 2-Axis analog input in a control stick form.
The potentiometers are the two blue boxes on the sides of the joystick. If you move the joystick while watching the center shaft of each potentiometer, you’ll see that each of the potentiometers pick up movement in only one direction. We will discuss how they actually work, a little later.
This joystick also contains a switch which activates when you push down on the cap. The switch is the small black box on the rear of the joystick. If you push down on the cap, you can see a lever pushing down on the head of the switch. The lever works no matter what position the joystick is in.
How PS2 2-axis thumb joystick module works?The basic idea of a joystick is to translate the stick’s position on two axes — the X-axis (left to right) and the Y-axis (up and down) into electronic information an Arduino can process. This can be little tricky, but thanks to the design of the joystick consisting of two potentiometers and a Gimbal Mechanism.
Gimbal MechanismWhen you rotate the joystick, the thumb handle moves a narrow rod that sits in two rotatable slotted shafts (Gimbal). One of the shafts allows motion in the X-axis (left and right) while the other allows motion in the Y-axis (up and down). Tilting the stick forward and backward pivots the Y-axis shaft from side to side. Tilting it left to right pivots the X-axis shaft. When you move the stick diagonally, it pivots both shafts.
A potentiometer is connected to each joystick shaft that interprets the position of the rod as analog readings. Moving the slotted shafts rotates the contact arm of the potentiometer. In other words, if you push the stick all the way forward, it will turn the potentiometer contact arm to one end of the track, and if you pull it back toward you, it will turn the contact arm the other way.
Reading analog values from JoystickIn order to read the joystick’s physical position, we need to measure the change in resistance of a potentiometer. This change can be read by an Arduino analog pin using ADC.
As the Arduino board has an ADC resolution of 10 bits, the values on each analog channel (axis) can vary from 0 to 1023. So, if the stick is moved on X axis from one end to the other, the X values will change from 0 to 1023 and similar thing happens when moved along the Y axis. When the joystick stays in its center position the value is around 512.
The graphic below shows the X and Y directions and also gives an indication of how the outputs will respond when the joystick is pushed in various directions.
In order to put this thumb joystick to use, you are going to want to understand which direction is X and which direction is Y. You will also need to decipher the direction it is being pushed in either the X or the Y direction.
Thumb Joystick Module PinoutLet’s have a look at the pinout of PS2 2-axis Thumb Joystick module.
GND is the Ground Pin which we connect the GND pin on the Arduino.
VCC supplies power for the module. You can connect it to 5V output from your Arduino.
VRx gives readout of the joystick in the horizontal direction (X-coordinate) i.e. how far left and right the joystick is pushed.
VRy gives readout of the joystick in the vertical direction (Y-coordinate) i.e. how far up and down the joystick is pushed.
SW is the output from the pushbutton. It’s normally open, meaning the digital readout from the SW pin will be HIGH. When the button is pushed, it will connect to GND, giving output LOW.


_ztBMuBhMHo.jpg?auto=compress%2Cformat&w=48&h=48&fit=fill&bg=ffffff)


Comments
Please log in or sign up to comment.