


Hardware components | ||||||
 |
| × | 1 | |||
_ztBMuBhMHo.jpg?auto=compress%2Cformat&w=48&h=48&fit=fill&bg=ffffff) |
| × | 1 | |||
 |
| × | 1 | |||
 |
| × | 1 | |||
Software apps and online services | ||||||
 |
| |||||
An Ultrasonic Sensor is a device that measures distance to an object using Sound Waves. It works by sending out a sound wave at ultrasonic frequency and waits for it to bounce back from the object. Then, the time delay between transmission of sound and receiving of the sound is used to calculate the distance.
It is done using the formula Distance = (Speed of sound * Time delay) / 2
We divide the distance formula by 2 because the sound waves travel a round trip i.e from the sensor and back to the sensor which doubles the actual distance.
The HC-SR04 is a typical ultrasonic sensor which is used in many projects such as obstacle detector and electronic distance measurement tapes. In this Instructable I'll teach you how to interface the HC-SC04 with an Arduino Uno.
Add TipAsk QuestionCommentDownload
Step 1: Components RequiredTo interface an Ultrasonic Sensor with an Arduino and view the distance on the serial monitor you'll need:
- Arduino Uno
- HC-SR04 Module
- BreadBorad
- Jumper wires
You'll need a laptop or a PC to upload code to the Arduino and view the Distance on the Serial Monitor.
Add TipAsk QuestionCommentDownload
Step 2: A Little About HC-SR04The HC-SR04 is an ultrasonic ranging module. This economical sensor provides 2cm to 400cm of non-contact measurement functionality with a ranging accuracy that can reach up to 3mm. Each HC-SR04 module includes an ultrasonic transmitter, a receiver and a control circuit.
There are Four Pins on the HC-SR04. They are :
- Vcc (5V supply)
- Gnd (Ground)
- Trig (Trigger)
- Echo (Receive)
The key features to be noted are:
- Operating Voltage: 5V DC
- Operating Current: 15mA
- Measure Angle: 15°
- Ranging Distance: 2cm - 4m
Add TipAsk QuestionCommentDownload
Step 3: The Arduino Serial MonitorThe Serial Monitor is a part of the Arduino IDE. It is also available in the Web IDE. It allows you to send and receive data from the board connected via USB. This is using the concept of Serial Communication.
You can send the commands by typing in the window on the top and pressing 'Enter' or clicking 'Send'. The data from the board is displayed below that.
This is very useful when debugging the code, or if you need to give inputs to the board, This is probably the most useful tool in the IDE. The more you use it, the better you get at testing complex projects that takes inputs and provides consequent outputs.
Add TipAsk QuestionCommentDownload
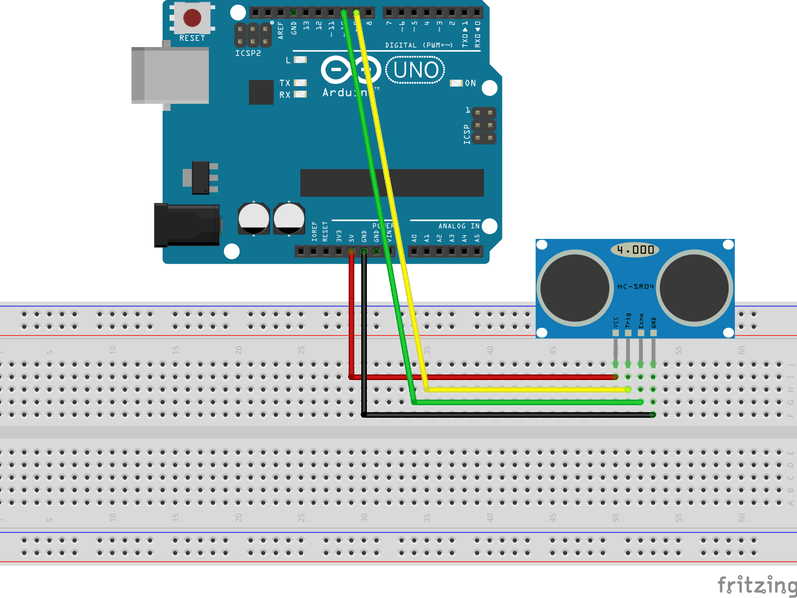
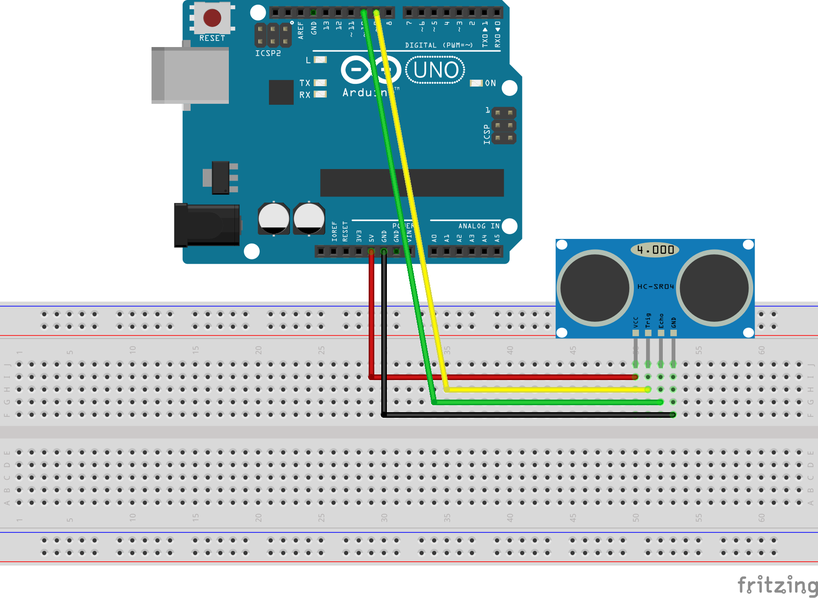
Step 4: The CircuitThe connections are as follows:
- Vcc to 5V Pin of the Arduino.
- Gnd to Gnd Pin of the Arduino.
- Trig to Digital Pin 9.
- Echo to Digital Pin 10.
Refer the schematics for more clarity on the connections.
. Few things to remember while building the circuit
- Avoid placing the sensor on metal surfaces to avoid short circuits which might burn the sensor.
- It is recommended to put electrical tape on the back side of the sensor.
- You can also directly connect the Ultrasonic sensor to the Arduino with jumper wires directly.

Comments
Please log in or sign up to comment.