FULL STACK RESTful MERN IRRIGATION SYSTEM - which means:
- The actual irrigation system that is controlled by a WiFi-capable Arduino (in my case, a WeMos D1 mini)
- The sever/back-end: a RaspberryPi (Zero W) that serves as a Node.js/Express server.
- The front-end: a React.js based website that lets you control the irrigation system.
WHY I'M USING A FULL STACK ENVIRONMENT TO CONTROL THE ARDUINO:
Most projects use a smartphone to directly communicate with the Arduino using apps like Blynk. It is easy to set up but has several drawbacks:
- Whenever you unplug the Arduino from the power supply, all settings are lost and you have to re-configure the Arduino with the smartphone.
- If you want to control the Arduino with multiple devices (for e.g. to control it with every smarphone in the household), you have to install and configure the app on every device. And you will probably run into compatibility issues - one app won't work on all of your devices (MS Windows computer vs Android Phone vs Mac Os Tablet).
- If you control the Arduino with multiple devices there's no chance to keep the devices' settings synchronized.
To overcome theses issues I've implemented a server that runs on a low-cost, power-efficient Raspberry Pi Zero W that handles the entire communication process:
- Any settings that you define or change on your smartphone/computer are pushed to the server.
- The server saves the changes locally and forwards the changes to the Arduino.
- Referring to databases, the system works like a many-to-many-relationship-setting: You can control multiple Ardunios with multiple browser-capable devices.
BENEFITS of a server-client approach:
- Whenever the Arduino reboots, it automatically and autonomously requests all settings from the server. You don't have to reconfigure the whole Arduino after every reboot.
- Because I've written all software by myself it is tailor-made and perfectly customized. This gives the opportunity to do more than the usual functionality that third party apps support. For example, the website of the irrigation system renders real time data of all incorporated analog sensors like moisture sensors etc.
- The server<->frontend- and Arduino<->Server-commuincation is effectively a RESTful approach and mainly conveys data in the standardized JSON-format. This way, each of the 3 pillars (Arduino | server | frontend) can be programmed independently. It enables me to define a generic functionality that I might not use today, but that I can easily access at a later point in time. As you know, modifying software on the Arduino requires it to be plugged in to your computer. So you can't change the software on the fly. This is pretty annoying because usually you hide the Arduinos at invisible but unfortunately not-so-friendly accessible spots (in contrast: I can modify the server- and front-end-software running on the Raspberry Pi via FTP and SSH).
- As mentioned earlier, this system lets you control multiple Arduinos that serve entirely different purposes using only one tiny server that is controlled over a single access point: the website. This irrigation system was my first Arduino project. Since then, I've also built Arduino-controlled LED-strips. The same server controls the irrigation system as well as my LED-strips and I can control both systems using the same website on any device that is connected to my local WiFi.
- code-reusability: a large portion of the code that powers the irrigation-Arduio is shared by the LED-strip-Arduino. I've exported most of the code to Arduino-libraries. That makes it really easy and efficient to add more Arduinos to the server-client-environment.
HOW IT WORKS
The Raspberry Pi server provides the website. You can access the website by entering the local ip-address and port (in the default settings the server runs on port 8080) of the RaspberryPi in your browser (http://raspberrypi.local:8080/). This way, it is possible to control the irrigation system from any device that is connected to your WiFi network like your smartphone/tablet/laptop/pc - there's no need to install a 3rd party app. The system is completely platform independent. Being a stingy person I run the server on a low-cost Raspberry Pi Zero W. It is a bit more complicated to install node.js on it, but there are great instructions on the internet on how to get it done.
Using the website you can control the Arduino:
- Manually start/stop the irrigation process
- Schedule a customized irrigation plan
- Track analog sensor data: the website shows real-time data of all analog sensors plugged into the Arduino. It updates the data every second (on mobile devices every 5 seconds.
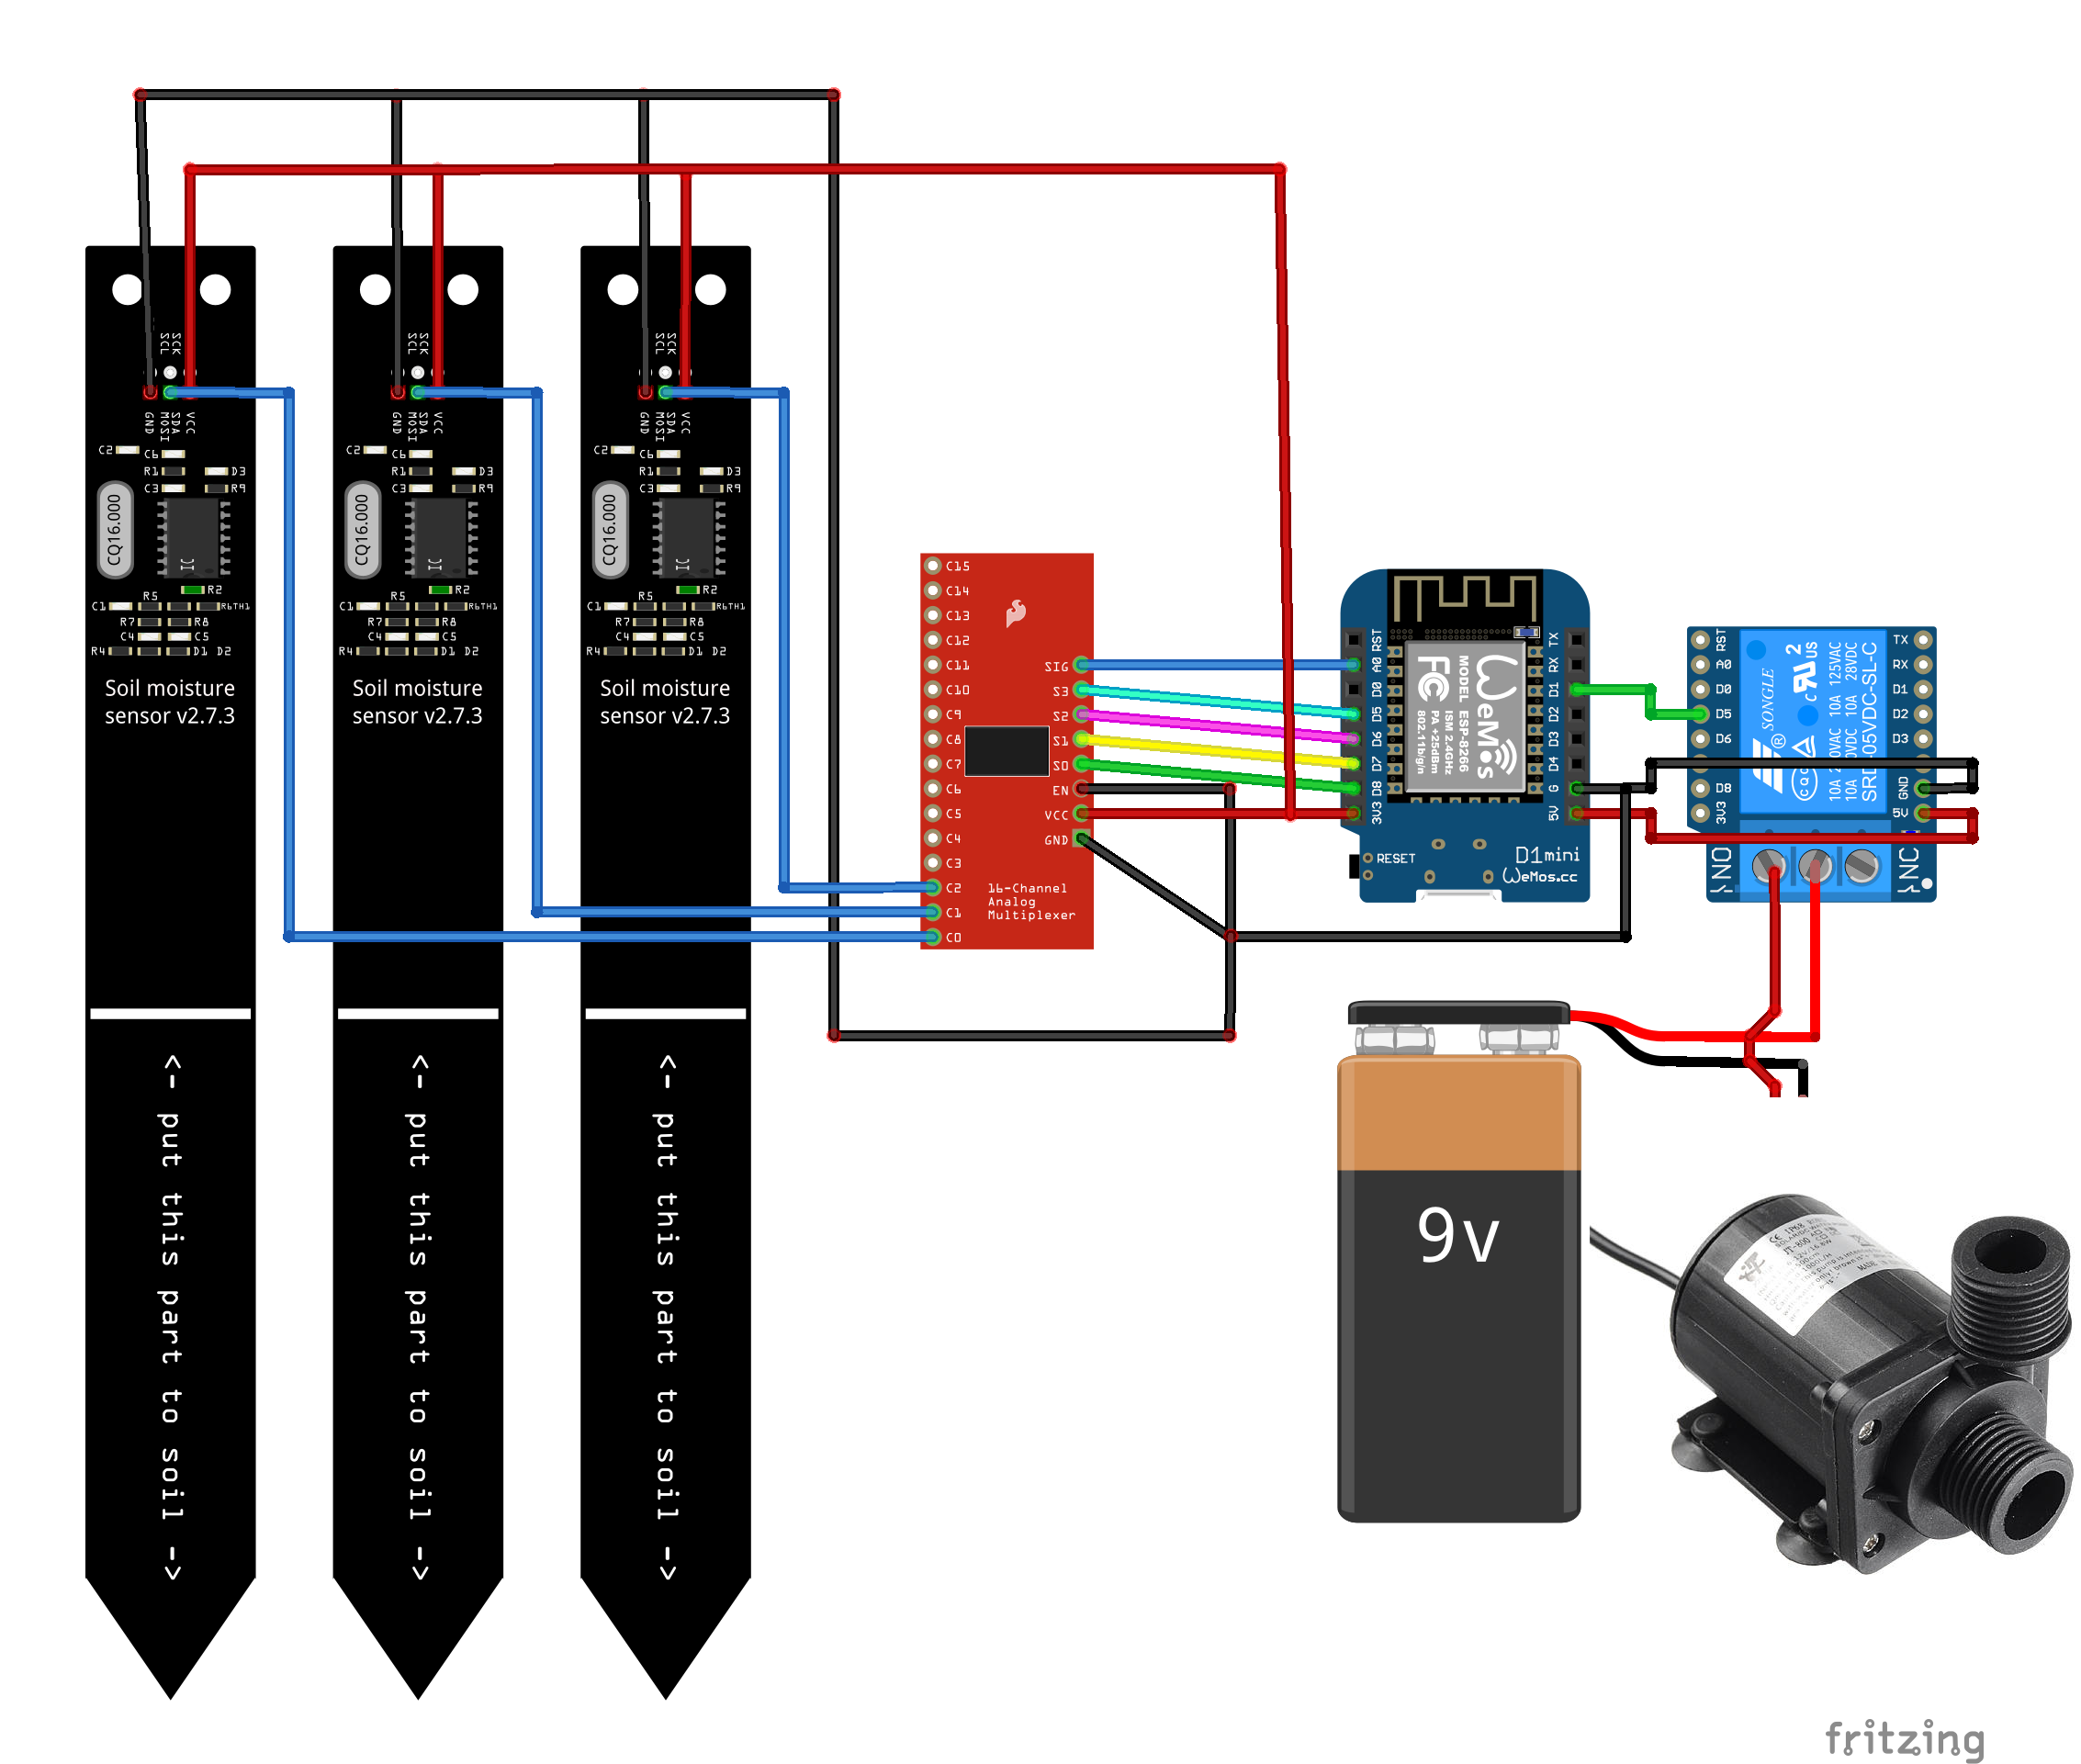
- Add analog sensors: You can plug in up to 16 analog sensors to the Arduino. You can add only a single sensor or add multiple sensors leveraging a multiplexer and track the values on the website - the software can handle all cases. To use a multiplexer, all you have to do is to define the digital pins that control the multiplexer in the Arduino-software. The software takes care of the rest.
- Define threshold values of moisture sensors: In case you incorporate moisture sensors, the Arduino will schedule additional irrigation cycles if the soil dries out despite the implemented schedule. If at least one of the moisture sensor values drops below each individually definable thresholds and the next proposed irrigation cycle won't schedule within the next 2 hours, the Arduino will initiate an additional irrigation cycle. As a result:
- 1. if you don't define an irrigation schedule, the Arduino will effectively irrigate the soil whenever the soil moisture drops below a certain level.
- 2. if you DO define an irrigation schedule, the Arduion will try to apply this plan - unless it is insufficient to keep the soil moistured. Therefore you can effectively define "preferred" irrigation times. Due to the noise I don't want the pump to be running in the middle of the night so I define a schedule that irrigates sufficient amounts in the evenings to make sure the soil won't dry out during the night.
The preceding screenshots demonstrate the website with my personal irrigation schedule. I've defined a simple schedule that irrigates the plants twice a day (in the morning and evening), every day of the week.
The homepage sends the data to the server using http-requests (get & post). The server saves the settings to the MongoDB database and forwards the data to the Arduino.
The server and the Arduino are programmed in a way that the Arduino sets itself up whenever you turn it on - after booting the Arduino requests the currently defined irrigation plan and other data automatically from the server all by itself. You can unplug the Arduino, plug it back in again and be sure that the Arduino continues to operate like it never had been disconnected.
STEP-BY-STEP INSTRUCTION
The code can be downloaded from my GitHub page (see links below):
- The Arduino code that runs on the Wemos D1 mini
- Arduino libraries: I exported most of the Arduino code to Arduino libraries to keep the code that runs on the Arduino clean and tidy
1. The Arduino code must be edited before you can upload it to your Arduino-board. Of course, you have to set your own WiFi-password and SSID. After these modifications, upload the code to your Arduino and fire up the Arduino.
2. Arduino libraries : You also have to copy my Arduino libraries in the libraries folder of your Arduino IDE installation: in the installation path of your Arduino IDE there should be a folder called 'libraries'. The only thing you have to do is copy my library-folders into this folder. The Arduino IDE recognizes these files automatically - no compiling needed!
note: This code is targeted for my Wemos D1 mini, so it is utilizing several ESP8266-libraries. To make the code executable on an Arduino board there are only a few minor modifications to the code required. You have to replace the ESP8266-specific libraries that are used for the WiFi-communication with the libraries that are targeted for the Arduino (e.g. simply replace #include <ESP8266WiFi.h> with #include <WiFi.h>).
3. Launch the server: you have to make sure you have installed the required node.js-modules (check the files package.json and server.js). In addition, I exported several functions to modules that both the front-end and back-end use. It is pretty nasty to use the same javascript files in the frontend and backend because node.js exports/imports code differently than you do it in browser-javascript-files. Therefore I used a trick and globally linked the code that is shared by the frontend and backend (npm link). I wrote a script that links the modules for you. All you have to do is run this script: after extracting the downloaded zip-file, run the link_modules.sh script that is in the projects root directory:
$ bash ./link_modules.sh
If you're not running a linux-distro, just have a look inside the script and execute the corresponding platform-specific commands.
After linking the modules, execute the following commands in the root folder:
$ npm run build
$ node server
You have to edit the IP-address that the server uses to connect to the Arduino. It is defined in the file ./server/IrrigationRouter.js. Go to the line const ARDUINO_IP = 'http://esp_0b9e2e'; and replace the IP-address with the one of your Arduino. (Acutally, this is completely unnecessary. In the Arduino-code, there's a DNS_NAME defined. Normally, you should be able to access the Arduino at http://d1miniirrigation.local:8080/. But due to some inexplicable issues it doesn't work on my local network. Maybe you are lucky and it works for you).
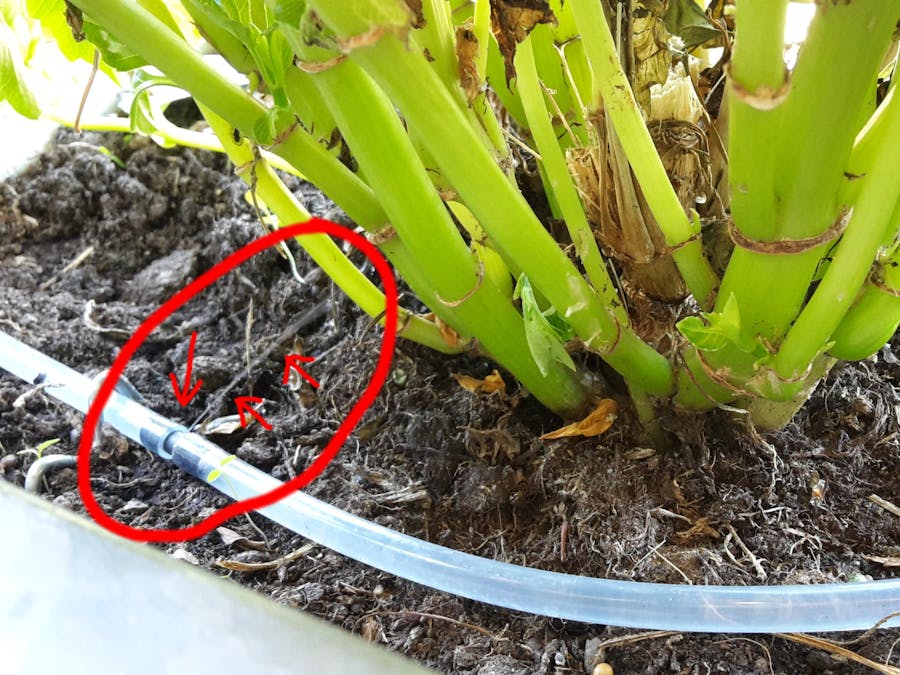
As demonstrated in the pictures, I interconnected the water tube with heat shrink tubes. Then I stuck a tiny hole into every heat shrink tube with a medium sized sewing needle. If the holes are properly sized, you will have some nice micro-sprinklers.
In the preceding pictures you can see the final setup. The pump is floating in the watering can that serves as the water reservoir. The reason why I decided to make it a floating water pump was because the pump operates so annoyingly loud. To protect the circuit from a short I literally drowned the pump in hot glue. Then I wrapped the glued pump into foam and put the pump into a custom plastic box. The plastic box consists of three caps from some old spray cans. I was not saving hot glue to ensure the pump won't come into contact with the water... I also glued a small box to the bottom of the pump case. It is filled with small lead balls to ensure that most of the pump is under water. It works surprisingly well. I can precisely adjust the draught of the pump. In addition, I put 4 pieces of foam around the case of the pump and one at the bottom of it to avoid direct contact between the pump-case and the water can to further reduce the noise. Now, even though the pump is extremely loud, I can sit right next to my floating rocket-pump and don't have to listen to the humming of the pump and instead enjoy the humming of the bees visiting my perfectly watered flowers.


Comments
Please log in or sign up to comment.