After developing the Arduino based Pick & Place Robot the idea was to develop an Artificial Intelligent AI-based line following robot. Developing a simple line following robot was good for the beginner just what it needed to add some sort of infrared sensors instead of servo motors in my recent project. "The idea was to test my skills at advanced level".
Although it was a difficult task some sort of online research helped me a lot.
Why there is a need for AI-Based line following robot?When comes to AI it's the recent technology that has the potential to change the world environment thus effective human life.A dream that can come true by putting intelligence to our robots to understand real-life problems and solve it accordingly, that dream can be only come true through Artificial Intelligence that's why everyone is talking about it.
- It can be used in the assembly/production line.
- Passenger pickup buses.
Although my prototype robot can be a bit of intelligence it's just a beginning for me to move my projects toward AI. Thus here I will try to explain step by step development of line following robot using Artificial Intelligence in quite a simple language. Due to a lack of resources, I will not build a robot but I can explain very well that how can you build it by doing some sort of research.I will try to provide accurate codes that will work on your Arduino IDE, So that you can develop your first AI robot quite easily.
You can support me on Patreon from Here: http://bit.ly/31NfQ6A
"You can find the cheapest rates apparatus in the USA on the description of this video just click on the video."
Now let's come to the project "An AI-based Line Following Robot ! ".
USE OF INFRARED SENSORS
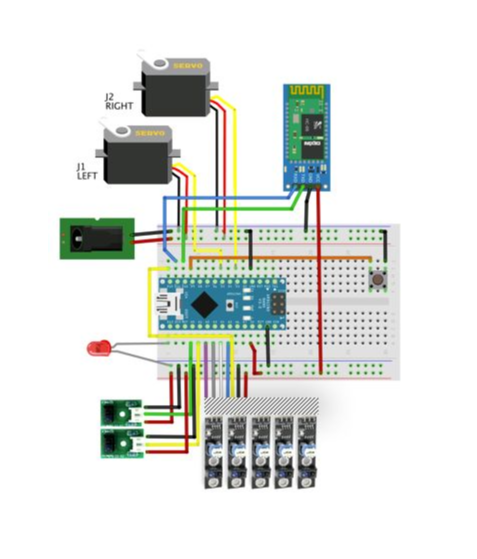
Our project includes 7 infrared sensors as shown in the diagram.
- 5 for PID Control
- 1 for left detection
- another one for right side detection.
5 PID Control Sensors Role: These 5 sensors will be used to generate digital output either high or low (1, 0) respectively.
The sensor centered with relation to the black line only that sensor will produce HIGH(1).The similarly possible outcome from that sensor could be:-
- 10000
- 11000
- 01000
- 01100
- 00100
- 00110
- 00010
- 00011
- 00001
- 00000
- 11111
Now come other two sensors for left and right possible outcomes are
Far-left Sensor: analog output high or low
Far-left Sensor: analog output high or low
To store the value of 5 sensors lets create an array variable.
in LFSensor[5]={1,1,1,1,1};To store the value of the left and right sensors we will use integer
int farleft_sensor=0;As we know we have 5 sensors that can be used to store the left and the right path is taken by robot in an array. So
LFSensor[0] = digitalRead(lineFollowSensor0);
LFSensor[1] = digitalRead(lineFollowSensor1);
LFSensor[2] = digitalRead(lineFollowSensor2);
LFSensor[3] = digitalRead(lineFollowSensor3);
LFSensor[4] = digitalRead(lineFollowSensor4);
farRightSensor = analogRead(farRightSensorPin);
farLeftSensor = analogRead(farLeftSensorPin);
MAZE LEFT-HAND RULE :
watch this video to understand the maze left-hand rule
In short, the Left-Hand Rule can be described as:
- Place your left hand on the wall.
- Begin walking forward
- At every intersection, and throughout the maze, keep your left hand touching the wall on your left.
- Eventually, you will reach the end of the maze. You will probably not go the shortest and most direct way, but you will get there.
So, the key here is to identify the intersections, defining what course to take based on the above rules. Specifically, in our kind of 2D Maze, we can find 8 different types of intersections (see the first picture above):
Looking at the picture, we can realize that the possible actions at intersections are:
At a "Cross"
- Go to Left, or
- Go to Right, or
- Go Straight
- At a "Cross"Go to Left, orGo to Right, orGo Straight
At a "T":
- Go to Left, or
- Go to Right
- At a "T":Go to Left, orGo to Right
At a "Right Only":
- Go to Right
- At a "Right Only":Go to Right
At a "Left Only":
- Go to Left
- At a "Left Only":Go to Left
At "Straight or Left":
- Go to Left, or
- Go Straight
- At "Straight or Left":Go to Left, orGo Straight
At "Straight or Right":
- Go to Right, or
- Go Straight
- At "Straight or Right":Go to Right, orGo Straight
At a "Dead End":
- Go back ("U turn")
- At a "Dead End":Go back ("U turn")
At "End of Maze":
- Stop
- At "End of Maze":Stop
But, applying the "Left-Hand Rule", the actions will be reduced to one option each:
- At a "Cross": Go to Left
- At a "T": Go to Left
- At a "Right Only": Go to Right
- At a "Left Only": Go to Left
- At a "Straight or Left": Go to Left
- At a "Straight or Right": Go Straight
- At a "Dead End": Go back ("U turn")
- At the "End of Maze": Stop
We are almost there! "Be calm!"
When the robot reaches a "Dead End" or the "End of a Maze", it is easy to identify them, because theydo not exist ambiguous situations (we have already implemented those actions on the Line Follower Robot, remember?). The problem is when the robot finds a "LINE" for example because a line can be a "Cross" (1) or a "T" (2). Also when it reaches a "LEFT or RIGHT TURN", those can be a simple turn (options 3 or 4) or options to go straight (5 or 6). To discover exactly what type of intersection the robot is, an additional step must be taken: the robot must run an "extra inch" and see what is next (see the second picture above, as an example).
So, in terms of flow, the possible actions can be now described as:
At a "DEAD END":
- Go back ("U turn")
- At a "DEAD END":Go back ("U turn")
At a "LINE":
- Run an extra inch
- If there is a line: It is a "Cross" ==> Go to LEFT
- If there is no line: it is a "T" ==> Go to LEFT
- If there is another line: it is the "End of Maze" ==> STOP
- At a "LINE":Run an extra inchIf there is a line: It is a "Cross" ==> Go to LEFTIf there is no line: it is a "T" ==> Go to LEFTIf there is another line: it is the "End of Maze" ==> STOP
At a "RIGHT TURN":
- Run an extra inch
- if there is a line: It is a Straight or Right ==> Go STRAIGHT
- If there is no line: it is a Right Only ==> Go to RIGHT
- At a "RIGHT TURN":Run an extra inchif there is a line: It is a Straight or Right ==> Go STRAIGHTIf there is no line: it is a Right Only ==> Go to RIGHT
At a "LEFT TURN":
- Run an extra inch
- if there is a line: It is a Straight or LEFT ==> Go to LEFT
- If there is no line: it is a LEFT Only ==> Go to LEFT
- At a "LEFT TURN":Run an extra inchif there is a line: It is a Straight or LEFT ==> Go to LEFTIf there is no line: it is a LEFT Only ==> Go to LEFT
Note that in fact, In case of a "LEFT TURN", you can skip the test, because you will take LEFT anyway. I left the explanation more generic only for clarity. At the real code, I will skip this test.
Here are some issues that may come while making this project.
Related Topic
Arduino DRIVER ISSUE RESOLVING
watch this video to solve Arduino driver issue :
here is the link to my website https://aquabcasing.com/


Comments
Please log in or sign up to comment.