- Introduction:
Creating your gadgets not only empowers you but also adds a personalized touch to your living space. In this project, we will look into DIY electronics to measure temperature and humidity using the XIAO ESP32C3 microcontroller, DHT11 sensor, and an OLED display by blending technology and creativity!
- What we need
- XIAO ESP32C3 microcontroller:
This is the brain of our hygrometer, responsible for processing sensor data and driving the OLED display.
It is a low-power, Wi-Fi, and Bluetooth-enabled microcontroller designed for use in Internet of Things (IoT) applications. It is based on the ESP32-C3 chip from Espressif Systems and features a dual-core processor, 400 KB of SRAM, and 2 MB of flash memory.
An OLED (organic light-emitting diode) display is a type of flat-panel display that uses organic materials to emit light. OLED displays are self-emissive, meaning that each pixel can emit its light without the need for a backlight. This allows for thinner, more flexible, and more energy-efficient displays compared to traditional LCD (liquid crystal display) panels.
In this project, it showcases humidity levels in real-time, adding a touch of elegance to our device.
The DHT11 sensor is a low-cost, digital humidity and temperature sensor.
It has a measurement range of 20% to 90% relative humidity and -40°C to 80°C temperature. The accuracy of the sensor is ±5% for humidity and ±2°C for temperature.
It will be our companion for measuring humidity with precision and reliability.
- Setting Up the Hardware
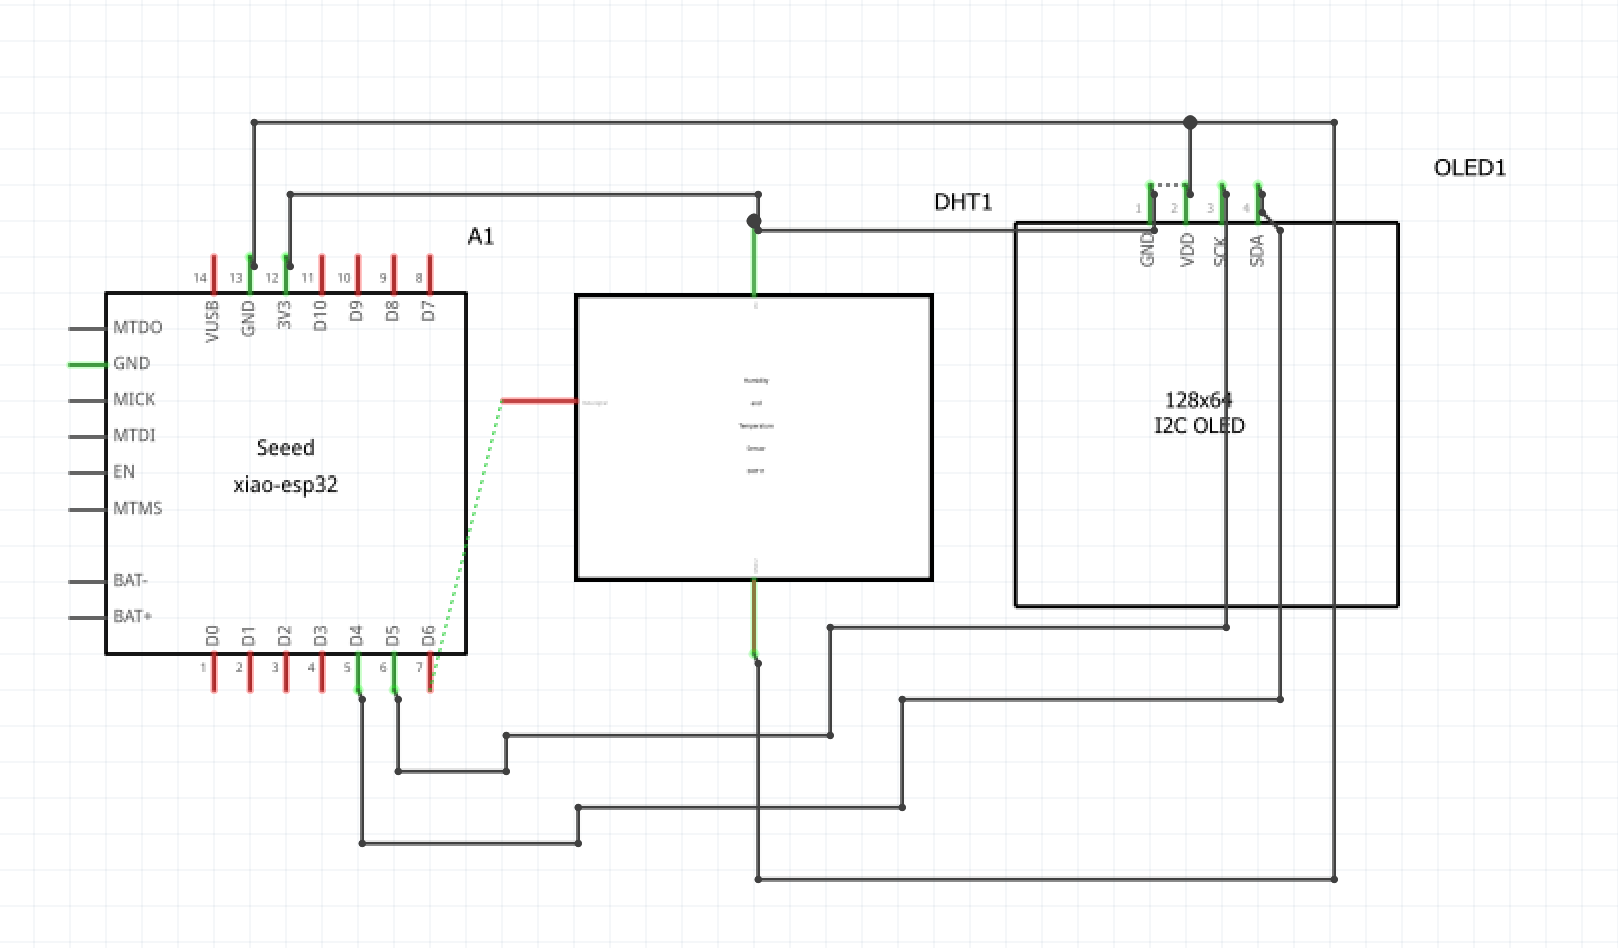
We begin by assembling our components. Connect the DHT11 sensor to the XIAO ESP32C3 microcontroller, ensuring proper wiring and compatibility.
i.e    ESP32C3            DHT11
          3V   ------------- 3V
           GND ------------ GND
          D6 ------------ Data pin of the DHT
OLED display
i.e    ESP32C3             OLEDDISPLAY
        3V   -------------  VCC
         GND ------------ GND
         SCL -------------- SCL
         SDA ------------- SDA
D6 ------------ Data pin of the DHT- Coding the Intelligence
Programming is the heart and soul of our Smart Hygrometer. Utilizing Arduino IDE, we write code to read data from the DHT11 sensor and display it on the OLED screen. The XIAO ESP32C3 microcontroller acts as the bridge, processing sensor inputs and driving the display with finesse.
Step1. Install the Arduino Ide from Here
Step2, Under file->prefersnces=>paste this line https://dl.espressif.com/dl/package_esp32_index.json
Step 3: Now head on to Tools =>Boards => Boardmanager, and search for esp32.
click install and all the ESP32 family boards will be installed.
Step 4: Before deploying our hygrometer, thorough testing and calibration are imperative. We simulate various humidity conditions to validate sensor accuracy and refine our code for optimal performance. Calibration ensures that our device delivers precise readings, enhancing its reliability in real-world applications.
But first, ensure you have installed the latest version of these libraries.#include "DHT.h" // DHT Library
#include <Wire.h>
#include <Adafruit_GFX.h>
#include <Adafruit_SSD1306.h>
Step 4: Integration and User Experience
With hardware and software harmonized, we focus on user experience and integration. Our Smart Hygrometer seamlessly blends into any environment, offering intuitive interaction and real-time feedback. Whether placed in a living room, office, or greenhouse, it becomes an indispensable tool for monitoring humidity levels with ease.
- Conclusion:
Building a Smart Hygrometer is not just about crafting a functional device; it's about embracing innovation and creativity. By leveraging the power of XIAO ESP32C3, OLED technology, and the accuracy of the DHT11 sensor, we've created a versatile gadget that enriches our daily lives.
Join us on this journey of exploration and discovery, and unleash the potential of DIY electronics in your home through our solution builder platform carenuity.com
Get inspired, get creative, and use XIAO ESP32C3 for your next sensors!


Comments
Please log in or sign up to comment.