


Hardware components | ||||||
 |
| × | 1 | |||
 |
| × | 1 | |||
| × | 1 | ||||
Hand tools and fabrication machines | ||||||
 |
| |||||
Cut the soda bottle as shown in the picture.
- Now wind the magnetic wire around the cut bottle
- Make 3 turns
- On the 4th turn, make a notch (loop) as shown in the figure
- Make another 3 turns
- Now you must have a total of 7 turns (3 initial turns + 1 turn which has the loop + 3 Final turns)
- Slide the coil off the bottle
- Once your done you must have 3 terminals (ends) in total as shown in the photo (1 beginning terminal + 1 notch (loop) terminal + 1 final terminal)
- Tape 3 parts of the coil to keep it from coming apart
- Wind the magnetic wire around the same cut bottle about 15 turns so that you will get two ends as shown in the picture
- Tape 4 parts of the coil to keep it from coming apart
Any transistor will have 3 terminals, they are:
1) Emitter
2) Base
3) Collector
Identification of Terminals:- Usually the middle terminal is the Base
- In case of 2N2222A - The transistor has a semi-circular shape. Hold the transistor so that that flat side is facing you. Now the left terminal is the Emitter, the middle terminal is the Base and the right terminal is the Collector.
For further clarification, refer to the attached photos of all three transistors which can be used.
Note: Make sure that you remove the invisible varnish coat on the magnetic coil while soldering. You can do this by using the sand paper and rubbing the tips of the wire till the coating is gone.
Soldering the transmission coil:- The emitter of the 2N2222A (or the other transistors) transistor is soldered to the black wire of the 9V battery holder.
- The two ends of the transmission coil are soldered to base and collector of the transistor (it doesn't matter which way they are soldered).
- The red wire of the battery holder is soldered to the notch of the transmission coil as shown in the circuit diagram.
The two ends of the LED is soldered to the two ends of the receiver coil. You can solder the ends in anyway, it wont make a difference.
Note: Make sure that you remove the invisible varnish coat on the magnetic coil while soldering. You can do this by using the sand paper and rubbing the tips of the wire till the coating is gone.
Finally its time for us to power this rig up! Attach the 9V battery to the battery holder. ONLY USE 9V BATTERY for this project because if we use a battery of higher voltage, there is a chance of the transistor getting damaged.
Your wireless power transmission coils are ready!
Making different types of coils. If you are curious and would like to further investigate this phenomenon, you can make receiver coils with any numbers of turns or a larger/smaller diameter. Try out various combinations and see what happens. I Promise you, you will see a difference.
Thank You!
How it works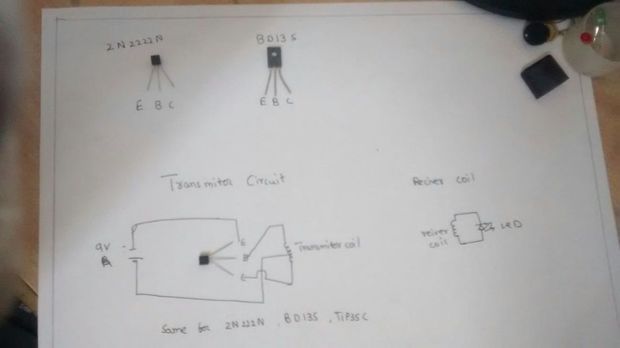

Comments
Please log in or sign up to comment.