

Deep learning has been a pretty big trend for machine learning lately, and the recent success has paved the way to build project like this. We are going to focus specifically on computer vision and Single Shot Detection (SSD) on in this sample. In this project we will be building an AI vision kit that can be used to count items, and use multiple cameras on a single unit to track multiple things, and use Azure IoT Hub as a data storage for Small Businesses.
Single Shot MultiBox Detector (SSD)
Single Shot MultiBox Detector (SSD) discretizes the output space of bounding boxes into a set of default boxes over different aspect ratios and scales per feature map location. At prediction time, the network generates scores for the presence of each object category in each default box and produces adjustments to the box to better match the object shape. network also combines predictions from multiple feature maps with different resolutions to naturally handle objects of various sizes.
For the past couple of years we've been using YOLO, but with advancement of SSD it is much faster than the YOLO method. Also, SSD is a lot more efficient than traditional YOLO method as SSD uses multiple activation maps for the bounding box as YOLO uses a single activation map for prediction of classes and bounding boxes.
Equipments needed is very simple for this project, you can either do it with your computer and a USB Movidius Neural Computing Stick or Build it using Embed computing like these IoT devices.
- Up2 Board
- Vision Kit Camera
- Movidius PCIe Add-on (Or USB Neural Computing Stick)
- A screen or monitor
- Helium Atom and Helium Element
In this guide we will be using a SSD neural net that is pre-trained and working with Caffe. So we'd also learn how to utilize other neural network with little bit of work. The Up2 Board is already installed with Ubuntu 16.04, making things a lot more easier. On the device we can first create a folder copying everything we trained on the server. We will first install Movidius NCS SDK
cd ~/workspace
git clone https://github.com/movidius/ncsdk.git
cd ~/workspace/ncsdk
make install
Full instruction can be seen from the video below
Next we need to download all the sample apps ncappzoo, which is also created by Movidius, and the specific app we need is stream inference, which can be gotten from the example file.
cd ~/workspace
git clone https://github.com/movidius/ncappzoo.git
cd ncappzoo
make
cd caffe
make
This should be able to get the entire software stack for NCS and OpenCV, next is we can create our own folder and run based on the live-object-detector example
cd ~/workspace
git
cd ai-vision-guide
./python3 test.py
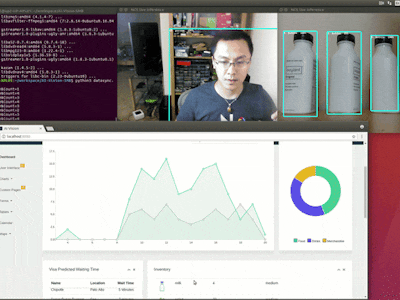
You should be able to see something like this. We are using SSD neuro network right here to identify the objects.
We can modify it further where it only detects based on label.txt that's generated from the next step.
  global lastcount
  count = 0
  file = open('label.txt','r')
  selected = file.read()
  file.close()
  for i in range( 0, output_dict['num_detections'] ):
      print( "%3.1f%%\t" % output_dict['detection_scores_' + str(i)]
             + labels[ int(output_dict['detection_classes_' + str(i)]) ]
             + ": Top Left: " + str( output_dict['detection_boxes_' + str(i)][0] )
             + " Bottom Right: " + str( output_dict['detection_boxes_' + str(i)][1] ) )
      if selected in labels[ int(output_dict['detection_classes_' + str(i)]) ]:
          count = count + 1
          # Draw bounding boxes around valid detections
          (y1, x1) = output_dict.get('detection_boxes_' + str(i))[0]
          (y2, x2) = output_dict.get('detection_boxes_' + str(i))[1]
          # Prep string to overlay on the image
          display_str = (
              labels[output_dict.get('detection_classes_' + str(i))]
              + ": "
              + str( output_dict.get('detection_scores_' + str(i) ) )
              + "%" )
          frame = visualize_output.draw_bounding_box(
                     y1, x1, y2, x2,
                     frame,
                     thickness=4,
                     color=(255, 255, 0),
                     display_str=display_str )
We can have the helium Pi connect on top of the Up2 board, when all done it looks something like this.
We will follow the rasperry pi SDK from Helium on
https://www.helium.com/dev/hardware-libraries/raspberry-pi
For up2 board, there is a little difference here that we need to address. We will be using "/dev/ttyS5", and we need to be in dialout permission setting in terminal, otherwise we'd have to use following code
sudo adduser up2 dialout
cd ~/workspace/
git clone --recursive https://github.com/helium/helium-cli.git
cd helium-cli
make
./helium -p /dev/ttyS5 infoThis would show you whether your Helium is running correctly. On Helium Dashboard, make sure that you activate Atom
After setting up the Atom we'd also have to register Element as they are the access point, (for those who has cellular version powering it up would do).
After activating element we should see it on Access Point.
After this is all set, we can simply add in the code, first we need to install the library on up2 board for python3 since NCS SDK is running on python3
sudo pip3 install helium-client
Afterwards we need to add to our ai-vision.py. Currently there is a bug on running this, as we need 'ttyS5' on Up2 board, and 'Serial0' if you were to use Raspberry Pi. Also, the python3 code needs byte array rather than String, so we need to add b'{string}' format to make this work.
from helium_client import Helium
helium = Helium(b'/dev/ttyS5')
helium.connect()
channel = helium.create_channel(b"Azure IoT App")
channel.send(b'data')
Now the data should be able to upload upstream without any problem, we will need to store it so that we can run track the result as well do additional logic.
Step 4: Connect Azure IoT Hub to Helium DashboardWe first create IoT Hub under all services, it would be wise to move IoT Hub into favorite so it would be accessed much more easier. We can use standard tier since the Free Trial $200 trial credit can cover it. You can also choose to use the Free Tier as well.
After selection the name you can move to Size and Scale.
After it's created we need to go to Shared Access Policies ->RegistryReadWrite entry -> Connection String -- Primary Key, also make sure Registry Read and Registry Write is checked, although they should be default
After getting that primary connection string, go to Helium Dashboard and create a Helium Connection, after pasting the connection string into the connection field, everything else should be automatically filled.
After setting this up, we would be able to get all the MQTT strings being automatically generated in Helium Hub. This can be easily accessed through the channel.
Since Azure requires device to publish and subscribe to a fixed MQTT topic, this will allow Helium Atom to do that as well as letting IoT Hub to push messages to Helium Atom. We can do following to test out the sending to Azure.
git clone https://github.com/helium/helium-cli.git
cd helium-cli
make
./helium -p /dev/
That will check whether Helium is installed correctly
./helium -p /dev/serial0 channel create "Azure IoT App"
./helium -p /dev/serial0 channel send 1 "Hello Azure"
This will send information from the Atom to Azure directly, we should check that on both Helium Dashboard as well as Azure IoT Hub Overview
And on Azure IoT Hub below we should see the same result
Device is authenticated through X509, and Helium platform handles all of it. Making it simple and clean.
Step 5: Setup Azure SQL DatabaseNext we need to be able to store the data coming from IoT device. There is a great guide about this written in detail on https://blogs.msdn.microsoft.com/sqlserverstorageengine/2018/01/23/working-with-azure-iot-data-in-azure-sql-database/ In this article we will focus on quick integration of how that happens. We first go to SQL databases to create a database as image below, we can select Basic Tier as we are only starting the app, the free trial credit should be able to cover it. This is the cheapest optionfor prototyping, as you scale, you might want to move to Azure Cosmos in the future since the minimum on Cosmos is $25.
Afterwards we can use Query editor to create following table, for starter we are just gona use Clean Water AI's simple data structure to get started
CREATE TABLE AIVision (
    id bigint IDENTITY (1,1) NOT NULL,
    Item nvarchar(max) NOT NULL,
    Count int NOT NULL,
    DateCreated datetime default CURRENT_TIMESTAMP
)
Now we have a table to store the data to, we need to connect this to an eventhub so that data can be stored in. Go to Connection Strings and grab the connection string for the next step.
In order to connect to function we will use Event Hub. We first need to create an Azure Function App, which allows serverless structure, which is great for IoT applications since we no longer have to maintain. To start we first need to create a function App under compute.
Creating Function App
We can create Function under these settings
Just take about a couple of minutes and we will have it under our notifications.
Now that we have functions, Next we will create a function under IoT Hub (Event Hub) trigger so we can get the event hub running. Go to function->platform features->Application settings
In here we are going to add the connection string we've created in the previous step. Save it after created
Connection String
Next step is create a Event Hub function, for this example we will use C#. After clicking new connection things should be auto populated.
Change the Function to following, this is to to insert data directly into Azure SQL Database.
using System.Configuration;
using System.Data.SqlClient;
using System.Threading.Tasks;
public static async Task Run(string myIoTHubMessage, TraceWriter log)
{
var map = myIoTHubMessage.Split('&').Select(x => x.Split('=')).ToDictionary(x => x[0], x => x[1]);
   String Item = map["Item"];
   String Confidence = map["Confidence"];
   log.Info(Item);
   log.Info(Confidence);
var str = ConfigurationManager.ConnectionStrings["sqldb_connection"].ConnectionString;
using (SqlConnection conn = new SqlConnection(str))
   {
       conn.Open();
var text = "INSERT INTO dbo.AIVision (Item, Count) VALUES ('" + Item + "', " + Count + ");";
using (SqlCommand cmd = new SqlCommand(text, conn))
       {
// Execute the command and log the # rows affected.
var rows = await cmd.ExecuteNonQueryAsync();
           log.Info($"{rows} rows were updated");
       }
   }
   log.Info($"C# IoT Hub trigger function processed a message: {myIoTHubMessage}");
}
When successful, you should be able to see
At this point we have the entire end to end data sending from Helium to Azure SQL via Azure IoT Hub. Next we need to retrieve the data, which we need to create an HTTP Trigger via Azure Function API.
We will change couple of values, routing to be /data so we can access /api/data, and Authorization level to be anonymous, and HTTP method for GET only
As for the code, we can test it out by accessing address
http://<yourapp>.azurewebsites.net/api/data?name=foobar&code=<functionkey>
This would test out the result and return "hello foobar". When this is finished, we can use following code to return the actual data. Next we can use following code to test out the entire app. This is the simplest query, which additional information can be gathered by writing more complex queries, but for prototype we will just focus on getting one record.
#r "System.Configuration"
#r "System.Data"
#r "Newtonsoft.Json"
using System;
using System.Net;
using System.Configuration;
using System.Data.SqlClient;
using System.Threading.Tasks;
using System.Text;
using Newtonsoft.Json;
public static async Task<HttpResponseMessage> Run(HttpRequestMessage req, TraceWriter log)
{
   log.Info("C# HTTP trigger function processed a request.");
 string item = req.GetQueryNameValuePairs()
        .FirstOrDefault(q => string.Compare(q.Key, "item", true) == 0)
        .Value;
 if(item == null || item == String.Empty){
 return new HttpResponseMessage(HttpStatusCode.BadRequest);
    }
var str = ConfigurationManager.ConnectionStrings["sqldb_connection"].ConnectionString;
using (SqlConnection conn = new SqlConnection(str))
   {
       conn.Open();
var text = "SELECT Top 1 Item, Count from dbo.AIVision WHERE Item = '" + item + "' Order by DateCreated DESC";
       EventData ret = new EventData();
using (SqlCommand cmd = new SqlCommand(text, conn))
       {
           SqlDataReader reader = await cmd.ExecuteReaderAsync();
try
           {
while (reader.Read())
               {
                   log.Info(String.Format("{0}, {1}",
                       reader[0], reader[1]));
                   ret.Item = (string)reader[0];
                   ret.Count = (int)reader[1];
               }
           }
finally
           {
// Always call Close when done reading.
               reader.Close();
           }
var json = JsonConvert.SerializeObject(ret, Formatting.Indented);
return new HttpResponseMessage(HttpStatusCode.OK)
           {
               Content = new StringContent(json, Encoding.UTF8, "application/json")
           };
       }
   }
}
public class EventData
{
public String Item { get; set; }
public int Count { get; set; }
}
When all done, it should yield result for the latest record
Make sure you get CORS right by adding http://localhost:8080 to it otherwise you won't get access to it
So this example we are going to track both inventory as well as traffic, so we are going to need 2 cameras + 2 NCS

Comments
Please log in or sign up to comment.