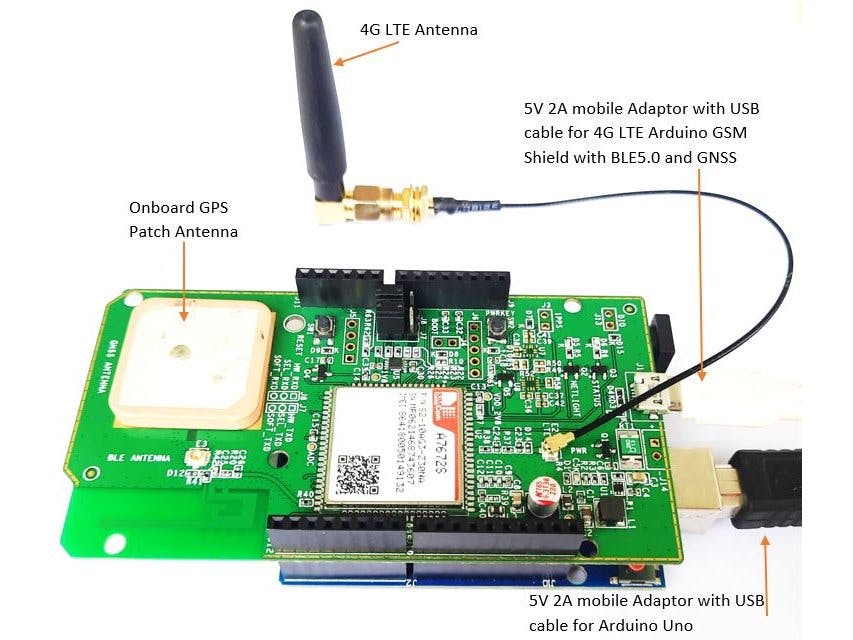
4G LTE, GNSS, BLE5.0 Arduino Shield with A7672S is a multi-Band 4G/3G/2G communication and GNSS positioning module, LTE-CAT1 speed option. This product is designed to be directly compatible with Arduino UNO to enable 4G LTE data connectivity for applications such as Internet of Things (IoT), Tracking. UART interface enables easy interface of the shield PCB with any other Microcontroller platform other than Arduino as well. These posts describe Vehicle Tracking System with A7672S Shield and Arduino UNO
Hardware setup:
This implementation needs
1) Arduino UNO board,
2) ParryTech “4G LTE Arduino GSM Shield with BLE5.0 GNSS” PCB,
3) 5V Power adapter for Arduino UNO,
4) 5V-2A Power adapter for 4G LTE Arduino GSM Shield with BLE5.0 GNSS,
5) LTE antenna along with U.FL to SMA RF cable,
6) Optional External GPS antenna along with U.FL to SMA RF cable,
7) Micro SIM Card with data plan.
Insert SIM Card, connect U.FL to SMA RF cable to the LTE antenna connector port on the ParryTech PCB, attach the SMA 4G LTE antenna.
External antenna connection (only if you want to use external GNSS antenna): Connect U.FL to SMA RF cable to the GNSS/GPS connector port E4 on the ParryTech PCB, attach the SMA GNSS/GPS active antenna. Please note this setup is tested both with onboard passive patch antenna and external active antenna options. (For using onboard patch antenna R65 needs to be populated with zero-ohm resister. For using external active antenna R64 needs to be populated).
Attach power supply to ParryTech PCB, attach power supply to Arduino UNO. Now the hardware setup is ready.
ParryTech 4G LTE GSM Modem can be used along with Arduino or any other Microchip / STM32 / Renesas microcontroller. In this application note we have used Arduino Uno board for interface. Bottom of the PCB has a Micro Sim card holder provision for inserting sim card.
Software:Install the Arduino IDE and upload software developed by ParryTechnology to Arduino Uno board. The application reads GNSS data from the parrytech module and publishes to open MQTT broker which can be visualized in thingsboard cloud app or mobile app. Any other web/mobile application which supports MQTT can also be integrated with this.
Things Board MQTT IntegrationMQTT Integration on thingsboard allows to connect to external MQTT brokers, subscribe to data streams from those brokers and convert any type of payload from your devices to ThingsBoard message format. Its typical use is whenever your devices are already connected to external MQTT broker or any other IoT platform or connectivity provider with MQTT based back-end.
This feature is supported only in things board professional edition. Create account and login into things board professional edition.
Under data converters, create an 'Uplink data converter' based on the data format uploaded from MQTT. The main function of Uplink data converter is to parse data of the incoming message and transform that to things board uses.
Then add new integration(type-MQTT) with suitable name and add the created uplink converters. Specify the MQTT Broker with port number and add the topic. Then Save the integration. The same broker and port number must be used on the application.
After successful creation of integration, turn on the device. A device gets added in thingsboard under device groups.
GPS data can be viewed in latest telemetry section under the device details of newly created device.
Select the details in telemetry (for example latitude and longitude) and add to widget in a dashboard (select widget of type map from various options shown).
The following image shows widget added into a dashboard under dashboard groups:
The same can be viewed on mobile via thingsboard mobile app for android. For mobile app please drop an email to us (enquiry@parrytech.net).
Things Board app installation in mobile:
Install an app in your mobile phone and Log in using your account. Select Dashboard and view live location update in Map.


_ztBMuBhMHo.jpg?auto=compress%2Cformat&w=48&h=48&fit=fill&bg=ffffff)


Comments
Please log in or sign up to comment.