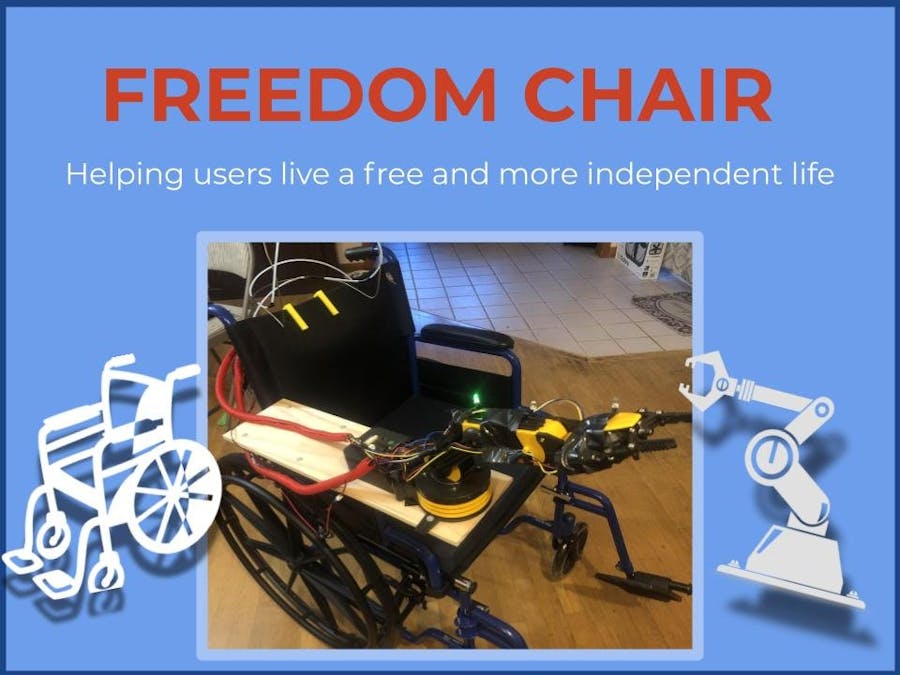
The Origin and Targeted Audience of the Freedom Chair: The Freedom Chair was designed as an open source wheel chair attachment to help quadriplegic people, or people who have lost use in all four limbs, gain a sense of independence within their lives. The reason for the name "Freedom Chair" is not only because it will help the user feel more free from their current limitations, but also because the idea was originally meant for, however not limited to, troops who came back from overseas without the use of their limbs. These soldiers fought for our freedom, so it only seemed right that I should try to give a little freedom back to them.
A popular maker magazine called 'Servo' had a small article on assistive technologies that I thought fit best with what I was trying to build. They write
"Assistive technologies can benefit people with disabilities by giving them a greater independence and control over their lives."
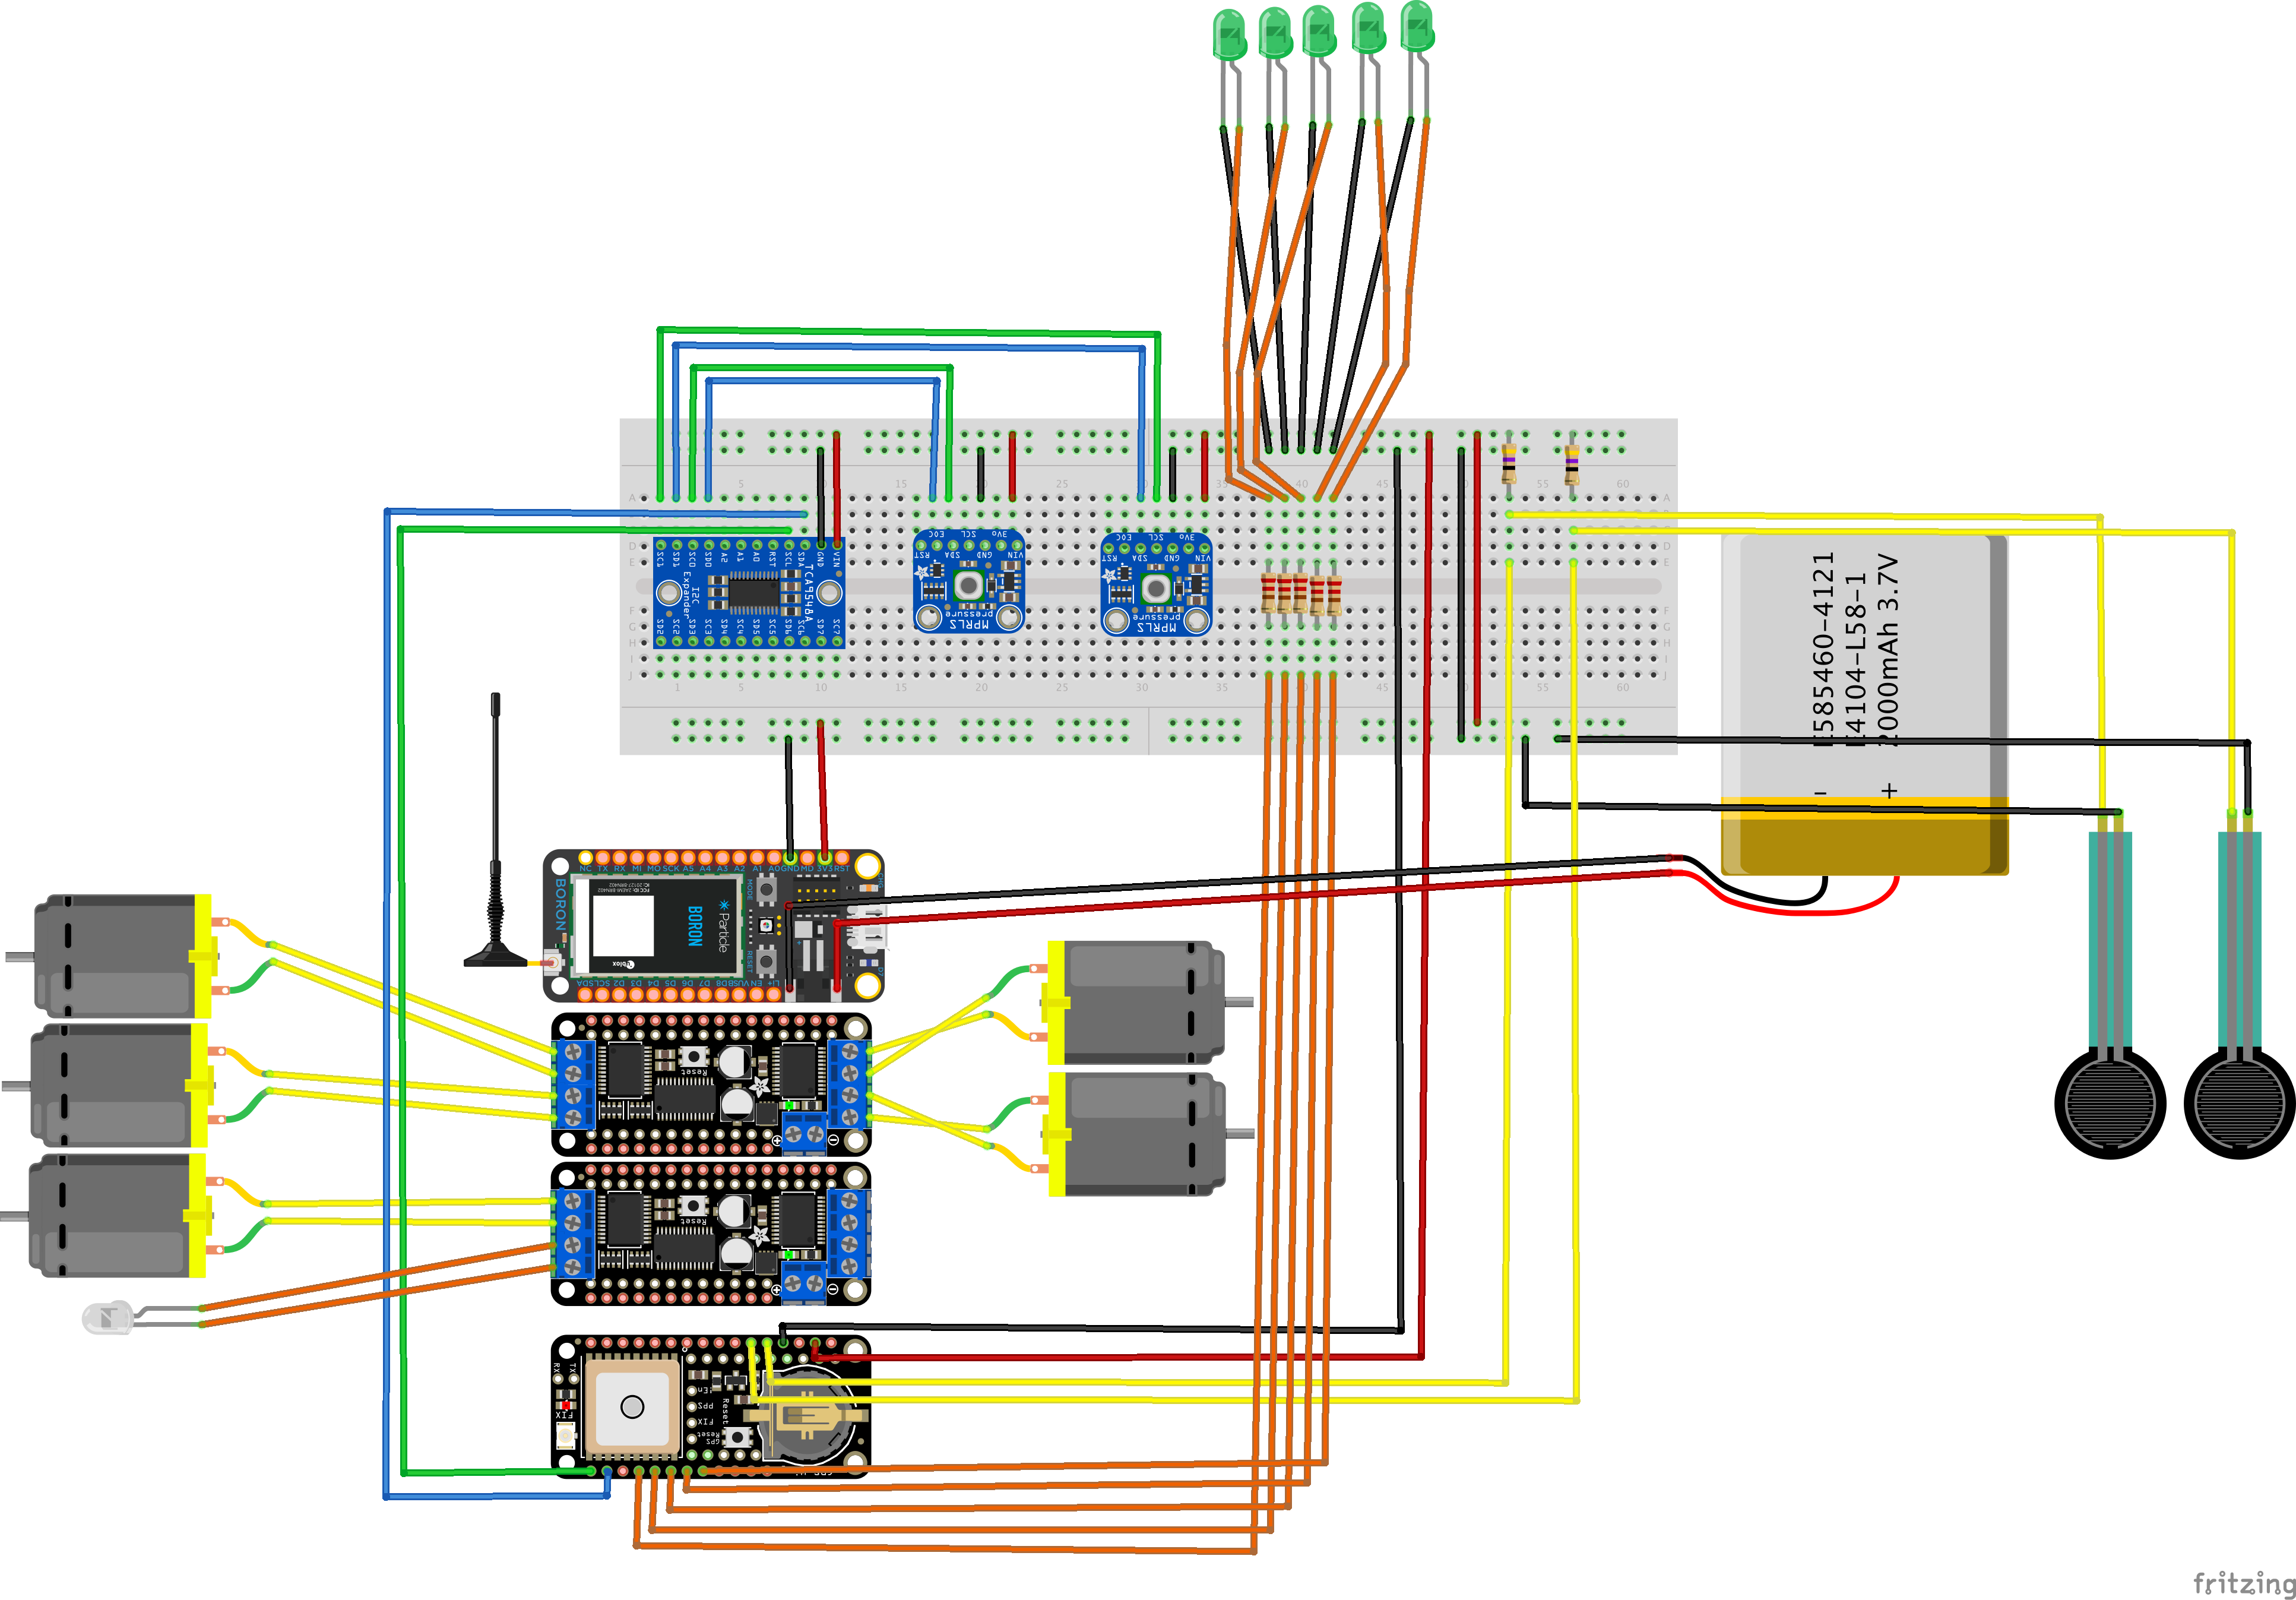
As I did more research I was troubled by how expensive these technologies could be. Although designed well, it seems unnecessary to have to pay thousands of dollars just to have a little freedom in ones life. This is where the Freedom Chair comes into play. The Freedom Chair attachment is a low cost piece of assistive technology, with various functions. Mounted on the wheel chair are two force sensing resistors, two "puff" sensors, a GPS, and most importantly, an easy to control robotic arm through the use of the puff sensors. Additionally, It is equipped with the Particle Boron board with LTE meaning that if the user were to fall out of the wheel chair, anywhere in the world, without WiFi, their care taker could be notified.
The Beginning Stages: My initial designs consisted of drawings of what I planned the the wheel chair to look like, with the mounted arm and clamps. I also started with programming the puff sensors in Python to change values, either increasing or decreasing depending on how much pressure was applied when I either puffed or sipped. I translated this knowledge to my knowledge of programming the motors, and was able to make the motors move back and forth at different speeds, corresponding to the actions the user took on the sensors.
The Particle and The Feather: As I continued working on the project, I learned about the Particle Boron with its LTE capabilities and its compatibility to Adafruit's line of Feather boards. The reason this was so important was because this covered all aspects and functions of my project. The compatibility with the Feather was so useful because I could use the Ultimate GPS FeatherWing add-an, and the FeatherWing motor controller board add-ons, all on a quad side by side Feather kit. The Boron's LTE capabilities were especially useful because it could send data to the Ubidots dashboard and when paired with a communications platform called Twilio, it can send text message alerts to a care takers phone. It created a very compact and stable platform to program the motors and sensors, and also to communicate over LTE to send data to different sources.
The Robotic Arm: The arm is controlled by the user through the use of Adafruit's MPRLS ported pressure sensors. The use of puff sensors to control a wheelchair's movement is where the idea of using puff sensors to control the robotic arm came from. One sensor changes the motor that the user wants to move, shuffling through each motor in sequential order, and the other sensor controls the direction and speed that the selected motor moves. These sensors detect whether the user is sipping or puffing on the sensor because it detects the change in pressure within a tube connected to the sensor. The sensors are connected by small tubing that is attached to a headpiece made from a simple metal coat hanger. the shape of the coat hanger followed the design of a harmonica neck mount so the user can sip and puff on the tubing without the use of their hands. The robotic arm came as an easy to put together toy kit with 5 DC motors for all pivot points on the arm which I connected to two Adafruit Feather compatible motor controller boards. The arm was mounted in front of the person, on top of a wooden board from Lowes. The board was mounted on top of the arm rest of the wheel chair with clamps, also from Lowes, and 3D-printed spacers. The 3D printed spacers were fairly easy to design due to the simplicity of the wheel chair arm design, and an accurate caliper. I was able to test my 3D printed design in Fusion360 with the help of the programs 'Assembly' feature, where you can bring in all the parts you have made and join them together to check measurements and functionality. One problem that I encountered while testing the use of the pressure sensors and the robotic arm was that I couldn't determine which motor I had selected, so most of the time I was stuck trying to select a motor and completing a simple task ended up being extremely frustrating. To overcome this problem, I attached 5 LED's that corresponds to each motor, so when you shuffle through the motors, you can see the LED's light up displaying which motor is selected. The coding for the arm was simple, because of the useful ''Adafruit Motorshield V2' library and the motors being standard DC motors. The code consists of various if-then blocks to run the motors with the corresponding LED's turning on as selected. Another issue that I ran into was that the LED's didn't actually match up with the specific motor due to issues wiring the board together. To combat this I hooked up the Particle board to my computer and used the serial port to display which motor was paired with which item in the LED list.
The Pressure Sensors and GPS Text Message Safety Notification: Another big feature of the "Freedom Chair" is its ability to keep the users caretaker alerted if something were to happen with the user falling out of the wheel chair. Although this project is meant to allow the user to operate themselves without supervision, it is always important to have a caretaker still able to monitor the user in case something were to go wrong. The two force sensing resistors in the chair will read a high value when someone sits down on them, with the help of a 3D-printed cone shaped plate that could take the weight of a person, and push it all down into one central point on the sensor. The only challenge I encountered when creating the pressure plate was keeping the design thin, because the user would have to sit on it. Even after thinning it out as much as I could, it was still too thick, so I got a cushion for the wheelchair and it stopped the pressure plates from getting in the way. When both sensors are pressed down, the program identifies that change as a person sitting in the chair. The importance of having two sensors in this case is that it acts as a fail safe. If one sensor happens to lag or stop working, the other sensor can accurately collect the data. This way, if one sensor displays a low value of force and the other shows a high value of force, the Boron LTE board will work with Twilio, a cloud communications platform, to send a text message to the care taker. This works because the board sends data to the Particle cloud, which sends data to the Twilio platform using a web-hook integration system. The text message is sent to the care taker with the location of the event using the Ultimate GPS FeatherWing add-on.
Particle.publish("twilio_sms", "emergency out of seat", PRIVATE);
This is especially important because if the user had gone outside to some place without WiFi, the Boron LTE can still transmit this data and the care taker can easily find the user. This is all displayed on Ubidots, an IOT dashboard that has a standard library for Arduino. This library can be included in the Particle IDE and is useful to display information in a readable way. The Particle Boron sends data to the Ubidots server, which displays the location of the wheelchair on a map, and what value the force sensitive resistors are reading. These values are continuously updated to the IOT dashboard.
ubidots.addContext("lat",str_lat); ubidots.addContext("lat",str_lng); ubidots.getContext(context); ubidots.add("position", 1.0, context); ubidots.add("Left_Seat_Sensor", leftSeatSensor); // Change for your variable name ubidots.add("Right_Seat_Sensor", rightSeatSensor);
Testing: Throughout the project, I was continuously testing my design to see if anything could be improved. I worked inside of my house by testing the arm mechanism on various objects such as saltshakers and snickers bars. When I felt ready to test outside, I brought the wheelchair to my local municipal building to see if it could press the handicap button to open a door.
Future Improvements: There is always room for improving your projects, which is why I included some future changes I might like to add to the freedom chair. One of the biggest problems I ran into while testing was the strength of the robotic arm. Although it was easy to control, it had some problems lifting some objects. The package said it was only rated to lift objects under 100 grams, however it was slightly disappointing when it couldn't even press a button on a door, As can be seen in the video below. The motor at the base of the arm continued to slip gears. To improve the arm, I would like to design the arm myself, with a couple of heavy duty servo motors and 3d printed parts. Another problem with the arm was that it wasn't able to turn objects upside down. When I was testing the design I tried to use a salt shaker with the robotic arm, however I found that I could not rotate the grippers. Although I eventually found a way to turn it upside down, it was a very long and complicated process that could easily be fixed with a servo motor at the wrist of the arm. Also when testing, I found it unbelievably hard to select a motor. Although I had added in the indicator lights, it still had some issues when shuffling through the motors. It shuffled through the motors so fast that you had to guess when it would land on the specific light. It was like a carnival game. There are simple solutions to this problem, and complicated solutions. The simple solution would be to add delays within the shuffling block of the code, however I tried to stay away from delays as much as I could, because every delay meant that the whole board stopped, and you stopped collecting data for however long the delay was. A more complicated solution would be to add a clock to the program, where it would start a countdown to the next time the user could activate the puff or sip function again.


Comments
Please log in or sign up to comment.