


Hardware components | ||||||
 |
| × | 1 | |||
 |
| × | 1 | |||
Software apps and online services | ||||||
 |
| |||||
| ||||||
This is set up to work with the WEB-Connected LED example app for the Particle Spark, Photon, or Electron.
App Inventor is an easy way to make Apps for the Android platform. We will go through how to use App Inventor for communicating with any Particle device.
The DesignerYou will want to make two buttons. The button names do not matter, but we will just call them ButtonOn and ButtonOff.
Next we will add the Web component with the following attributes.
- CheckAllowCookies.
- Enter https://api.particle.io/v1/devices/in the Url field.
Now we get into the codding. The thing to keep in mind is that a Particle function can only be called with an HTTP POST request. App Inventor makes it easy to send GET data so we will have to jump through a few hoops to get there.
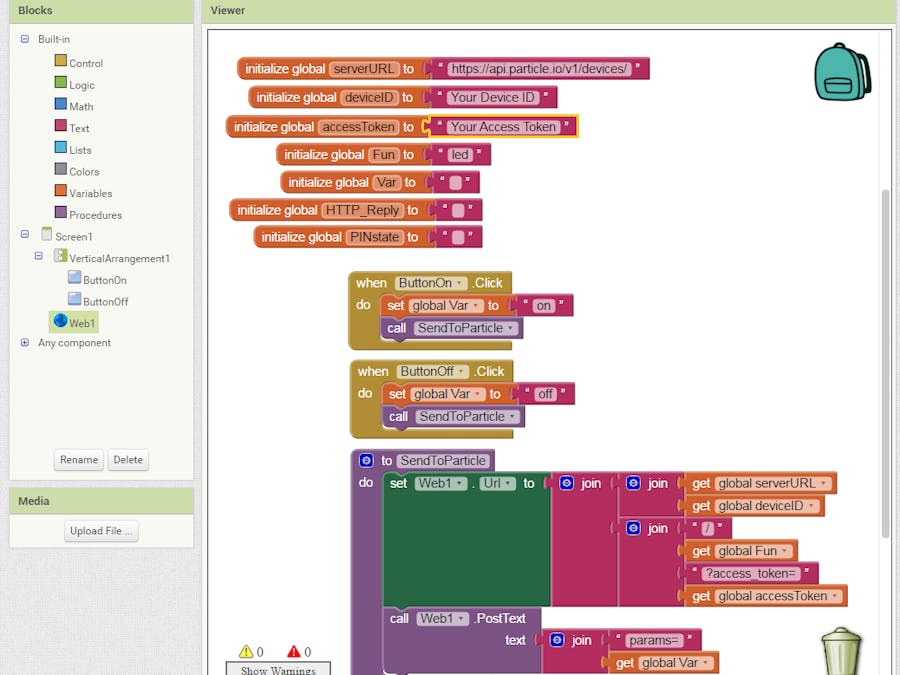
Set Global VariablesFirst, lets set up some global variables. These can be found under Variables and initialize global. To this we will add a Text value to start with.
- Make sure the serverURLis set to "https://api.particle.io/v1/devices/".
- Copy the Device IDand use that for thedeviceIDvariable.
- Locate the Access Tokenfrom your Particle account and use that for theaccessToken.
- Funshould be set to the function name from the Particle code. For this instance, we are calling "led".
- Varis a placeholder for the value we will be sending to the function. It is blank.
- HTTP_Reply can be used to get a conformation message from the Particle device.
- PINstatecan be used later to toggle the On/Off button.
In App Inventor, a Procedure is a block of code that can be called on to run at any time. This saves time and space when you need to run the same code over and over again.
- From the Procedures blocks, add the Do block.
- Name this procedure "SendToParticle".
- Add the Set Web1 block from the Web1 section to the new procedure.
- Now we will assemble a string for the set Web1.Url by using the Join block from Text.
- All together we will be joining the serverURL,deviceID,"/",Fun,"?access_token=", and accessToken.
- Under the Set.Url block, we will add a Call.PostText block from the Web1 section.
- To this we will add a Join block for sending to our Particle function via POST request.
- We will join "params=" and the Var value.
When ever this procedure is called Val will be sent via POST to:
https://api.particle.io/v1/devices/your-device-id/led?access_token=your-access-token
The Button ClickFor now we will just use one button for ON and one for OFF. So we want to grab the when.click from the ButtonOn and ButtonOff blocks.
- To that we will add a Set block for the Var variable. Also add the value of "on" to this.
- Next we will be calling on the SendToParticle Procedure.
That is it!
Once this App is loaded onto your phone it will turn the built-in LED, attached to Pin 7 on the Particle device, on or off.
What Next?Well this is a good place to get you started. From here you can try to make the button toggle the LED on or off.
Change the button into an image to make things look a little nicer.
Add a Relay to Pin 7 on the Particle device and you can turn an actual light on or off.
The possibilities are nearly endless and this will help get you well on the road to making it easy to use the next big IOT... thing.
Code DownloadThis file can be imported directly into App Inventor.


Comments
Please log in or sign up to comment.