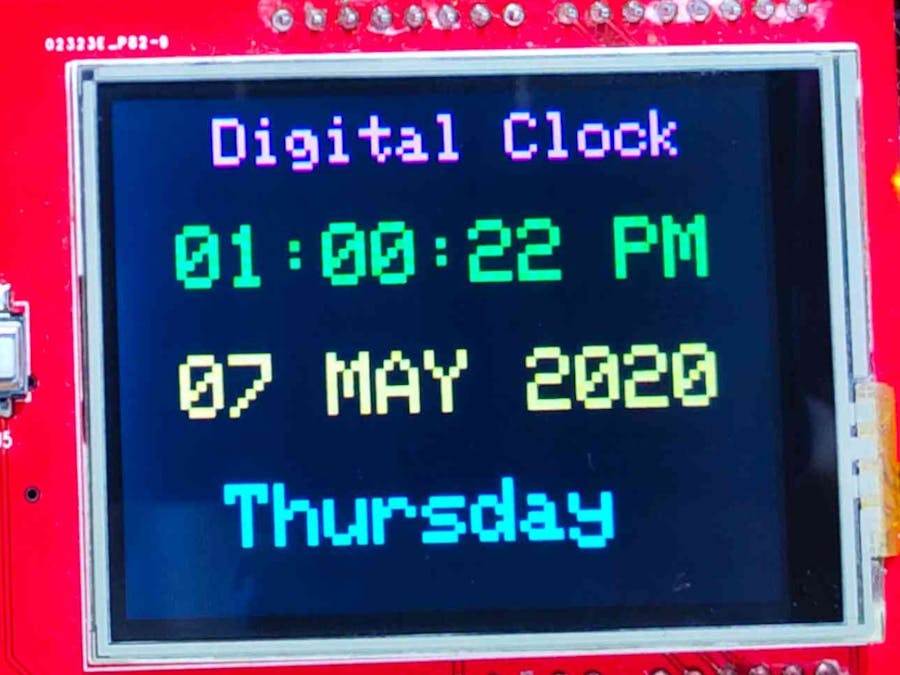
When you are using DS1302, DS1307 or DS3231 RTC in your real time clock project, You may have observed it’s library works on 24 hours format clock. If you are like me who don’t like to see clock in 24 hour format, this tutorial is for you. we will learn how to set 12 hour clock in RTC (Real Time Clock) using DS1302 with TFT Display. It is simple to convert from 24 hour format to 12 hour format clock by using any of DS1302, DS1307 or DS3231 RTC. In short we are subtracting 12 hours from 24 hours. So let’s get started.
Components Required:Libraries Required:1. DS1302 Library:
Download library for Real Time Clock library from Rinky-Dink Electronics OR you can download it from here because library may change by the time or it may not work.
Download Real time clock library DS1302.zip
2. MCU Friend TFT Display Library:
- mcufriend_kbv
- Adafruit_GFX
- Dependencies Libraries (Touchscreen etc)
Open Arduino IDE. Go to Sketches > include library > Manage Libraries > Type library name > install
Know more about how to add library in Arduino IDE.
Circuit for 12 Hour Format Real Time Clock with TFT Display:Set the current time in 24hr format, don’t worry it won’t show you time in 24 hour format. Because of our code it will take automatically time according to AM/PM. After setting the time, upload the code.
rtc.setDOW(THURSDAY);
rtc.setTime(12, 59, 50);
rtc.setDate(07, 05, 2020);
Now, time is stored in DS1302. You will need to comment out the following lines and again upload the code.
//rtc.setDOW(THURSDAY);
//rtc.setTime(12, 59, 50);
//rtc.setDate(07, 05, 2020);
Note: If you don’t comment out and upload the code. It will cause Arduino to start time from where it is been set. Not from current time.
Code For Arduino 12 Hour Clock in RTC:#include <Adafruit_GFX.h>
#include <MCUFRIEND_kbv.h>
MCUFRIEND_kbv tft;
#include <DS1302.h>
// Init the DS1302
DS1302 rtc(24, 26, 28);
// Init a Time-data structure
Time t;
int activate;
#define BLACK 0x0000
#define BLUE 0x001F
#define RED 0xF800
#define GREEN 0x07E0
#define CYAN 0x07FF
#define MAGENTA 0xF81F
#define YELLOW 0xFFE0
#define WHITE 0xFFFF
#define GREY 0x8410
void setup()
{
Serial.begin(9600);
uint16_t ID = tft.readID();
Serial.print("TFT ID = 0x");
Serial.println(ID, HEX);
if (ID == 0xD3D3) ID = 0x9486; // write-only shield
tft.begin(ID);
tft.setRotation(1);
tft.fillScreen(BLACK);
// Set the clock to run-mode, and disable the write protection
rtc.halt(false);
rtc.writeProtect(false);
// The following lines can be commented out to use the values already stored in the DS1302
rtc.setDOW(WEDNESDAY); // Set Day-of-Week to TUESDAY
rtc.setTime(20, 58, 50); // Set the time to 24hr format it will automatically take time according to AM/PM
rtc.setDate(06, 05, 2020); // Set the date to May 7th, 2018
}
void loop()
{
// Get data from the DS1302
t = rtc.getTime();
tft.fillRect(170, 50, 50, 50, BLACK);
// update
if (t.sec<=1){
tft.fillScreen(BLACK);
}
// Day
tft.setCursor(50,180);
tft.setTextSize(4);
tft.setTextColor(CYAN);
tft.print(rtc.getDOWStr());
// Heading
tft.setCursor(50,10);
tft.setTextColor(MAGENTA);
tft.setTextSize(3);
tft.print("Digital Clock");
//time
tft.setCursor(30,60);
tft.setTextSize(4);
tft.setTextColor(GREEN);
if (t.hour>=12){
activate = 1;
t.hour = t.hour-12;
if (t.hour== 0) {
t.hour = 12; // Day 12 PM
}
if (t.hour<=9){
tft.print("0");
tft.print(t.hour);
tft.print(":");
}
else {
tft.print(t.hour);
tft.print(":");}
}
else {
activate = 0;
if(t.hour==0){
t.hour=12; // Night 12 AM
}
if (t.hour<=9){
tft.print("0");
tft.print(t.hour);
tft.print(":");
}
else {
tft.print(t.hour);
tft.print(":");}
}
if (t.min<=9){
tft.print("0");
tft.print(t.min);
tft.print(":");
}
else {
tft.print(t.min);
tft.print(":");}
if (t.sec<=9){
tft.print("0");
tft.print(t.sec);
tft.print(" ");
}
else {
tft.print(t.sec);
tft.print(" ");
}
//AM/PM
if (activate==1){
tft.print("PM");
}else{
tft.print("AM"); }
//Date
tft.setCursor(30,120);
tft.setTextColor(YELLOW);
if (t.date<=9){
tft.print("0");
tft.print(t.date);
tft.print(" ");
}
else {
tft.print(t.date);
tft.print(" ");}
switch (t.mon)
{
case 1:
tft.print("JAN");
break;
case 2:
tft.print("FEB");
break;
case 3:
tft.print("MAR");
break;
case 4:
tft.print("APR");
break;
case 5:
tft.print("MAY");
break;
case 6:
tft.print("JUN");
break;
case 7:
tft.print("JUL");
break;
case 8:
tft.print("AUG");
break;
case 9:
tft.print("SEP");
break;
case 10:
tft.print("OCT");
break;
case 11:
tft.print("NOV");
break;
case 12:
tft.print("DEC");
break;
}
tft.setCursor(200,120);
tft.print(t.year);
delay(1000);
}This line will update screen portion, where second is appeared.
tft.fillRect(170, 50, 50, 50, BLACK);Update whole TFT screen every one minute.
if (t.sec<=1){
tft.fillScreen(BLACK);
}If hour is greater than 12 hours. It will minus 12 hours from it. At the same time make activate equal to 1.
if (t.hour>=12){
activate = 1;
t.hour = t.hour-12;If activate is equal to 1 it will show time as PM else AM.
if (activate==1){
tft.print("PM");
}else{
tft.print("AM"); }I have added this code for date, hours, minutes & seconds. This code will make sure, time should be in double digit, not single digit.
if (t.sec<=9){
tft.print("0");
tft.print(t.sec);
tft.print(" ");
}
else {
tft.print(t.sec);
tft.print(" ");
}If you like this kind of content, For more updates please subscribe my YouTube Channel. Till Then Keep Learning Keep Making.
Recent Posts
- Arduino 12 hour Format Clock with TFT Display May 7, 2020
- Send Data From Arduino to NodeMCU and NodeMCU to Arduino Via Serial Communication May 5, 2020
- ESP8266: How To Make Wi-Fi Radio May 2, 2020
- IoT Based Digital World Clock using ESP8266 April 30, 2020
- WebCam Motion Detection With Motioneyeos Using Raspberry Pi April 28, 2020


Comments
Please log in or sign up to comment.