


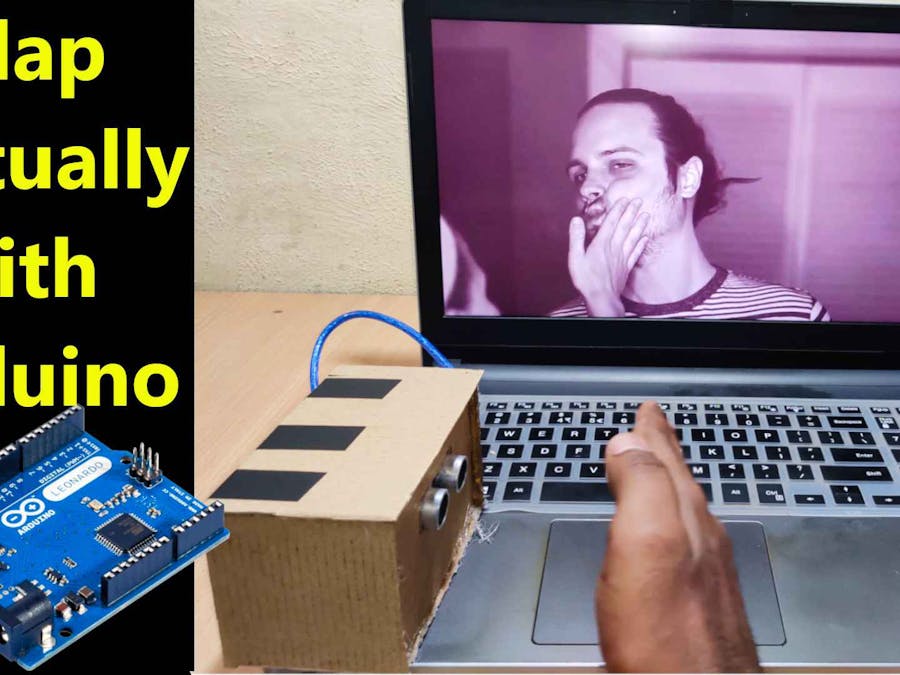
Making a project in a fun way is a best way to learn the things. In this tutorial we are going to make a Arduino cool project. Where we will use ultrasonic sensor as a keyboard and pass the keyword input via Arduino Leonardo, as a result it will control computer. Therefore controlling a video on screen. When we move hand close to sensor, in video we virtually slapping a guy. In same way moving hand away from sensor causes reverse the video. Overall we are slapping a guy virtually with Arduino Leonardo. This project is made just for fun. At the same time you are learning how to integrate Arduino with computer. So let’s get started.
If you don’t have VLC Player I would recommend download and install it.
Step 1: Open VLC player. Go to tools → preferences → hotkeys
Step 2: Edit very short forward jump & very short backward jump with hotkeys 1 & 2 respectively and save it.
You can choose any video for doing this project but I am using slapping video. I am using Video made by DistillVideos from Pixabay. I also made some changes in original video like original video of that guy was 6 second and I made it 19 seconds slow in video editing software. Because whenever we use very short forward jump or very short backward jump in VLC Player it moves forward or backward 3 seconds. Hence make sure video length should be three times slow. eg. if video length is 10 second make it 30 second slow video in any video editing software. As a result you can see smooth picture on video screen, when controlling with ultrasonic sensor.
You can download original slapping video from pixabay.
OR download my edited version. I already made it slow three times, so you don’t need to edit it in video editing software.
Circuit Diagram For Arduino Leonardo Virtual Slapping Project://RoboticaDIY.com
#include "Keyboard.h"
#define trigPin 13
#define echoPin 12
int frame1 = 0;
int frame2 = 0;
int frame3 = 0;
int frame4 = 0;
int frame5 = 0;
int frame6 = 0;
int frame7 = 0;
int limit[] = {35,30,25,20,15,10,5,0};
int wait = 50;
int previous_distance;
int diff;
void setup() {
Serial.begin (9600);
pinMode(trigPin, OUTPUT);
pinMode(echoPin, INPUT);
// initialize control over the keyboard:
Keyboard.begin();
}
void loop() {
long duration, distance;
digitalWrite(trigPin, LOW);
delayMicroseconds(2);
digitalWrite(trigPin, HIGH);
delayMicroseconds(10);
digitalWrite(trigPin, LOW);
duration = pulseIn(echoPin, HIGH);
distance = (duration/2) / 29.1;
diff = previous_distance - distance;
if (diff > 0){
if (frame1 == 0){ // frame 1
if (distance <= limit[0] && distance > limit[1]) {
frame1 = 1;
frame2 = 0;
frame3 = 0;
frame4 = 0;
frame5 = 0;
frame6 = 0;
frame7 = 0;
previous_distance = distance;
Keyboard.write('1');
delay(wait);
}
}
if (frame2 == 0){ //frame 2
if (distance <= limit[1] && distance > limit[2]) {
frame1 = 0;
frame2 = 1;
frame3 = 0;
frame4 = 0;
frame5 = 0;
frame6 = 0;
frame7 = 0;
previous_distance = distance;
Keyboard.write('1');
delay(wait);
}
}
if (frame3 == 0){ //frame 3
if (distance <= limit[2] && distance > limit[3]) {
frame1 = 0;
frame2 = 0;
frame3 = 1;
frame4 = 0;
frame5 = 0;
frame6 = 0;
frame7 = 0;
previous_distance = distance;
Keyboard.write('1');
delay(wait);
}
}
if (frame4 == 0){ // frame 1
if (distance <= limit[3] && distance > limit[4]) {
frame1 = 0;
frame2 = 0;
frame3 = 0;
frame4 = 1;
frame5 = 0;
frame6 = 0;
frame7 = 0;
previous_distance = distance;
Keyboard.write('1');
delay(wait);
}
}
if (frame5 == 0){ //frame 2
if (distance <= limit[4] && distance > limit[5]) {
frame1 = 0;
frame2 = 0;
frame3 = 0;
frame4 = 0;
frame5 = 1;
frame6 = 0;
frame7 = 0;
previous_distance = distance;
Keyboard.write('1');
delay(wait);
}
}
if (frame6 == 0){ //frame 3
if (distance <= limit[5] && distance > limit[6]) {
frame1 = 0;
frame2 = 0;
frame3 = 0;
frame4 = 0;
frame5 = 0;
frame6 = 1;
frame7 = 0;
previous_distance = distance;
Keyboard.write('1');
delay(wait);
}
}
if (frame7 == 0){ //frame 3
if (distance <= limit[6] && distance > limit[7]) {
frame1 = 0;
frame2 = 0;
frame3 = 0;
frame4 = 0;
frame5 = 0;
frame6 = 0;
frame7 = 1;
previous_distance = distance;
Keyboard.write('1');
delay(wait);
}
}
}
else {
if (frame1 == 0){ // frame 1
if (distance <= limit[0] && distance > limit[1]) {
frame1 = 1;
frame2 = 0;
frame3 = 0;
frame4 = 0;
frame5 = 0;
frame6 = 0;
frame7 = 0;
previous_distance = distance;
Keyboard.write('2');
delay(wait);
}
}
if (frame2 == 0){ //frame 2
if (distance <= limit[1] && distance > limit[2]) {
frame1 = 0;
frame2 = 1;
frame3 = 0;
frame4 = 0;
frame5 = 0;
frame6 = 0;
frame7 = 0;
previous_distance = distance;
Keyboard.write('2');
delay(wait);
}
}
if (frame3 == 0){ //frame 3
if (distance <= limit[2] && distance > limit[3]) {
frame1 = 0;
frame2 = 0;
frame3 = 1;
frame4 = 0;
frame5 = 0;
frame6 = 0;
frame7 = 0;
previous_distance = distance;
Keyboard.write('2');
delay(wait);
}
}
if (frame4 == 0){ // frame 1
if (distance <= limit[3] && distance > limit[4]) {
frame1 = 0;
frame2 = 0;
frame3 = 0;
frame4 = 1;
frame5 = 0;
frame6 = 0;
frame7 = 0;
previous_distance = distance;
Keyboard.write('2');
delay(wait);
}
}
if (frame5 == 0){ //frame 2
if (distance <= limit[4] && distance > limit[5]) {
frame1 = 0;
frame2 = 0;
frame3 = 0;
frame4 = 0;
frame5 = 1;
frame6 = 0;
frame7 = 0;
previous_distance = distance;
Keyboard.write('2');
delay(wait);
}
}
if (frame6 == 0){ //frame 3
if (distance <= limit[5] && distance > limit[6]) {
frame1 = 0;
frame2 = 0;
frame3 = 0;
frame4 = 0;
frame5 = 0;
frame6 = 1;
frame7 = 0;
previous_distance = distance;
Keyboard.write('2');
delay(wait);
}
}
if (frame7 == 0){ //frame 3
if (distance <= limit[6] && distance > limit[7]) {
frame1 = 0;
frame2 = 0;
frame3 = 0;
frame4 = 0;
frame5 = 0;
frame6 = 0;
frame7 = 1;
previous_distance = distance;
Keyboard.write('2');
delay(wait);
}
}
}
}Total frame added 7. But in reality our video should show 6 frames. Why I have given 7 frames then? Our video is 19 second long, each forward or backward cause 3 second changes in video, as a result we will see 19/3 that is 6 frame. But when we move hand fast, it may miss one frame, to prevent that I have added one extra frame.
int frame1 = 0;
int frame2 = 0;
int frame3 = 0;
int frame4 = 0;
int frame5 = 0;
int frame6 = 0;
int frame7 = 0;This limit is distance in cm & we will be using this array to give range of distance in coding. You can play with this setting, to know what works best for you.
int limit[] = {35,30,25,20,15,10,5,0};It is delay time after each key pressed via Arduino Leonardo.
int wait = 50;These lines will calculate the distance.
long duration, distance;
digitalWrite(trigPin, LOW);
delayMicroseconds(2);
digitalWrite(trigPin, HIGH);
delayMicroseconds(10);
digitalWrite(trigPin, LOW);
duration = pulseIn(echoPin, HIGH);
distance = (duration/2) / 29.1;As we are moving video forward and backward. The sensor only knows, what is current distance. But it doesn’t know it is forward in the direction or reverse in direction. So adding a difference, which will tell the program, it is forward or backward in a direction.
diff = previous_distance – distance;Positive value of diff shows, it is in forward direction, hence video will move forward. If value is negative it means it is in backward direction.
if (diff > 0)Initially all frame start with zero. Limit[0] is 35 and Limit [1] is 30. By doing this frame1 zero & one. We are locking the frame. Otherwise it will move forward constantly, if we keep hand in front of sensor. This piece of code make sure frame lock to same distance range, move forward or backward only if another range is detected.
if (frame1 == 0){ // frame 1
if (distance <= limit[0] && distance > limit[1]) {
frame1 = 1;
frame2 = 0;
frame3 = 0;
frame4 = 0;
frame5 = 0;
frame6 = 0;
frame7 = 0;
previous_distance = distance;
Keyboard.write('1');
delay(wait);
}
}Similarly it is done for all 7 frame and backward frame. Only changes are keyboard write 1 for forward and 2 for backward.
Video:I hope you enjoyed this fun project of mine, for latest content please subscribe to my YouTube Channel. Till Then Keep Learning Keep Making.
Categories: Arduino
Tags: Arduino LeonardoFun projectleonardo projectslap projectvirtual slap project
Recent Posts- Slap Virtually with Arduino Leonardo – Fun Project April 14, 2020
- Raspberry Pi 4 Data Logger- DHT11/DHT22 Sensor Data Logger April 12, 2020
- ESP8266- Blynk Plot Sensor Readings in Live Charts & Export CSV File April 10, 2020
- ESP8266 Home Automation System by using Nodemcu Relay & Blink App April 8, 2020
- Motion Detection Automatic Light On/Off with Arduino April 6, 2020

Comments
Please log in or sign up to comment.