Hardware components | ||||||
_ztBMuBhMHo.jpg?auto=compress%2Cformat&w=48&h=48&fit=fill&bg=ffffff) |
| × | 1 | |||
 |
| × | 1 | |||
 |
| × | 10 | |||
 |
| × | 3 | |||
| × | 1 | ||||
 |
| × | 3 | |||
Software apps and online services | ||||||
 |
| |||||
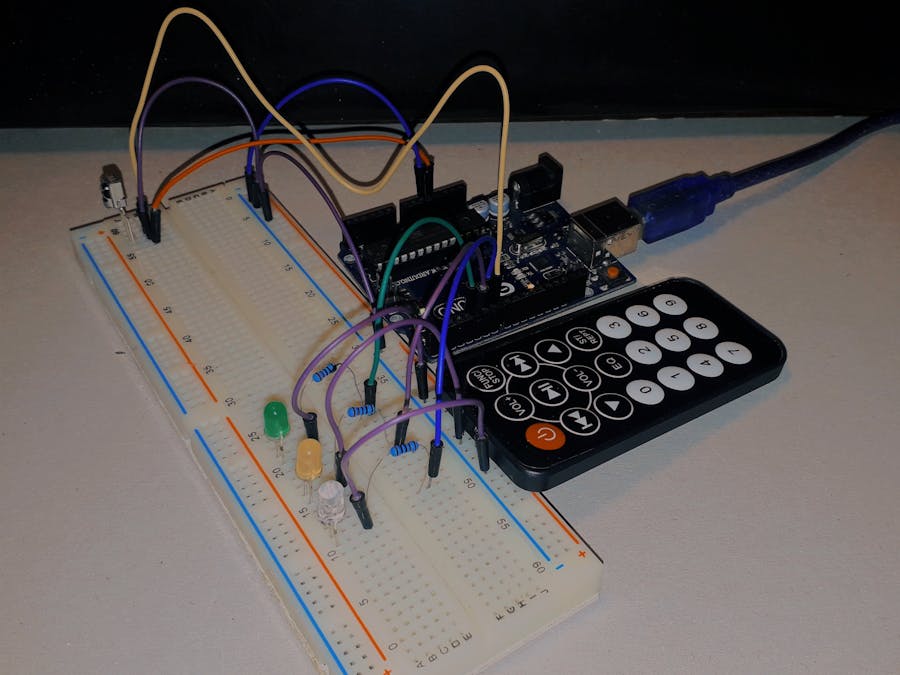
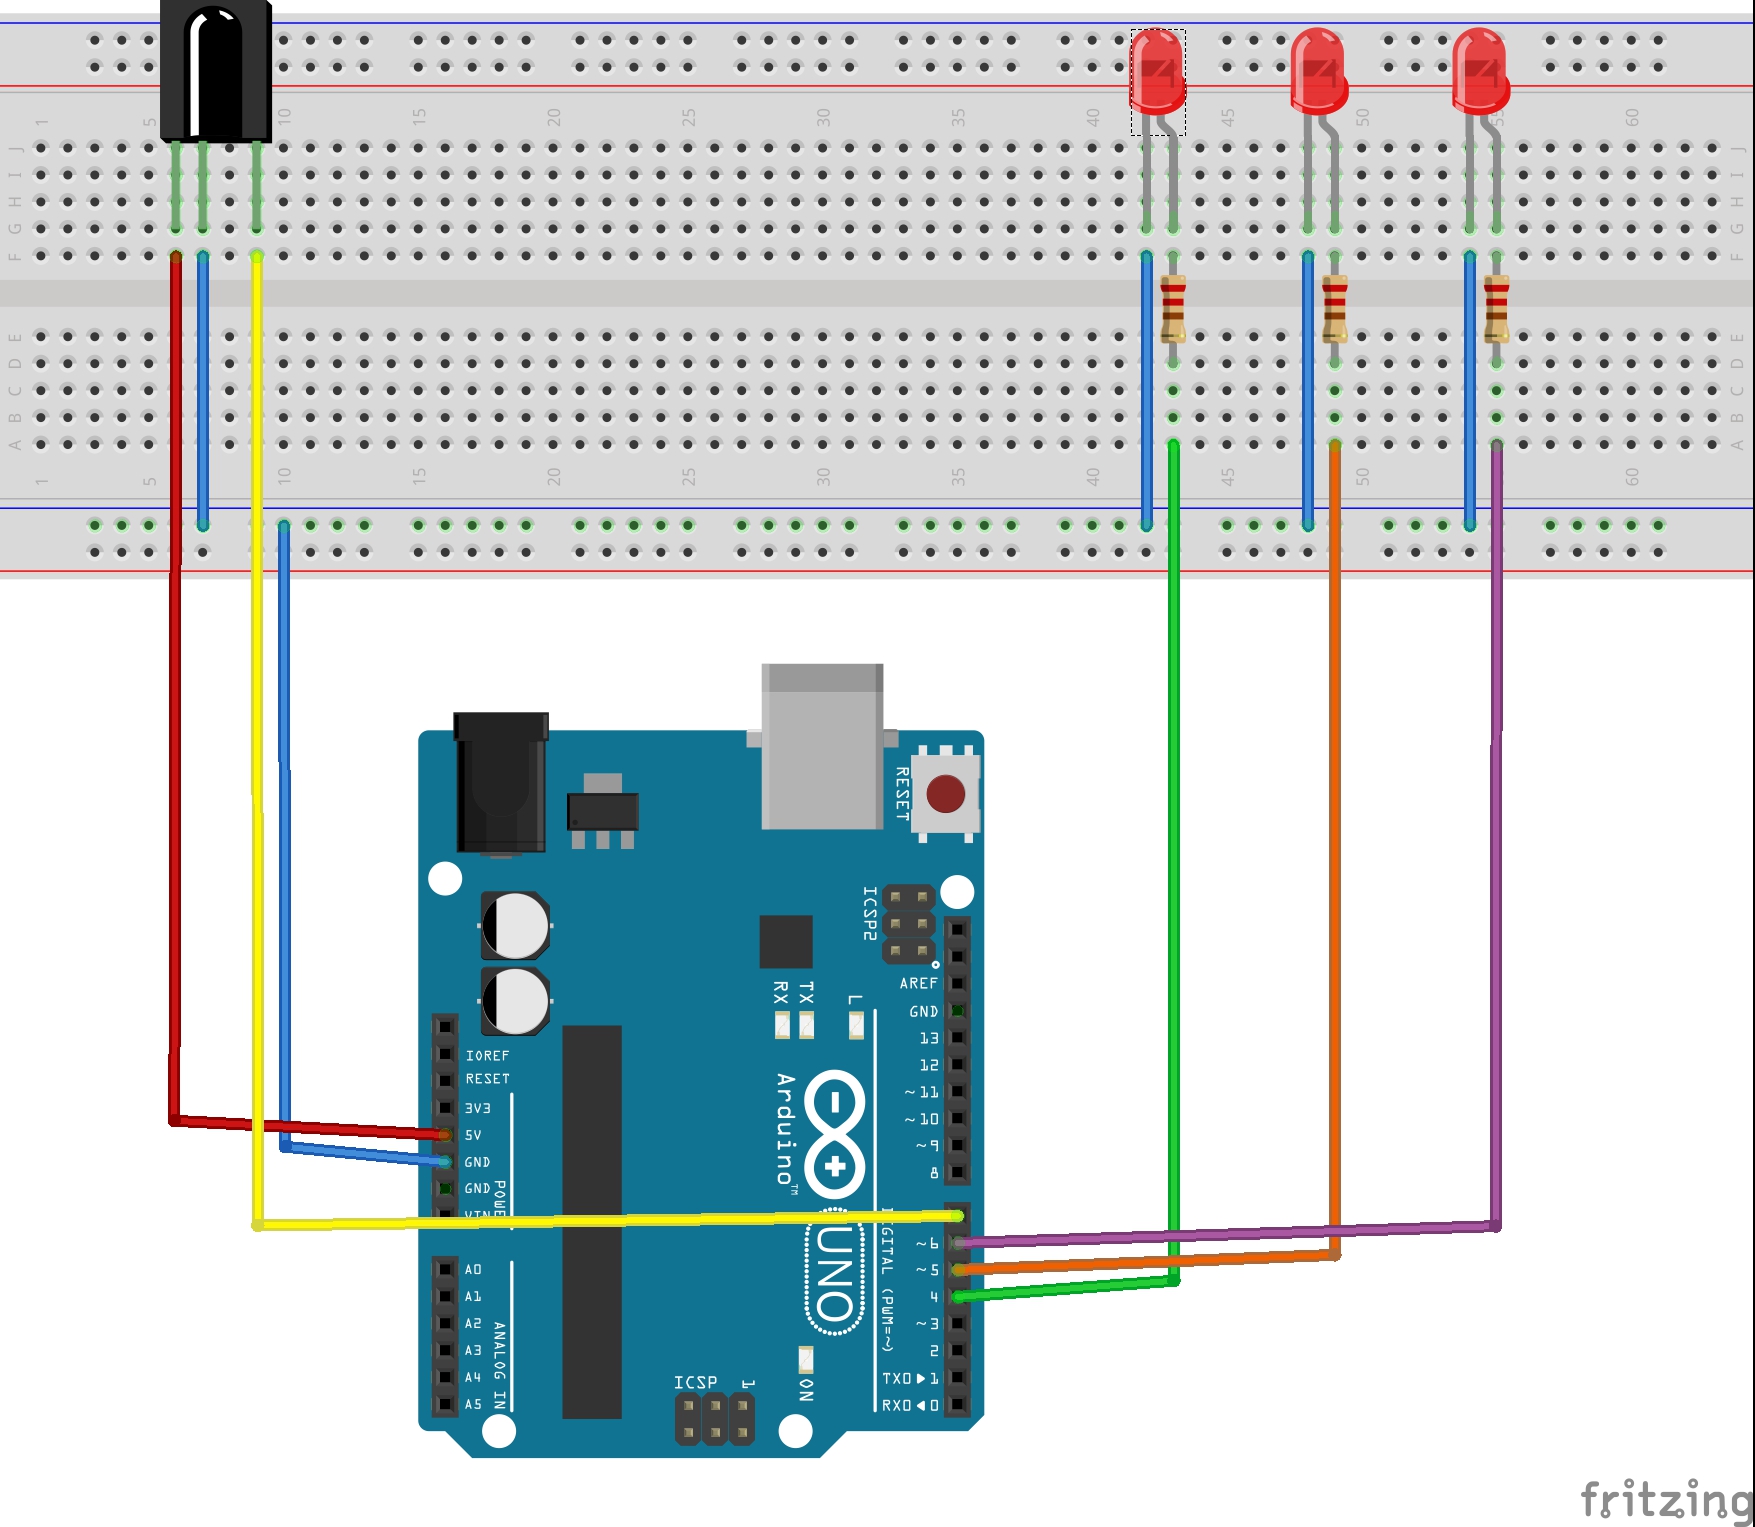
Now i'll show you how to use an IR reciever to do different things using a remote, in this case I'm turning on/off LEDs, but you can come up with something better, and modify the code a bit
IR with LEDs Manual
ArduinoIn this code, you'll have to replace the value of the button you want to use for the "0xFD08F7" on row 29, as well as in row 32 and 35.
With this code, once you press a button, an LED will turn on, and it won't turn off until you press the same button again.
If you want them to turn off automatically after a certain amount of time, I left another code after this one.
With this code, once you press a button, an LED will turn on, and it won't turn off until you press the same button again.
If you want them to turn off automatically after a certain amount of time, I left another code after this one.
#include <IRremote.h>

const int RECV_PIN = 7;
IRrecv irrecv(RECV_PIN);
decode_results results;

#define led1 4 //Associates led1 al to pin 4
#define led2 5 //Associates led2 al to pin 5
#define led3 6 //Associates led3 al to pin 6
boolean led1_est = false;  //variable that stores the state of the led
boolean led2_est = false;  //variable that stores the state of the led
boolean led3_est = false;  //variable that stores the state of the led
void setup()
{
  Serial.begin(9600);  //Initializes serial port
  pinMode (led1, OUTPUT);  //Establishes led1 as an output
  pinMode (led2, OUTPUT);  //Establishes led2 as an output
  pinMode (led3, OUTPUT);  //Establishes led3 as an output

  irrecv.enableIRIn();
}

void loop()
{
  if (irrecv.decode(&results))  //If it recieves data
  {
    Serial.println(results.value, HEX);
    irrecv.resume(); //Prepares to recieve next value
    if (results.value == 0xFD08F7) led1_est = !led1_est;  //Change here for the HEX value of your button
      //If the recieved data matches the one stored, changes the state of led1

    if (results.value == 0xFD8877) led2_est = !led2_est;//Change here for the HEX value of your button
      //If the recieved data matches the one stored, changes the state of led2

    if (results.value == 0xFD48B7) led3_est = !led3_est; //Change here for the HEX value of your button
      //If the recieved data matches the one stored, changes the state of led3

    else
    {
      Serial.println ("Invalid Code");  //If it doesnt match the stored values, it prints out "Invalid code"
    }
  }
  digitalWrite(led1,led1_est);  //Asigns led1 the state of "led1_est"
  digitalWrite(led2,led2_est);  //Asigns led2 the state of "led2_est"
  digitalWrite(led3,led3_est);  //Asigns led3 the state of "led3_est"

}
IR with LEDs Auto
ArduinoHowever, with this code, once you turn on an LED by pressing the button, it will automatically go off after 2000 miliseconds (you can change this in the code in row 25, 32, 39)
#include <IRremote.h>

const int RECV_PIN = 7;
IRrecv irrecv(RECV_PIN);
decode_results results;

#define led1 4 //Associates led1 al to pin 4
#define led2 5 //Associates led2 al to pin 5
#define led3 6 //Associates led3 al to pin 6

void setup(){
  irrecv.enableIRIn();

  pinMode(led1, OUTPUT);    //Establishes led1 as an output
  pinMode(led2, OUTPUT);    //Establishes led2 as an output
  pinMode(led3, OUTPUT);    //Establishes led3 as an output
}

void loop(){
    if (irrecv.decode(&results)){

        switch(results.value){
          case 0xFD08F7: //Change here for the HEX value of your button
          digitalWrite(led1, HIGH);
          delay(2000);
          digitalWrite(led1, LOW);
          }

        switch(results.value){
          case 0xFD8877: //Change here for the HEX value of your button
          digitalWrite(led2, HIGH);
          delay(2000);
          digitalWrite(led2, LOW);
          }

        switch(results.value){
          case 0xFD48B7: //Change here for the HEX value of your button
          digitalWrite(led3, HIGH);
          delay(2000);
          digitalWrite(led3, LOW);
          }


        irrecv.resume();
    }
}


Comments
Please log in or sign up to comment.