

Hardware components | ||||||
 |
| × | 1 | |||
 |
| × | 1 | |||
 |
| × | 2 | |||
| × | 1 | ||||
| × | 1 | ||||
 |
| × | 1 | |||
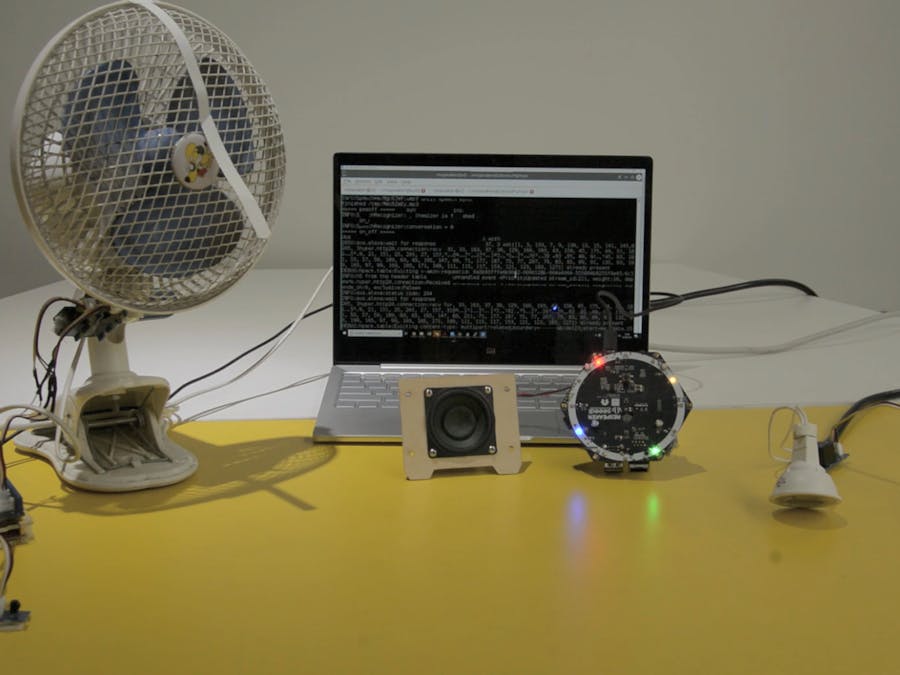
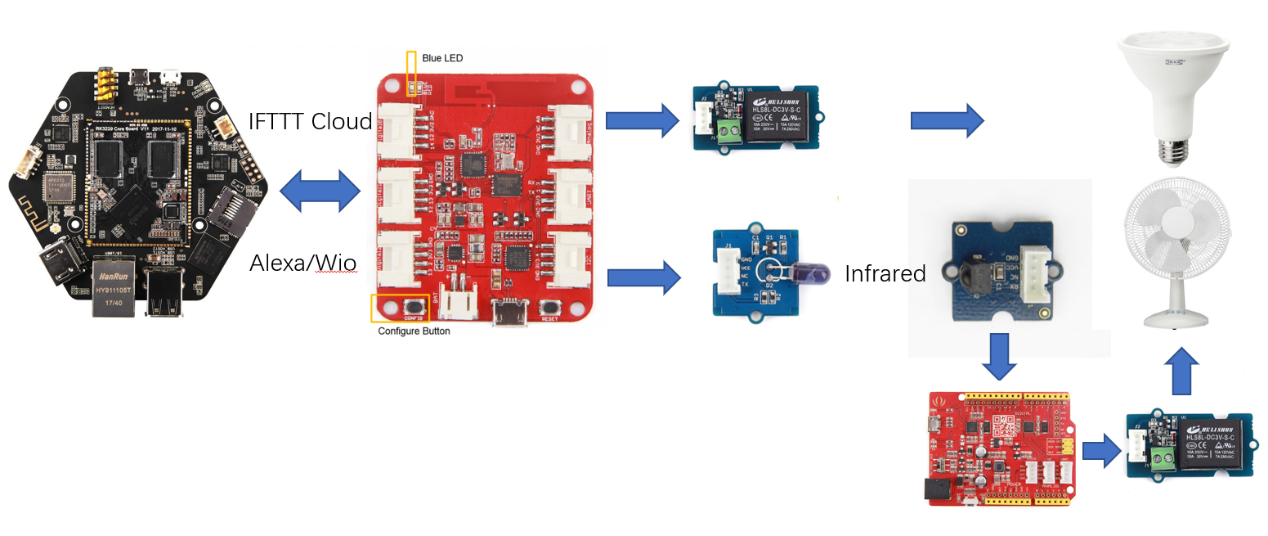
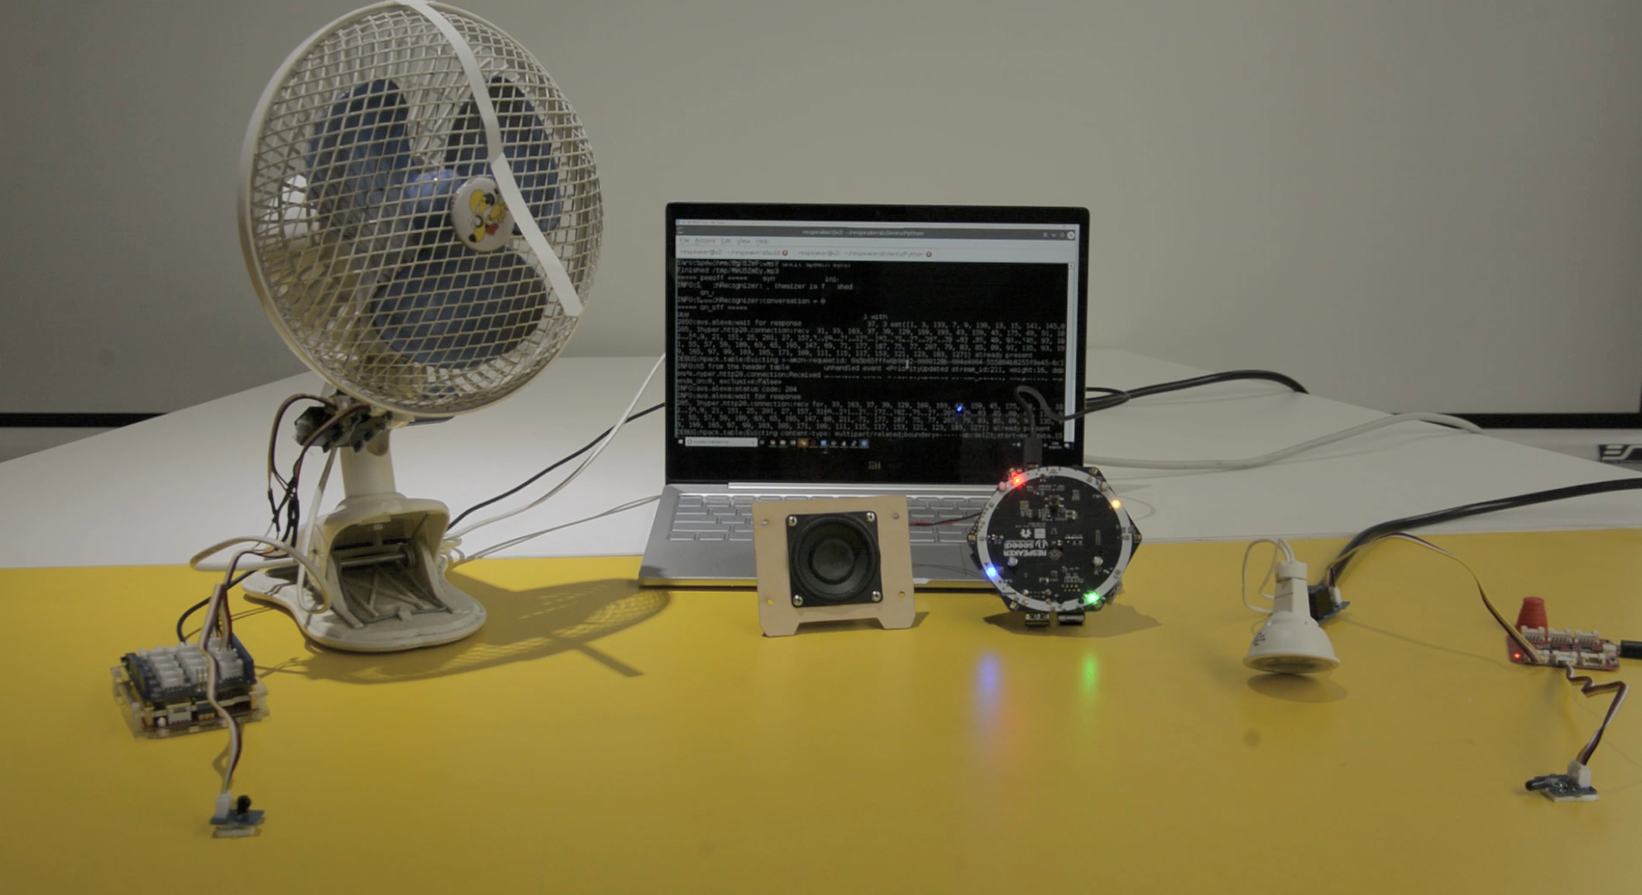
In this project, we use the ReSpeaker Core v2.0 and Wio Link to control a light and fan via IFTTT. We connect the light through Grove-delay to Wio Link and fan through Grove-Infrared_Receiver to Grove-Infrared_emitter attached to Wio Link. So, we can define the infrared sending info through API. We can also use the infrared to control the air conditioner/TV.
Hardware ConnectionA. Install Alexa on ReSpeaker Core v2.0
1. Preparations
System Upgrade
The system running on ReSpeaker v2 should be upgraded to version 20180107 or later, as from that version on, many fixes for PulseAudio configuration have been applied.
Download link: https://v2.fangcloud.com/share/7395fd138a1cab496fd4792fe5?folder_id=188000179754
You can back up your workspace to the onboard eMMC. If your onboard eMMC isn't formated, format it via fdisk and mount it.
librespeaker
librespeaker is distributed via Debianapt (stored in Seeed's repo), installation of librespeaker is as easy as the following:
$ sudo apt install librespeaker
To know more about librespeaker, please see the documentation: http://respeaker.io/librespeaker_doc
Audio Configurations
Though all the configurations are properly done within the system image, we recommend double checking the configurations of your system, especially when you've changed something from the default.
First, ALSA configurations:
a. Make sure there's no self-defined asound.conf in /etc/asound.conf.
b. Check the volume settings for the playback and capture devices:
$ sudo alsamixer
Tune it like this:
Then save the configuration permanently.
$ sudo alsactl store
After this, check the PulseAudio configurations of your system.
c. Make sure there's no self-defined client.conf in ~/.config/pulse/. You may simply delete the directory:
$ rm -rf ~/.config/pulse
d. Make sure that udev-detect module is enabled:
$ pactl list modules|grep -n3 udev
If you see the following printings, it is loaded.
42-
43-
44-Module #5
45: Name: module-udev-detect
46- Argument:
47- Usage counter: n/a
48- Properties:
e. Make sure there's no manually added ALSA devices in /etc/pulse/default.pa. All the sound devices should be discovered by the udev-detect module. If you have never touched this file, ignore this step.
Now restart PulseAudio with:
$ pulseaudio -k
This command kills the PulseAudio demon, but PulseAudio will auto-spawn itself. Now connect to the GUI of the system via VNC, try recording with Audacity. If you have no problem in recording and playing, the preparations are done.
2. Run ReSpeaker
$ cd ~
$ git clone https://github.com/respeaker/respeakerd.git
$ cd respeakerd/build
$ chmod a+x respeakerd
$./respeakerd -debug -snowboy_model_path="./resources/snowboy.umdl"-snowboy_res_path="./resources/common.res"-snowboy_sensitivity="0.4"
The program will pause on the printings like:
From vep_amix_init() for (complex_t*)vobj->amix->out[i]allocated 1024 bytes, flagsVCP_MEM_AMIX, reg: 0, total: 2048
From vep_amix_init() for (complex_t*)vobj->amix->out[i]allocated 1024 bytes, flags VCP_MEM_AMIX, reg: 0, total: 1024
From vep_amix_init() for (complex_t*)vobj->amix->out[i]allocated 1024 bytes, flagsVCP_MEM_AMIX, reg: 0, total: 0
That's OK, let's go ahead to the set up of the Python client. Please do not close the terminal.
Note: If you're having any issues running this application, try to re-compile it with the instructions here.
3. Run Python Client
Open another terminal.
$ cd ~/respeakerd/clients/Python
$ sudo pip install avs pixel_ring voice-engine
$ sudo apt install python-mraapython-upm libmraa1 libupm1 mraa-tools
Authorize Alexa with your Amazon account:
$ alexa-auth
Now connect to the GUI desktop of the ReSpeaker's system via VNC, open the built-in browser, visit http://127.0.0.1:3000, and do the OAuth.
Now run the demo:
$ python demo_respeaker_v2_vep_alexa_with_light.py
The hotword is snowboy.
Configure Alexa and Wio on IFTTT1. Set Up Wio Link Through Wio APP 
Follow Wio Link Get Starting to connect Grove-Relayon the D0 port, Grove-Infrared Emitter on D1 setup Wio APP.
2. Set Up IFTTT 
Step 1: Sign up for a IFTTT account.
Step 2: Select MyApplets
Step 3: Select NewApplet
Step 4: Click +this
Step 5: Select amazonalexa and log in to the same Amazon account as ReSpeakerCore v2.0.
Step 6: Select Say a specific phrase
Step 7: Enter lower case characters keyword light on and then click CreateTrigger
Step 8: Click +that
Step 9: Choose SeeedWio as action service
Step 10. Select on, off or trigger Grove
Step 11: Select correct online Grove module and on as do
Step 12. Follow Step 3 ~ Step 11 to add the off function
Step 13. Follow Step 3 ~ Step 10 and then drive any Grove with API to add fan on and off functions
Step 14: Select data_hex and configure the first parameter and make sure it matches with Seeeduino code
We connect Grove-Relay to digital port 4 and Grove-Infrared Receiver to digital port 2 of base shield. Download the IRSendRev-master library from GitHub. Copy and paste the code below to Arduino IDE. Please refer to http://wiki.seeedstudio.com/Grove-Infrared_Receiver for more details.
/*
* IRremote: IRrecvDemo - demonstratesreceiving IR codes with IRrecv
* An IR detector/demodulator must be connectedto the input RECV_PIN.
* Version 0.1 July, 2009
* Copyright 2009 Ken Shirriff
*/
#include<IRremote.h>
intRECV_PIN = 2;
IRrecvirrecv(RECV_PIN);
decode_resultsresults;
voidsetup()
{
Serial.begin(9600);
// In case the interrupt driver crashes on setup, give a clue
// to the user what's going on.
Serial.println("Enabling IRin");
irrecv.enableIRIn(); // Start the receiver
Serial.println("Enabled IRin");
pinMode(5, OUTPUT);
}
voidloop() {
if (irrecv.decode(&results)) {
Serial.println(results.value, HEX);
if(results.value == 0X0000FFFF) {
digitalWrite(5, HIGH);
Serial.print("turn fan on");
}
if(results.value == 0XF000000F) {
digitalWrite(5, LOW);
Serial.print("turn fan off");
}
irrecv.resume(); // Receive the next value
}
delay(100);
}
Final Interaction1. Let’s say, “Snowboy, what is your favourite fruit?” to interact with Alexa.
2. Let’s say, “Snowboy, Alexa trigger light on” and the light will turn on.
3. Let’s say, “Snowboy, Alexa trigger light off” and the light will turn off.
4. Let’s say, “Snowboy, Alexa trigger fan on” and the fan will turn on.
5. Let’s say, “Snowboy, Alexa trigger fan off” and the fan will turn off.


Comments