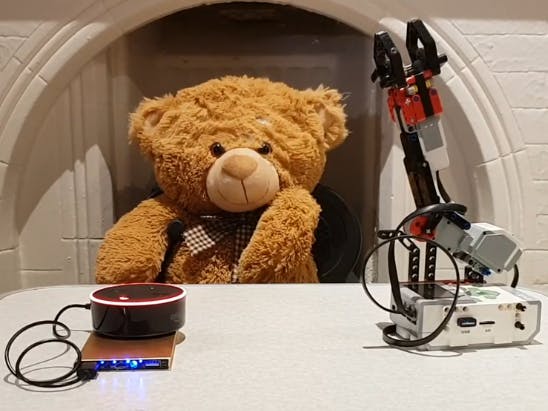
This project using the EV3 and the Alexa framework to build a semi-autonomous voice controlled robotics arm. Check out the build instruction in schematic to assemble the robotics arm.
Setting Up Alexa Skill
First I need to setup the Alexa command via Alexa Developer Console. Create a custom skill and chose Alexa-Hosted as we going to use Node.js as the backend framework to communicate EV3 with Alexa.
Next, go to model.json in the side tab and import in the the model.json file from the repo. Use this link .
Once the model is imported. Save and build the model. Next we need to modify the index.js file. This file is the Alexa implementation. It handle the user voiced input and send command/data to the EV3. Below is an example of a index.js method for opening claw.
const OpenIntentHandler = {
    canHandle(handlerInput) {
        return Alexa.getRequestType(handlerInput.requestEnvelope) === 'IntentRequest'
        && Alexa.getIntentName(handlerInput.requestEnvelope) === 'ClawOpen';
},
    handle: async function (handlerInput) {
    // get the slot values from the intent request
    const request = handlerInput.requestEnvelope;
    const location = Alexa.getSlotValue(request, 'ClawOpen');
    // get the endpoint of the EV3 robot
    const endpointId = await getEndpointID(handlerInput);
    console.log(`endpointId: ${JSON.stringify(endpointId)}`);
    // get the persistent attributes
    const attributesManager = handlerInput.attributesManager;
    var s3Attributes = await attributesManager.getPersistentAttributes() || {};
    if (Object.entries(s3Attributes).length === 0)
    s3Attributes = DEFAULT_PERSISTENT_ATTRIBUTES;
    console.log(JSON.stringify(s3Attributes));
    const directive = Util.build(endpointId, NAMESPACE, NAME_CONTROL,
    {
        type: 'open',
        state: s3Attributes.robot.state,
        location: location_fixed,
    });
    return handlerInput.responseBuilder
        .addDirective(directive)
        .getResponse();
    }
};
You must go to the Code section on the side Tab and copy the index.js from the repo into the Alexa Developer Console. Use the link below to go to index.js.
https://github.com/shiuday658/LegoArm/blob/master/AlexaSkill/index.js
Finally, save and deploy the new code onto the Amazo Dot.
Gadget Code
First, we need to set up Alexa Gadget in Alexa Console Developer and then copy the output Amazon ID and Alexa Gadget Secret into the main.ini
For code development environment, I am going to use VS2017 with the ev3dev-browser sdk.
Edit the main.py with the following code or copy and past it from the repo.
https://github.com/shiuday658/LegoArm/blob/master/main.py
import time
import json
from math import *
# import the navigation functions for the robot
from navigation import *
# import the Alexa Gadgets Toolkit so the robot can communicate with an Alexa device
from agt import AlexaGadget
# import the required libraries to interface with the EV3 hardware components
from ev3dev2.motor import LargeMotor, MediumMotor
from ev3dev2.sensor.lego import ColorSensor, InfraredSensor
from ev3dev2.led import Leds
# a basic class to handle PID control behavior
class PID:
kp, kd = 0, 0
e0 = 0
def __init__(self, kp=0, kd=0):
self.kp = kp
self.kd = kd
def calculate(self, e):
v = self.kp * e + (e - self.e0) * self.kd
self.e0 = e
return v
# main class that handles all of the robot behaviors controlled through the Alexa Skill
class Robot(AlexaGadget):
def __init__(self):
super().__init__()
# initialize all of the motors
print('Initializing devices')
self.leds = Leds()
self.motor_hand = LargeMotor(address='outA')
self.motor_claw = MediumMotor(address='outC')
# called when the EV3 brick connects to an Alexa device
def on_connected(self, device_addr):
self.leds.set_color('LEFT', 'GREEN')
self.leds.set_color('RIGHT', 'GREEN')
print("{} connected to Echo device".format(self.friendly_name))
# called when the EV3 brick disconnects from an Alexa device
def on_disconnected(self, device_addr):
self.leds.set_color('LEFT', 'BLACK')
self.leds.set_color('RIGHT', 'BLACK')
print("{} disconnected from Echo device".format(self.friendly_name))
# the function called to receive gadget control directives from the Alexa Skill through the connected Alexa device
def on_custom_mindstorms_gadget_control(self, directive):
# decode the directive payload into a JSON object
payload = json.loads(directive.payload.decode("utf-8"))
print("Control payload: {}".format(payload))
# determine which command to be executed
control_type = payload['type']
if control_type == 'OpenClaw':
# get the source and destination states for this command
src_state = State[payload['state']]
self.motors_claw.on(20)
time.sleep(2)
self.motors_claw.off(brake=True)
elif control_type == 'CloseClaw':
# get the source and destination states for this command
src_state = State[payload['state']]
self.motors_claw.on(-20)
time.sleep(2)
self.motors_claw.off(brake=True)
elif control_type == 'ClawUp':
# get the source and destination states for this command
src_state = State[payload['state']]
self.motors_hand.on(20)
time.sleep(2)
self.motors_hand.off(brake=True)
elif control_type == 'ClawDown':
# get the source and destination states for this command
src_state = State[payload['state']]
self.motors_hand.on(-20)
time.sleep(2)
self.motors_hand.off(brake=True)
elif control_type == 'ClawDance':
# get the source and destination states for this command
src_state = State[payload['state']]
while(danceflag == 1):
self.motors_hand.on(20)
time.sleep(2)
self.motors_hand.on(-20)
self.motors_hand.off(brake=True)
# move the robot straight back at a certain speed for a certain number of rotations
def move_back(self, speed=0.2, distance=1.6):
self.motor_left.on_for_rotations(round(speed * 100),
distance,
block=False)
self.motor_right.on_for_rotations(round(speed * 100), distance)
# turn off all motors and lights
def poweroff(self):
self.motor_hand.off(brake=False)
self.motor_claw.off(brake=False)
# called at program startup
def main():
# create a robot instance
robot = Robot()
# run the main function to handle Alexa Gadget code
robot.main()
# poweroff after the execution has been completed (or program exited)
robot.poweroff()
if __name__ == '__main__':
main()
Now, yo must connect your EV3 with your home wireless network and then enable bluethoon on EV3 via it controlled interfaced.
Once everything is setup , click on the Send workspace to the device. The code should now be compile on your EV3
Finally pair your Alexa with your EV3 device and everything should be ready
Demo


Comments