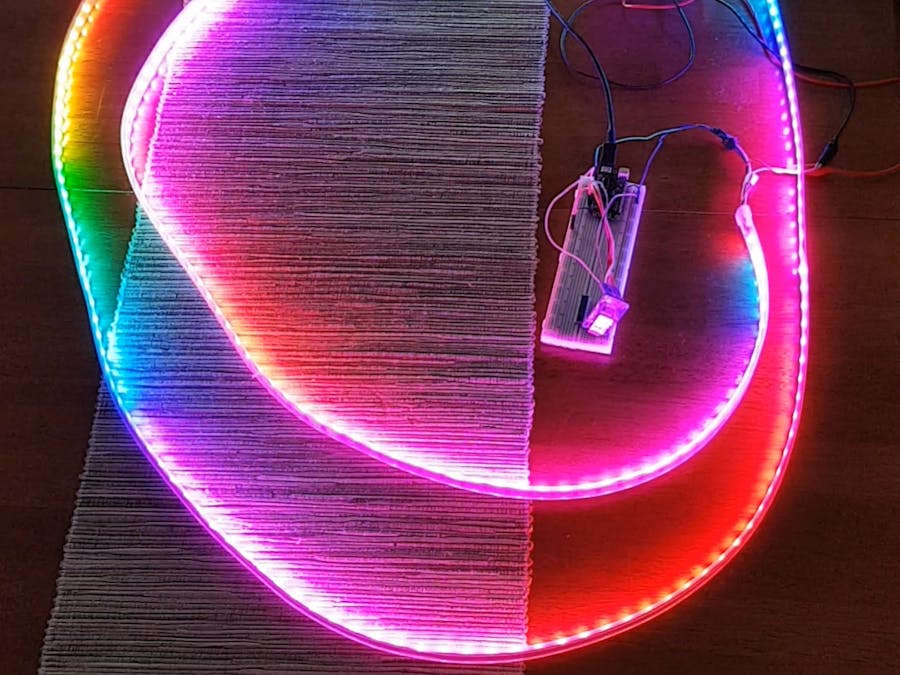
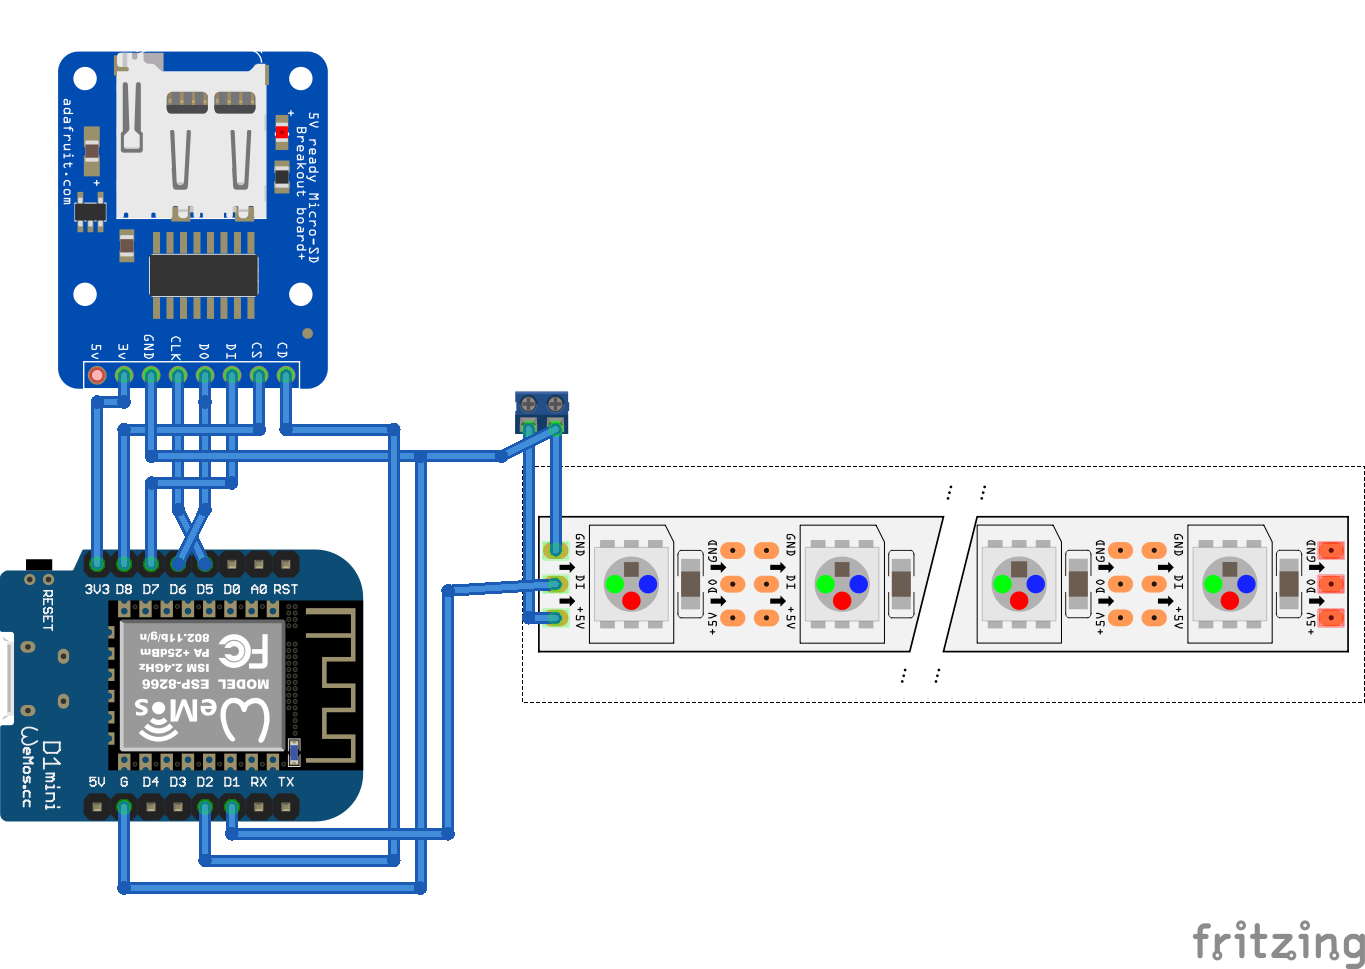
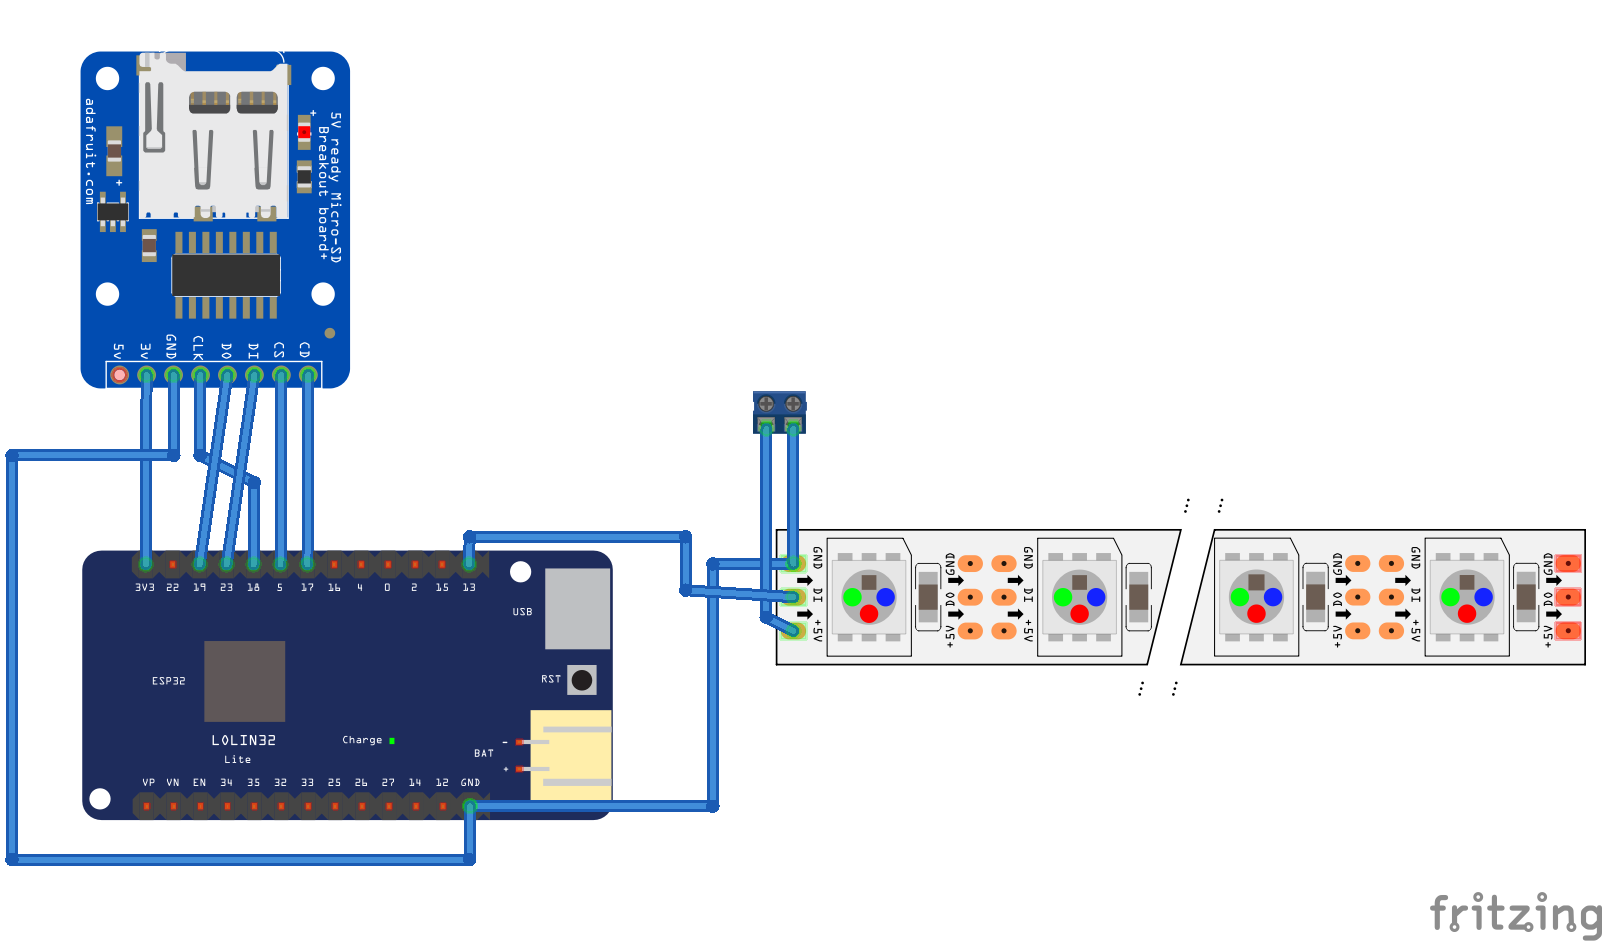
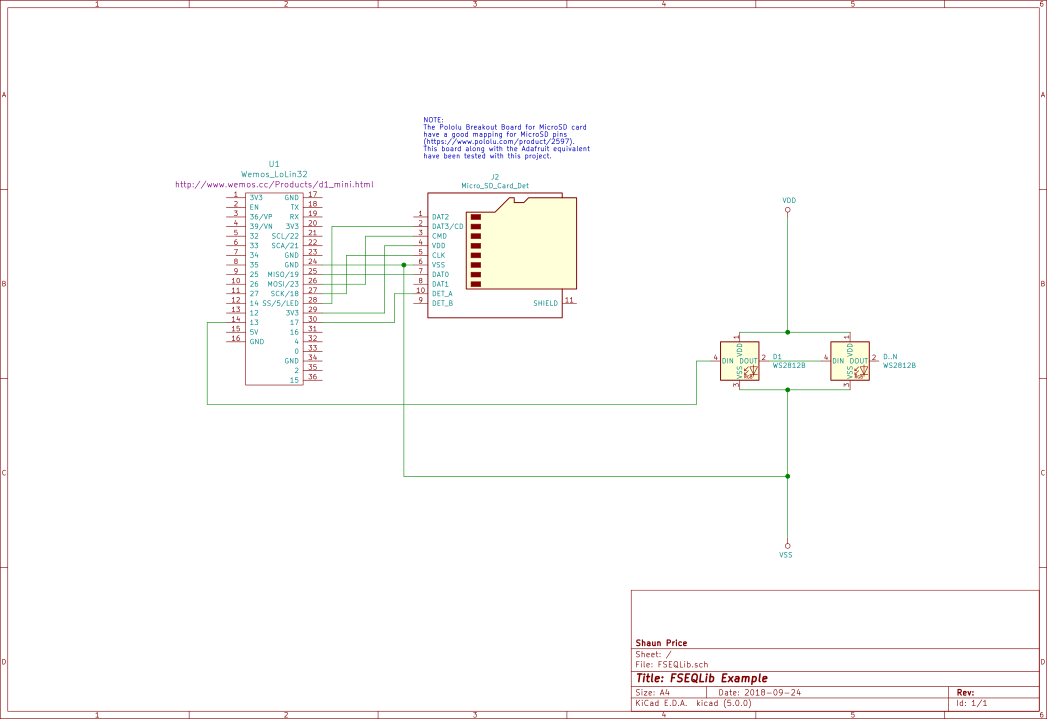
You're going to need a couple of things to get started as follows:
- 1 x ESP32 or an ESP8266 board. I used the Wemos Lolin32 Lite (ESP32) and a Wemos D1 R2 mini (ESP8266) but Arduino compatible boards will work as long as they are fast enough.
- 1 x microSD card reader. I've tested is with the [Adafruit MicroSD card breakout board] (https://www.adafruit.com/product/254) and the Polulu Breakout Board for MicroSD Card.
- 1 x microSD card
- 1 x LED light strip. The example uses a strip of WS2811/WS2812's but the Xlights FSEQ file jus supplies the colour values and is not specific to any lights.
- 1 x FSEQ file. The open source and free Xlights program generates these files when it saves sequences. The standard Arduino file does not support long filenames so you'll need to rename it into the 8.3 format. As an example, I renamed my file from single.fseq to show.dat.
Note: If you wish to play the FSEQ as in the example project you'll either need to save the FSEQ file in uncompressed format (V1 or V2 Uncompressed) or implement the decompression function in your code. The version settings for the sequences are set in [File][Preferences] on the Sequences tab as shown below.
Start by download the library and example code from GitHub (https://github.com/ShaunPrice/FSEQLib). If you download the GitHub repository as a zip file you can use the Arduino IDE to load the library as a zip file. The examples will appear in your Arduino Examples.
Install it using the Arduino Library manager and install it using the IDE ("Sketch" -> "Include Library" -> "Add.ZIP Library..."
Select the Zip file you just downloaded from GitHub.
Now the FSEQLib library is installed you can open the example application.
Don't forget to select your development board and the COM port for you development board.
For more information, see https://www.arduino.cc/en/Guide/Libraries
Next, check that you SPI pin's used to read the data from the SD card are correct. The SD Card VSPI PINS on the Wemos Lolin32 Lite (ESP32) card are as follows:
SCLK = 18
MISO = 19
MOSI = 23
SS = 5
The SD Card SPI PINS on the Wemos D1R2 mini (ESP8266) card are as follows:
SCLK = D5/GPIO 5
MISO = D6/GPIO 12
MOSI = D7/GPIO 13
SS   = D8/GPIO 15
If you're using the card detect pin you'll also need to define it. You may need a 10k pull-up resistor connected to this pin to make sure it goes high. The Card Detect (CD) pin gets pulled to ground when there's no card inserted but it will be floating if there's no pull-up resistor (resistor connected to positive).
The Card Detect (CD) pin is defined as follows in the example:
For the ESP8266:
#define CARD_DETECT_PIN D2For the ESP32:
#define CARD_DETECT_PIN 17Check that you have the correct number of nodes/pixels per strip defined and if you're using universes in the example make sure they're also defined. The example uses only one universe (output) but can be configured to use more.
Finally, you'll also need to tell the FastLED,Adafruit Neopixel or other library which pin you're using and how many LED's/Nodes/Pixels are on that pin. I've used both the FastLED, Adafruit and sent the data via a second SPI interface to an FPGA. The example uses the FastLED libraries.
The Card Detect (CD) pin is defined as follows in the example:
For the ESP8266:
#define DATA_PIN_1 D1For the ESP32:
#define DATA_PIN_1 13You'll also need to configure your lights with the following defines:
Name of the FSEQ file to play:
#define FSEQ_FILE "/show.dat"Universes aren't really defined here but I use the term to define the // number of times I want to split up the sequence step channels into.
#define UNIVERSES 1Number of Nodes/Pixels. The example below is 240 pixels (4 meters of 60 per meter WS2812/Neopixel).
#define NUM_NODES 240Compile the example code and upload it to the ESP8266 or ESP32.
Next, follow the Xlights process below to create you sequence file, rename it and copy it to the MicroSD card that you'll run on the ESP8266, ESP32 or other board.
If it's not working change the following line in the example to turn debug on as shown. Don;'t forge to recompile and upload again.
#define DEBUG 1 // 0=OFF, 1=SerialYou'll be able to see the FSEQ header and any error messages in you Serial terminal.
Don't forget to set debug off and recompile and upload when your finished.
#define DEBUG 0 // 0=OFF, 1=SerialDownload Xlights from https://xlights.org/ and install it.
Set up the Xlights show directory or use the default. You'll need to know where this directory is located later.
Add a Null lighting network
Set the number of channels to three times the number of nodes or pixels. Three times because each node or pixel has three LED's (Red, Green and Blue) and each channel represents an LED.
Click on Save Setup to save the Lighting Network.
Go to the Layout tab and select the String icon as shown.
Draw the string then update the Nodes/String setting to the number of nodes or pixels your string has. The end channel will update to the correct number of channels for the number of nodes entered.
Next select the sequence tab and then create a new sequence by clicking the icon show.
In the dialogue box that displays click on Animation.
Select the frame rate you want or select custom. The video shown uses custom with a frame rate of 50fps (20mS). The higher the frame rate the smoother the display will be but you'll limit the number of pixels you can display. I had no issues with 240 on either the ESP32 or ESP8266.
On the next dialogue page click on Quick Start.
Your sequence is now ready to add effect to. A new line named single line is now available. Left click and drag the desired effect to it. I used the butterfly effect.
Left click the end of the line and drag it to the time you want it to end. You may also need to drag the start to the where you want it to start. You can use multiple effects one after the other of even overlay-ed on each other. Check out the Xlights tutorials linked to in the getting help section below to find out how.
Save your sequence. You can also clock on the Xlights play button (show below) to test them in the preview.
Now open the show folder you set at the start and you should have a file ending in .fseq. This is the file you need to copy to the MicroSD card and rename to the value you defined for the filename in the #define FSEQ_FILE shown below.
#define FSEQ_FILE "/show.dat"Note that you need to rename the FSEQ file to the 8.3 format if you're not using a file system library that uses long file names (e.g. this_is_a_long_file_name.fseq could be renamed to short.fsq). The example uses the default FS library with doesn't support long file names.
Getting Help on LED lighting and XlightsI recommend:
- AusChristmas Lighting (https://auschristmaslighting.com/forums/)
- Adafruit's The Magic of NeoPixels (https://learn.adafruit.com/adafruit-neopixel-uberguide/the-magic-of-neopixels)
- Xlights/Nutcracker Wiki (http://www.nutcracker123.com/wk/index.php?title=Main_Page)
- For Vixen users, the code does work with files exported from Vixen as FSEQ. The dummy nodes won't work as nothing gets exported other than the header. I found setting the controller to Generic Serial is the best option.
- If you're a C++ programmer you might have noticed that the library has some compile time directives to see if it's being compiled for Arduino. That's because I also use the library in a Windows command line application for testing that's compiled with Visual Studio. The code for the Command Prompt executable is in the code section.


Comments
Please log in or sign up to comment.