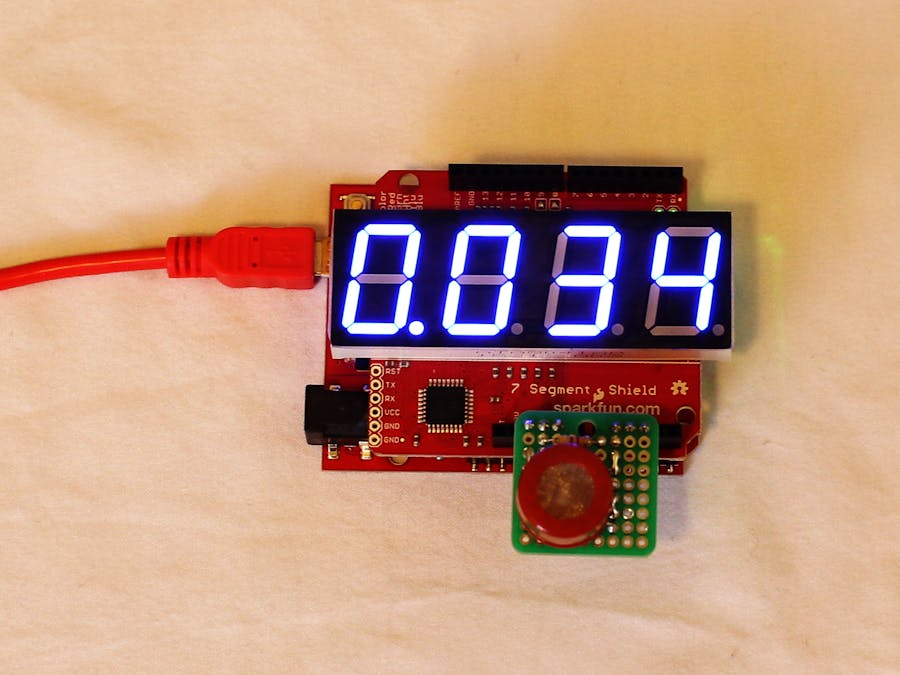
The MQ-3 sensor is a tin oxide sensor that can detect alcohol (the drinking kind) particles in the air. We can use an Arduino to calculate the user's blood alcohol content (BAC) and display it on a 7-segment display. While it could be a neat party trick, it is also useful for letting people know if they should drive home.
Disclaimer: The alcohol sensor used was not calibrated (see the datasheet for that) and is not very accurate. I am not responsible for it being off. It is not a substitute for a police officer's breathalyzer.
Step 1: Gather Components
You will need an Arduino, a 7-Segment display, an alcohol sensor, a protoboard, a resistor, some wire, and a USB cable. See the components in the Hardware section for what to buy.
Step 2: Construct the Shield
Solder the 7 Segment Display to the OpenSegment Shield. Solder the stackable headers to the OpenSegment Shield.
Step 3: Attach the Alcohol Sensor
Solder the alcohol sensor to the gas sensor breakout board. It does not matter which way the sensor goes in (A1, B1, H1, and GND can be rotated 180°). Just make sure that the silkscreen markings are facing down, away from the sensor (i.e. you can still read them once the sensor is soldered to the board).
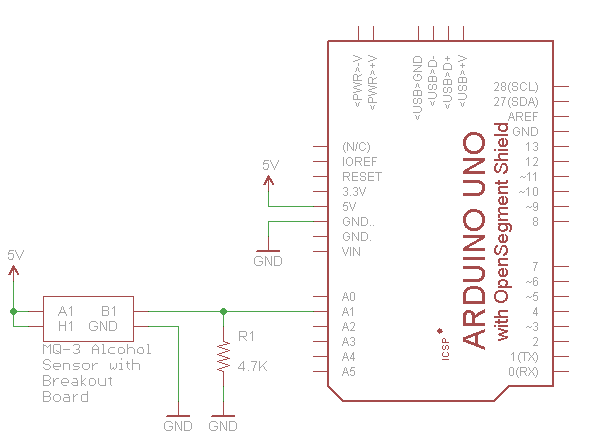
Solder a 4.7k Ω resistor from B1 to GND.
Solder A1 and H1 together.
See the schematic for more information.
Step 4: Combine the Components
Attach the OpenSegment Shield to the Arduino. Connect the alcohol sensor to the Arduino with the following:
- A1 and H1 (sensor) → 5V (Arduino)
- B1 (sensor) → A1 (Arduino)
- GND (sensor) → GND (Arduino)
Step 5: Power and Upload Code
Connect a USB cable from your computer to the Arduino. Upload the code from the GitHub repository below. Wait 5-10 minutes before taking a reading, as the sensor needs to heat up. Some people recommend letting the sensor "burn in" (leaving it on) for 48 hours before taking a reading.
Use a steady, 5-second "whistle blow" (like you are blowing out birthday candles) directly into the sensor with your face about 2 inches from the sensor. This seems to give the most accurate reading.
Step 6: Show It Off!
Tape/nail/staple the display on your wall at your next event and hang the cheat sheet next to it (you might have to modify it so it reflects your State/Country's legal limits).
How We Compute BAC
As it turns out, there is no easy way to compute BAC from the alcohol sensor. If we look at the 5th page of the MQ-3 datasheet, we can see that there is a curve that maps parts per million (PPM) of alcohol to a voltage at B1 (assuming a 4.7k Ω resistor from B1 to GND).
We used a polynomial regression tool (like this one) to fit a 5th order polynomial to several points taken from the curve (read manually - lots of opportunity for error). As a result, we got this equation (v is voltage):
PPM = 150.4351049*v^5 - 2244.75988*v^4 + 13308.5139*v^3 -39136.08594*v^2 + 57082.6258*v - 32982.05333
We used Excel to create a list of ADC values (in the Arduino, that ranges from 0 - 1023) and their associated voltages (0 - 5V). In the next column, we computed the PPM from the voltages.
Finally, we can convert PPM to BAC with
BAC = PPM / 2600
thanks to the table on the 2nd page of this datasheet (BAC to PPM).
Unfortunately, that creates many negative and impossibly high BAC values. Since the MQ-3 cannot handle PPM under about 70 and above about 500, we simply say that everything under 70 PPM is BAC = 0.000 and anything over 500 PPM is ERROR.
All valid BAC values were copied into a lookup table (BAC_Lookup.h) in the Arduino code. Any analog-to-digital (ADC) value from pin A1 over 410 (voltage of 2.004 V) has 410 subtracted from it and its corresponding value in the table is displayed. Any ADC value over 859 (voltage of 4.198 V) simply displays "E.EEE" to show that the sensor is outside its operating range.
The Excel table can be found here:


_3u05Tpwasz.png?auto=compress%2Cformat&w=40&h=40&fit=fillmax&bg=fff&dpr=2)
Comments