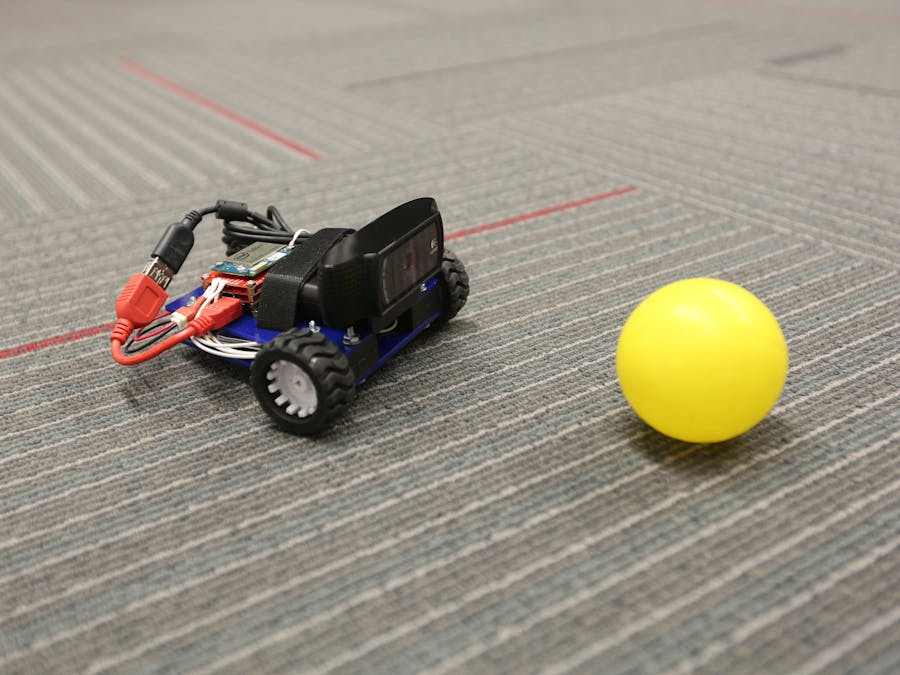
EdiBot 2.0 is an update to the original EdiBot and uses fewer components, which results in a much smaller robot. EdiBot 2.0 can be seen in action in the video below:
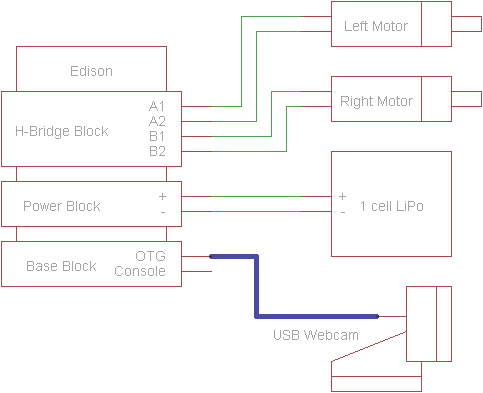
Step 1: Solder ConnectionsCut 4x 6 inch lengths of stranded wire (~22AWG). Strip and tin the ends. Solder one set of ends to the motors.
Solder the other ends of one motor to A1 and A2 and the wires from the other motor to B1 and B2 of the H-Bridge Block.
Update [9/20/16]: You will also need to close the VSYS->VIN jumper with solder.
Cut, strip, and tin 2x 1 inch wires. Solder the wires to a JST connect, and solder the other ends to the + and - terminals of the Power Block. Make sure that the JST key is facing up (where "up" is toward the Edison in the Block stack).
Using the Hardware Pack, attach the Edison to the H-Bridge Block. Then attach the H-Bridge Block to the Battery Block, and finally,
attach the Base Block on the bottom of the stack. Note the double standoffs under the Base Block. Here is the order:
- Edison
- H-Bridge Block
- Power Block
- Base Block
Using a laser engraver/cutter, cut out the chassis plates (see attachments).
Put the motors into the enclosures and attach the wheels.
Attach the Edison Block stack using the M2 screws, and attach the webcam using the 1/4-20 screw to the top plate.
Use the hardware in the Ball Caster kit to attach the caster to the bottom plate (do not use any of the provided spacers).
Using the Velcro straps, tie down the battery and webcam.
Put the 4-40 screws through washers and then through the bottom plate, sticking up. Put the motor enclosures over the front set of screws and spacers over the back screws.
Put the top plate on the screws. Add washers and secure with nuts. Note that you might have to undo the Velcro on the webcam to get to the screws.
Attach USB OTG cable to Edison's OTG port and connect the webcam. Secure the bundle of USB cable under the webcam's Velcro strap.
Download and unzip the Latest Yocto Poky Image from the Edison downloads page.
Follow this guide to update the Edison using the Phone Flash Tool Lite.
Once the Edison has been successfully updated, follow this guide to configure it and connect it to a WiFi network.
Note: for these programming steps, you'll want to use a serial connection via the "Console" port on the Base Block.
Step 6: Install OpenCVWe will use Alex_T's unofficial Edison repositories to install OpenCV. To do that, get a terminal to the Edison over a Serial connection and modify the base-feeds file:
vi /etc/opkg/base-feeds.conf
Press 'i' to go into insert mode. Copy the following contents and press shift + insert to paste them.
src/gz all http://repo.opkg.net/edison/repo/all src/gz edison http://repo.opkg.net/edison/repo/edison src/gz core2-32 http://repo.opkg.net/edison/repo/core2-32
Press esc and enter :wq
to exit vi. Run the command:
opkg update
and the Edison should download the lists of packages. Install OpenCV with:
opkg install opencv-dev opencv-staticdev libopencv-core-dev
Then, we want to install the python OpenCV wrappers:
opkg install python-opencv
This may take some time, so be patient.
Step 7: Download the Ball_Chase programWe'll grab the program right from GitHub:
wget https://raw.githubusercontent.com/ShawnHymel/EdiBot/master/Ball_Chase.py
You can run it with:
python Ball_Chase.py
If the motors run the wrong way or are swapped, you can change the swapMotors
, leftDir
, and rightDir
variables in the code.
Having to type in the python command every time the robot boots up can be cumbersome. To remedy that, we'll have EdiBot run the Python script at boot.
We'll write our own systemd unit file:
vi /lib/systemd/system/ball_chase.service
In that file, enter:
[Unit]
Description=EdiBot Ball Chase
After=xdk-daemon.service
Requires=xdk-daemon.service
[Service]
TimeoutStartSec=1
ExecStart=/usr/bin/python /home/root/Ball_Chase.py
[Install]
WantedBy=multi-user.target
Save and exit (esc then :wq). Now, we'll need to register our service:
systemctl enable ball_chase.service
Reboot, and your robot should start chasing balls right after it boots!
If you want to prevent the script from running on start, enter: systemctl disable ball_chase.service
. You'll need to do this if you want to manually run the script again. Additionally, if you want to stop the service, enter systemctl stop ball_chase.service
.
And that's it! Attach the LiPo to JST connector and flip the switch on the Power Block to "ON."


_3u05Tpwasz.png?auto=compress%2Cformat&w=40&h=40&fit=fillmax&bg=fff&dpr=2)
Comments
Please log in or sign up to comment.