


Hardware components | ||||||
 |
| × | 1 | |||
 |
| × | 1 | |||
Software apps and online services | ||||||
 |
| |||||
 |
| |||||
Hi everyone,
I have experimented with multiple projects (and published a few of them) using both the HC-SR04 and the Sparkfun Sound Detector. First things first, let me show you how to order them in the links below.
Immediately, you can see the price difference. Each HC-SR04 cost only $2, while a Sound Detector cost a $15 just for a single piece. Let's move on to the other parts of this comparison.
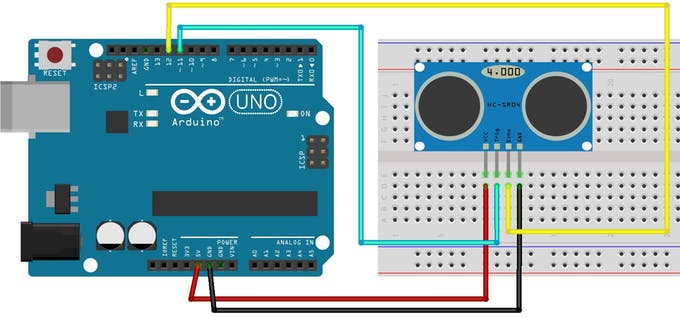
Hardware Compatibility/PinoutUltrasonic Sensor
The Ultrasonic Sensor has a rather simple design and schematic, with an echo pin and trig pin that does motion detection. Click here to find out how they work.
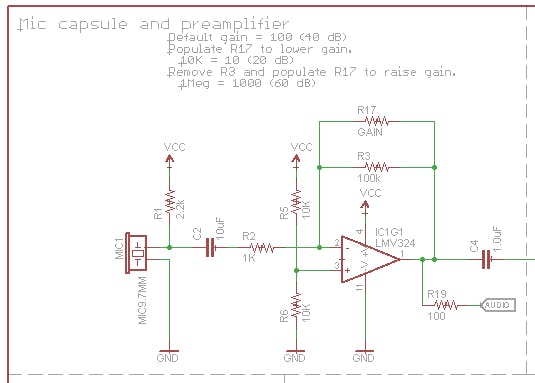
Sparkfun Sound Detector
The sound detector has three different outputs for changing audio signals and is very flexible and sensitive. Click here to find out how they work.
Hardware Winner - Even.
The Sound Detector has three outputs for flexibility, but only matches out with the Ultrasonic Sensor due to the latter's simplicity for beginners.
CodeThe code paints the same exact picture as the schematics, with the Sound Detector being more flexible and the Ultrasonic Sensor being simpler.
Ultrasonic Sensor
int trigPin = 11;
int echoPin = 12;
long duration;
int distance;
void setup() {
pinMode(trigPin, OUTPUT);
pinMode(echoPin, INPUT);
Serial.begin(9600);
}
void loop() {
digitalWrite(trigPin, LOW);
delayMicroseconds(2);
digitalWrite(trigPin, HIGH);
delayMicroseconds(10);
digitalWrite(trigPin, LOW);
duration = pulseIn(echoPin, HIGH);
distance= duration*0.034/2;
Serial.print("Distance: ");
Serial.println(distance);
}
The code for the Ultrasonic Sensor is rigid (unless if you add another component), and the only thing that changes would be the digital io pin in the if statement (if you used different digital pins than from the hardware example provided).
Sound Detector (code was found here)
/******************************************************************************
* sound_detector_demo.ino
* Sound detector sample sketch
* Byron Jacquot @ SparkFun Electronics
* February 19, 2014
* https://github.com/sparkfun/Sound_Detector
*
* This sketch demonstrates the use of the Sparkfun Sound Detector board.
*
* The Sound Detector is a small board that combines a microphone and some
* processing circuitry. It provides not only an audio output, but also a
* binary indication of the presence of sound and an analog representation
* of it's amplitude.
*
* This sketch demonstrates two different modes of usage for the Sound
* Detector. The gate output (a binary indication that is high when sound
* is present, and low when conditions are quiet) is used to fire a pin-change
* ISR, which lights an LED when the sound is present. The envelope output
* (an analog voltage to rises to indicate the amplitude of the sound) is
* sampled in the loop(), and it prints an indication of the level to the
* serial terminal.
*
* For more details about the Sound Detector, please check the hookup guide.
*
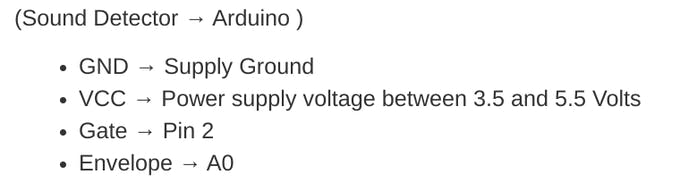
* Connections:
* The Sound Detector is connected to the Adrduino as follows:
* (Sound Detector -> Arduino pin)
* GND → GND
* VCC → 5V
* Gate → Pin 2
* Envelope → A0
*
* Resources:
* Additional library requirements: none
*
* Development environment specifics:
* Using Arduino IDe 1.0.5
* Tested on Redboard, 3.3v/8MHz and 5v/16MHz ProMini hardware.
*
* This code is beerware; if you see me (or any other SparkFun employee) at the
* local, and you've found our code helpful, please buy us a round!
*
* Distributed as-is; no warranty is given.
******************************************************************************/
// Define hardware connections
#define PIN_GATE_IN 2
#define IRQ_GATE_IN 0
#define PIN_LED_OUT 13
#define PIN_ANALOG_IN A0
// soundISR()
// This function is installed as an interrupt service routine for the pin
// change interrupt. When digital input 2 changes state, this routine
// is called.
// It queries the state of that pin, and sets the onboard LED to reflect that
// pin's state.
void soundISR()
{
int pin_val;
pin_val = digitalRead(PIN_GATE_IN);
digitalWrite(PIN_LED_OUT, pin_val);
}
void setup()
{
Serial.begin(9600);
// Configure LED pin as output
pinMode(PIN_LED_OUT, OUTPUT);
// configure input to interrupt
pinMode(PIN_GATE_IN, INPUT);
attachInterrupt(IRQ_GATE_IN, soundISR, CHANGE);
// Display status
Serial.println("Initialized");
}
void loop()
{
int value;
// Check the envelope input
value = analogRead(PIN_ANALOG_IN);
// Convert envelope value into a message
Serial.print("Status: ");
if(value <= 10)
{
Serial.println("Quiet.");
}
else if( (value > 10) && ( value <= 30) )
{
Serial.println("Moderate.");
}
else if(value > 30)
{
Serial.println("Loud.");
}
// pause for 1 second
delay(1000);
}
This is the code provided on Sparkfun's hookup guide. It is one way to use their Sound Detector.
Winner - Even, for the same reason as the hardware - the Ultrasonic Sensor provides simplicity, while the Sound Detector brings flexibility and functionality to the table.
Price TagFinally, the difference in pricing has been brought up. As aforementioned, the Sparkfun Sound Detector is $15 (with headers) compared to a $2 dist. Sensor (when you buy with a pack of five). Currently, however, the Sparkfun Sound Detector is available without the headers for $10.
Winner - Ultrasonic Sensor, with its cheap price when you buy a pack of five.
DurabilityAfter a couple of times of using the same Ultrasonic Sensor, I feel like it only works half the time sometimes. I just thought it would be noteworthy, and if you have experienced something similar, please comment.
The Sound Detector, on the other hand, I have not had any problems with.
ConclusionOverall, the Ultrasonic Sensor is better for beginners, while the Sound Detector should be the choice of more advanced creators, what with its 3 outputs. I have used both and I have no complaints or regrets. Both are amazing sensor modules that can be incorporated in almost any Arduino project.


_3u05Tpwasz.png?auto=compress%2Cformat&w=40&h=40&fit=fillmax&bg=fff&dpr=2)
Comments
Please log in or sign up to comment.