Hello friends welcome back to "Techno-E-solution", In previous video we see how we can control the home appliances with the help of Smartphone & Bluetooth but there is no any manual control for the system, so In this tutorial we are going to make a Smartphone control as well as manual controlled home automation system with Complete details.
Follow Me On :-| YOUTUBE | INSTAGRAM | FACEBOOK | INSTRUCTABLES | DAILYMOTION | HACKSTER |
If you like this project subscribe us on Youtube, So without wasting time Let's get started..............
Take reference from the following video for part 1 of this system :-
LET'S MAKE PCB :-
Follow the following process for Making PCB Using Tonner Transfer Technic.
DOWNLOAD PCB LAYOUT
- Take a Single Sided Copper Clad PCB Board
- Cut the PCB as per PCB Layout
- Remove the dirt & rust from the PCB by using wire scrub or sand paper
- Place layout print on PCB & Heat the PCB with the help of Iron for 5-10 Min
- Take water in the container & deep the PCB into the water for 5 min
- Slowly remove the paper from the PCB
- Now take 2-3 spoon of ferrite chloride powder in container with water
- Deep PCB into the solution for 5-10 min for etching process
- After etching completed clean the excessive tonner from the PCB
- Drill The PCB with the help of PCB drill machine
- Now place app components on PCB & Solder It
- In this way the PCB board is completed.
BLYNK APP INSTALLATION & SETUP :-
- Install Blynk App from google play store.
- Create Account On Blynk.
- Create New Project.
- You will get Tocken on your E-Mail.
- Give Name to Project.
- Select Device & Connection Type & click on Create Button.
- Select Bluetooth, then add 8 buttons.
- Give name to Buttons.
- Set the Pins.
- The app setup is completed
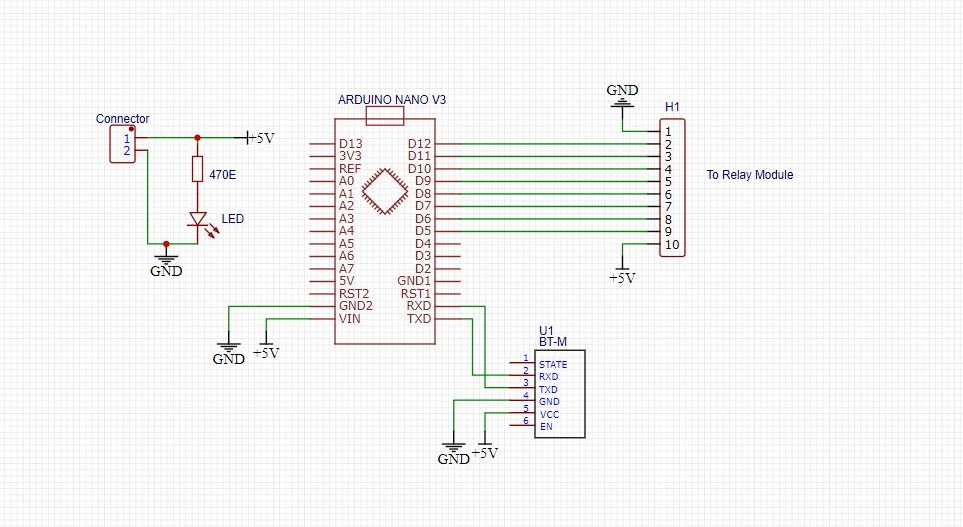
FINAL CONNECTION :-
- Connect Two-way switches to PVB switch board.
- Now connect switches to relay module as per above circuit diagram.
- Also connect socket to relay module as per above circuit diagram.
- Connect load to the central pin of switch as shown in circuit diagram.
- Now adjust LM2596 to 5V and Connect to the PCB.
- Fix all parts in board.
- Give Power Supply.
- Now your project is done.
DEMO & TESTING :-- Open Blynk app.
- Turn On Bluetooth.
- Click on Bluetooth button & select hc-05
- Now Smartphone get Connected to the Home Automation System.
- Now you can control 8 Load by using your Smartphone.
If you like this project do subscribe for more interesting projects.
----------------------------------------------------------------------------------------------------
NEXT PCB :-
NEXTPCB PCB MANUFACTURER COMPANY
NextPCB was founded in 2004 and has since established itself as a turnkey PCB manufacturing and assembly factory for prototype quantities as well as small-volume to big-volume production.
Why NEXTPCB?
NextPCB provides one-stop services for PCB with professional PCB manufacturing practices fulfilling the advanced design requirements. The company provides the speed of PCB and assembly manufacturing with efficient collaboration and quality assurance.
NextPCB provides a variety of PCBs with optimistic capabilities. Starting from the single-layer they provide PCB services up to 20 layers, with a board thickness of 0.6mm to 2.5mm with a tolerance of 10% and much more capabilities. Check out the manufacturing capabilities of NextPCB for better production of your PCB.


Comments
Please log in or sign up to comment.