Hackster is hosting Hackster Holidays, Ep. 6: Livestream & Giveaway Drawing. Watch previous episodes or stream live on Monday!Stream Hackster Holidays, Ep. 6 on Monday!
SurtrTech
Published © GPL3+

Interfacing Grove Speech Recognizer with Arduino

A quick tutorial on how to interface the voice recognition module with few examples.

BeginnerFull instructions provided11,393
Interfacing Grove Speech Recognizer with Arduino

Things used in this project

Story

Read more

Schematics

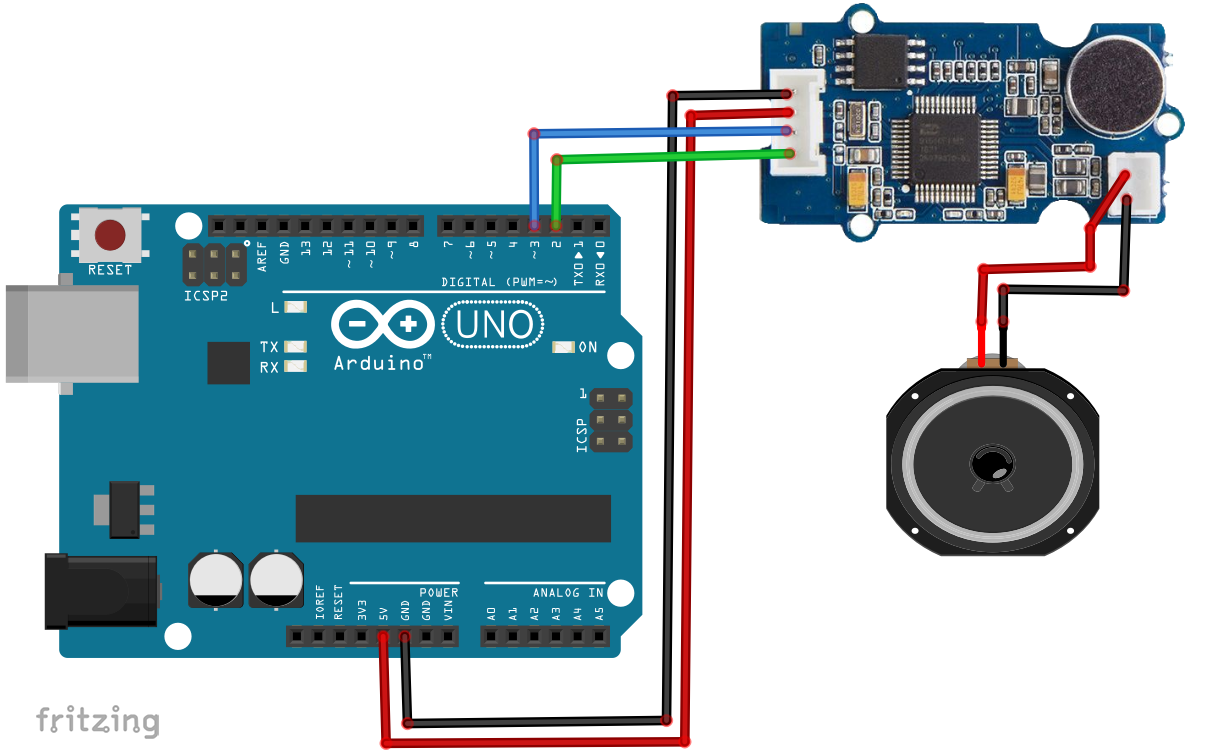
Basic Wiring

Here's how you can test your module with the basic code, the speaker is optional

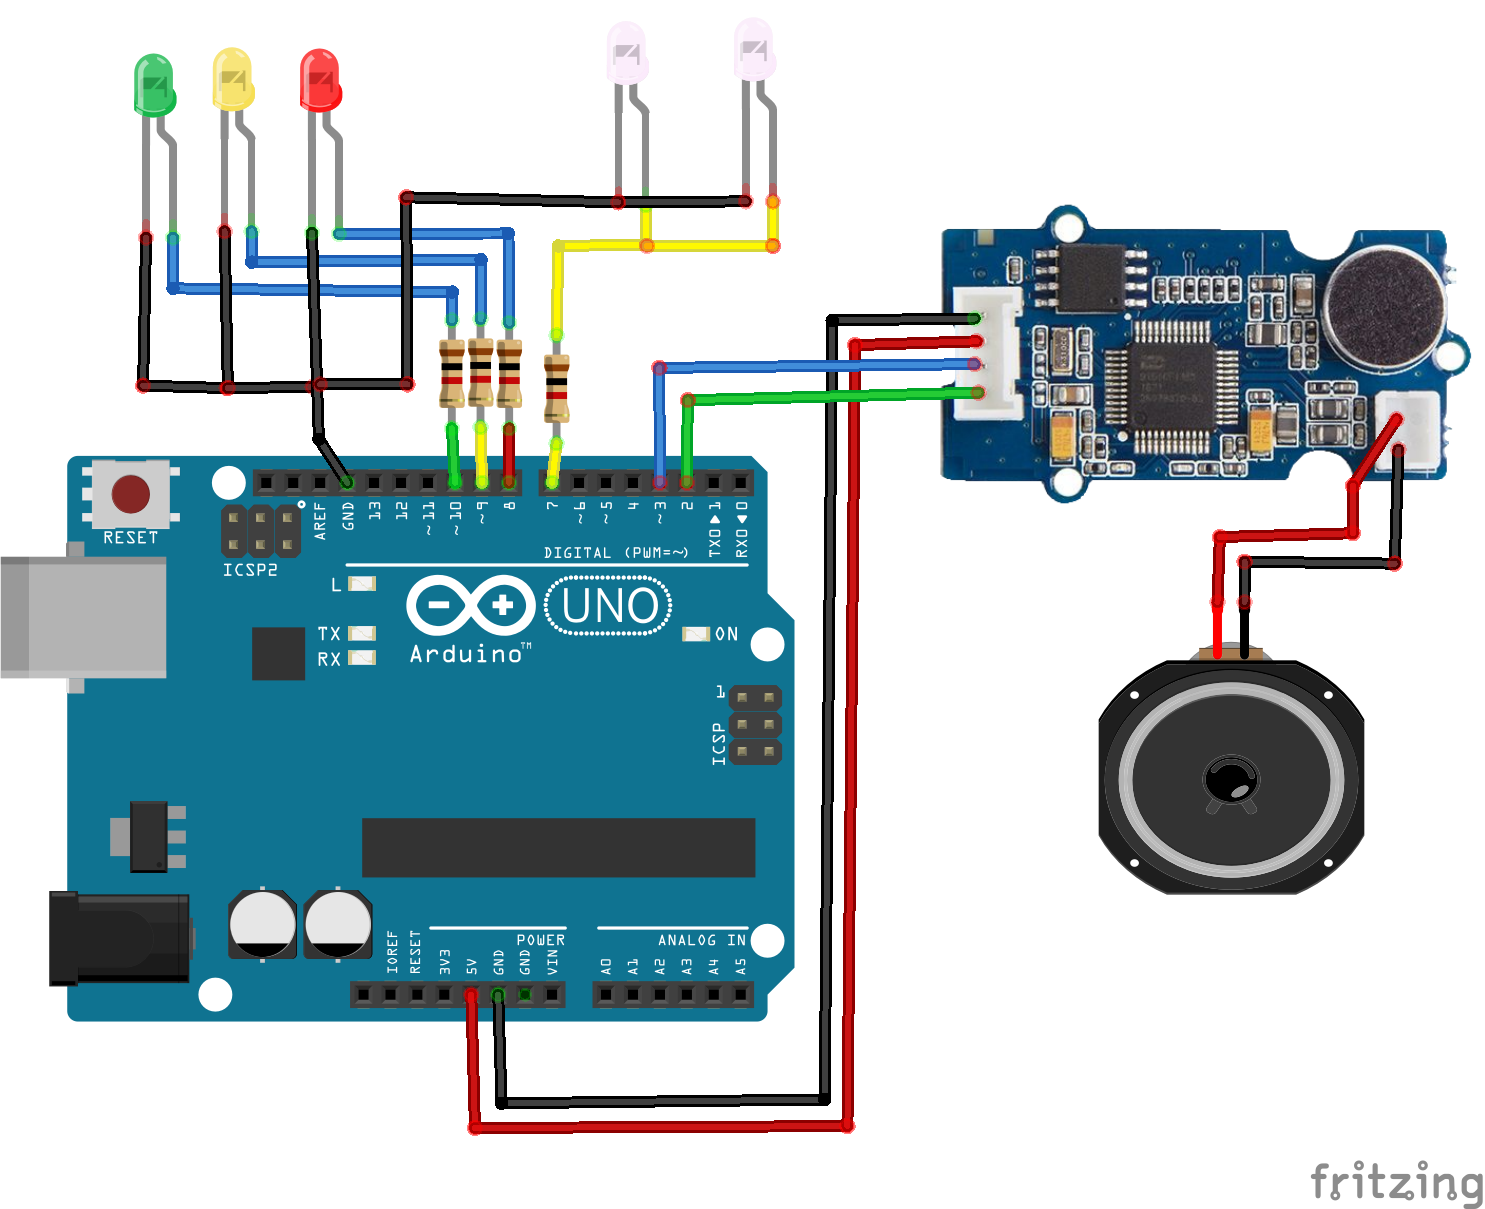
With LEDs

Here's my 1st examples just lighting LEDs with voice commands I considered the 2 Leds on 7 as my lights and the other ones just lights on and off with a random code

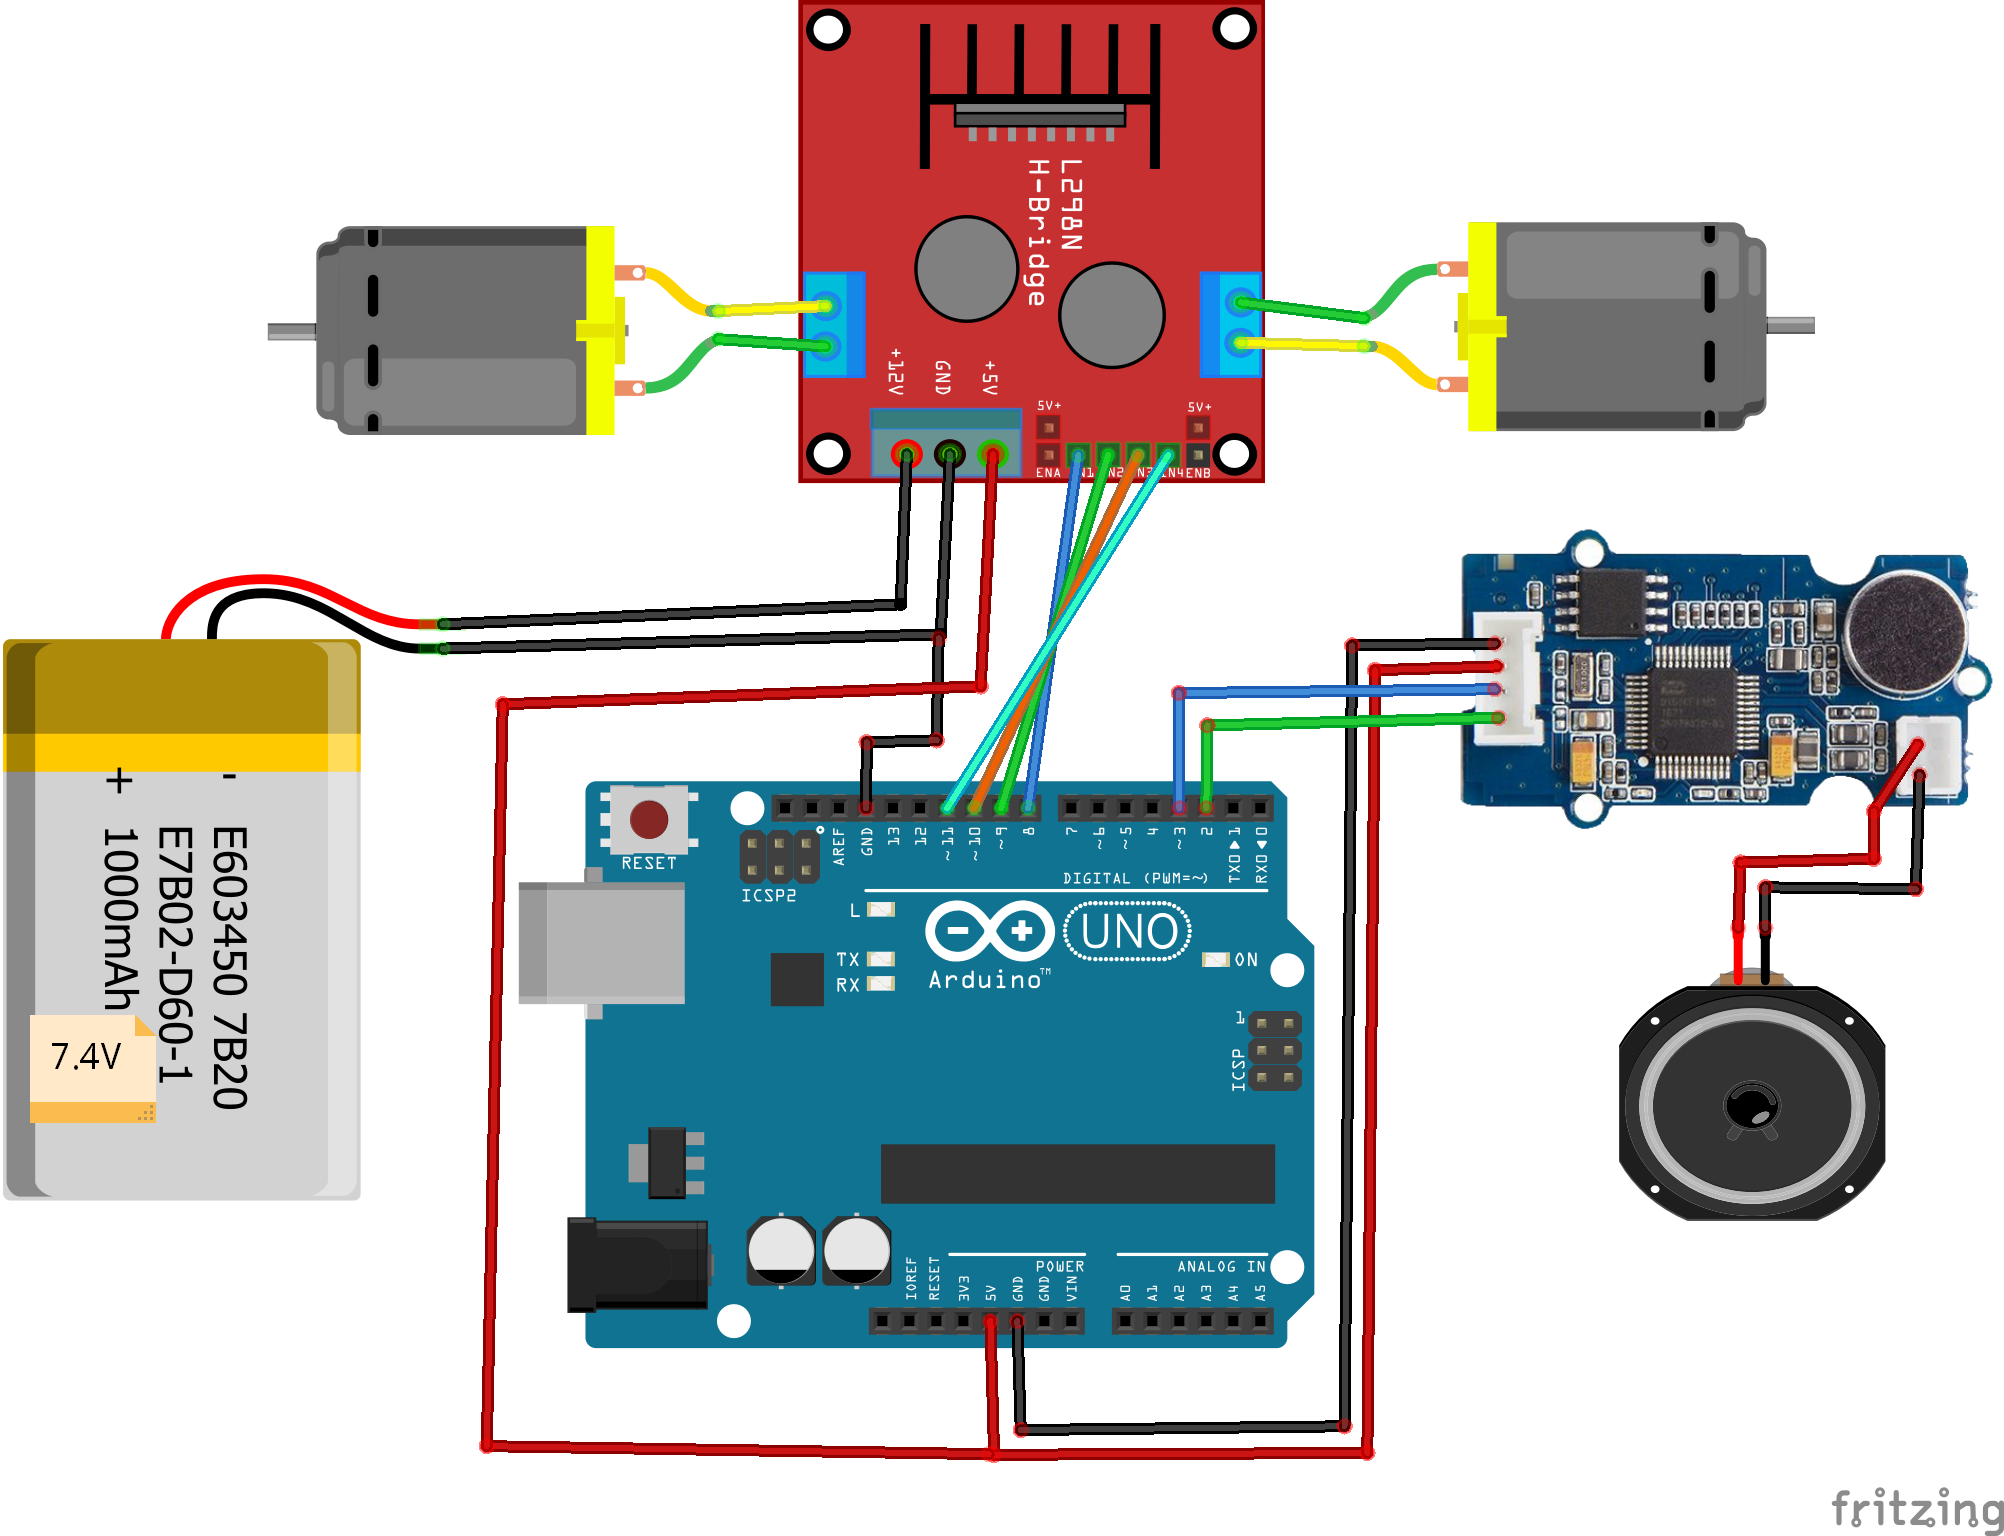
2WD Robot

To control a 2WD robot

Code

Basic code

Arduino
Simple code to test your module and it shows the command on the Serial Monitor
//Code from http://wiki.seeedstudio.com/Grove-Speech_Recognizer/

#include <SoftwareSerial.h>

#define SOFTSERIAL_RX_PIN  2
#define SOFTSERIAL_TX_PIN  3

SoftwareSerial softSerial(SOFTSERIAL_RX_PIN,SOFTSERIAL_TX_PIN);

const char *voiceBuffer[] =
{
    "Turn on the light",
    "Turn off the light",
    "Play music",
    "Pause",
    "Next",
    "Previous",
    "Up",
    "Down",
    "Turn on the TV",
    "Turn off the TV",
    "Increase temperature",
    "Decrease temperature",
    "What's the time",
    "Open the door",
    "Close the door",
    "Left",
    "Right",
    "Stop",
    "Start",
    "Mode 1",
    "Mode 2",
    "Go",
};

void setup()
{
    Serial.begin(9600);
    softSerial.begin(9600);
    softSerial.listen();
}

void loop()
{
    char cmd;

    if(softSerial.available())
    {
        cmd = softSerial.read();
        Serial.println(voiceBuffer[cmd - 1]);
    }
}

Lights + Random LEDs

Arduino
Just a random LED sequence and Light voice controlled to know the module
//A code to test with Grove Speech Recognizer
//it turns on and off lights (LEDs) on pin 7 and the (Mode 1/2) commands the 
//other LEDs 

#include <SoftwareSerial.h>

#define SOFTSERIAL_RX_PIN  2
#define SOFTSERIAL_TX_PIN  3

#define RED 8
#define YEL 9
#define GRE 10
#define LIGHT 7

short m=0;

SoftwareSerial softSerial(SOFTSERIAL_RX_PIN,SOFTSERIAL_TX_PIN);

const char *voiceBuffer[] = //Vocie commands you can keep this list to 
{                           //know your commands or remove it
    "Turn on the light",
    "Turn off the light",
    "Play music",
    "Pause",
    "Next",
    "Previous",
    "Up",
    "Down",
    "Turn on the TV",
    "Turn off the TV",
    "Increase temperature",
    "Decrease temperature",
    "What's the time",
    "Open the door",
    "Close the door",
    "Left",
    "Right",
    "Stop",
    "Start",
    "Mode 1",
    "Mode 2",
    "Go",
};

void setup()
{
  Serial.begin(9600);
  softSerial.begin(9600);
  softSerial.listen();
  pinMode(RED,OUTPUT);
  pinMode(YEL,OUTPUT);
  pinMode(GRE,OUTPUT);
  pinMode(LIGHT,OUTPUT);
}

void loop()
{
    int cmd;
    if(softSerial.available())        //If something is received
    {
        cmd = softSerial.read();     //The number of the command is stored
        Serial.println(voiceBuffer[cmd - 1]); //Shows the command name
    }
    if(cmd==1)                 //To turn on the lights by its command
    digitalWrite(LIGHT,HIGH);  //Turn on the lights which have "1" as number
    
    if(cmd==2)                //Turn them Off
    digitalWrite(LIGHT,LOW);
    
    if(cmd==20)              //Mode 1 will execut once
    Mode1();
    
    if(cmd==18){              //Turn off mode 2 by "Stop"
    m=0;
    digitalWrite(RED,LOW);
    digitalWrite(YEL,LOW);
    digitalWrite(GRE,LOW);
    }
    if(cmd==21)
    m=1;

    if(m==1)                 //Turn on mode2 and keep it as long m=1
    Mode2();       
    
}


void Mode1(){                   //Random LED sequence
  digitalWrite(RED,HIGH);
  digitalWrite(YEL,HIGH);
  digitalWrite(GRE,HIGH);
  delay(1000);
  digitalWrite(RED,LOW);
  delay(1000);
  digitalWrite(YEL,LOW);
  delay(1000);
  digitalWrite(GRE,LOW);
  delay(1000);
  digitalWrite(RED,HIGH);
  delay(1000);
  digitalWrite(YEL,HIGH);
  delay(1000);
  digitalWrite(GRE,HIGH);
  delay(2000);
  digitalWrite(RED,LOW);
  digitalWrite(YEL,LOW);
  digitalWrite(GRE,LOW);
}

void Mode2(){  
  digitalWrite(RED,HIGH);
  digitalWrite(YEL,HIGH);
  digitalWrite(GRE,HIGH);
  delay(1000);
  digitalWrite(RED,LOW);
  digitalWrite(YEL,LOW);
  digitalWrite(GRE,LOW);
  delay(700);
  digitalWrite(RED,HIGH);
  digitalWrite(YEL,LOW);
  digitalWrite(GRE,HIGH);
  delay(500);
  digitalWrite(RED,HIGH);
  digitalWrite(YEL,LOW);
  digitalWrite(GRE,LOW);
  delay(300);
}

2WD Robot code

Arduino
You can use this code to control a robot to advance, turn or stop, here the forward stops automatically after 2s you can remove it and stop it by "Stop" command
//This code is to use with Grove Speech recognizer and 2WD robot with
//l298n DC motor driver

#include <SoftwareSerial.h>

#define SOFTSERIAL_RX_PIN  2
#define SOFTSERIAL_TX_PIN  3

SoftwareSerial softSerial(SOFTSERIAL_RX_PIN,SOFTSERIAL_TX_PIN);

int in1 = 8;   //L298n pins and here I didn't add the speed control
int in2 = 9;
int in3 = 10;
int in4 = 11;

void setup() {
  
 pinMode(in1, OUTPUT);
 pinMode(in2, OUTPUT);
 pinMode(in3, OUTPUT);
 pinMode(in4, OUTPUT);

 softSerial.begin(9600);
 softSerial.listen();
}

void loop() {
    int cmd;
    if(softSerial.available())
    {
        cmd = softSerial.read();
   
    }
    
    if(cmd==19){   //I removed the command list here I used "Start"
    Forward();    //Left Right and Stop and cmd==their number
    delay(2000); //I added a delay to stop it you can remove it and use a
    Stop();     //voice command to stop it
    }

    if(cmd==17){
    Right();
    delay(500);
    Stop();
    }

    if(cmd==16){
    Left();
    delay(500);
    Stop();
    }
       
    if(cmd==18)
    Stop();

}

//Classic L298n Driver functions
void Forward(){
  digitalWrite(in1, LOW); 
  digitalWrite(in2, HIGH);
  digitalWrite(in3, HIGH);
  digitalWrite(in4, LOW);  
}


void Left(){
  digitalWrite(in1, LOW); 
  digitalWrite(in2, HIGH);
  digitalWrite(in3, LOW);
  digitalWrite(in4, LOW);  
}

void Right(){
  digitalWrite(in1, LOW); 
  digitalWrite(in2, LOW);
  digitalWrite(in3, HIGH);
  digitalWrite(in4, LOW);  
}

void Stop(){
  digitalWrite(in1, LOW); 
  digitalWrite(in2, LOW);
  digitalWrite(in3, LOW);
  digitalWrite(in4, LOW);  
}

Credits

SurtrTech

SurtrTech

9 projects • 207 followers
YT Channel bit.ly/35Ai76l, run by Automation and Electrical Engineer, Electronics amateur, no IT background so you may see wreckage in codes

Comments