


Hardware components | ||||||
 |
| × | 1 | |||
Software apps and online services | ||||||
| ||||||
| ||||||
 |
| |||||
 |
| |||||
 |
| |||||
| ||||||
| ||||||
Hand tools and fabrication machines | ||||||
 |
| |||||
| ||||||
Due to COVID-19 ways of working have changed dramatically with many more people who used to work in offices now working from home. This can result in limited social interaction and increased loneliness impacting on a person's mental health.
To solve this problem, I have created the Desk Buddy. This is a small device which acts as a fun office friend to keep the user company and provide the user with assistance for their working day. The Desk Buddy could easily be mass produced making it cheap enough for companies to provide to their workers, in order to boost their mental health and productivity. This device will not hinder productivity as it is not a toy and does not require much interaction. If necessary, the Desk Buddy can also can be muted. The Desk Buddy is small enough to sit on a desk under a monitor, this means it does not take up much space and is not distracting.
This project uses the Core2 for AWS IoT EduKit in a number of ways. The screen shows the Desk Buddy's face which consists of 2 animated eyes which show emotion and if the Buddy is awake or asleep. The screen is also home to 4 pages of tools, each of which can help the user throughout the day in different ways. The user can navigate these on the device by touching the capacitive touch button below the screen. The first page is a to-do list, this works with audio notes which the user can record with one button press and play with another. The second page is a stopwatch which has various uses for example recording how long it takes to perform a presentation. The third page is a timer, this can be used to time break activities which the Desk Buddy suggests to the user for example doing some yoga. The fourth page is where multiple Desk Buddy's can interact together using AWS IoT, this works by having a selection of activities which include: requesting a walk, requesting a coffee, requesting to play an online game and requesting a random joke to be send to another user. This works by using MQTT, the sending device published the action to a specific address on the service and then the receiving device is subscribed to the same address so whenever anything is published the other device receives it instantly which means it can then perform the required action. Each action also sends a notification to the users phone using IFTTT which gives the user more information, for example in the request a walk they receive a link to local parks. To make sure the user sees this alert the RGB led strips on either side will flash on and off and the vibration motor will be turned on.
When the user starts work, they switch on the Desk Buddy and it will interact with them at various time intervals. Currently it is set to 2, 4 and 6 hours after being turned on but this could be changed according to the user work schedule. At the 2 hour mark the Desk Buddy will change from its usual animated eyes to a sleepy emotion signalling that the user should take a break, at this point the Desk Buddy suggests an activity for the user to do for example do some short yoga with a video link being sent to the user's phone. At the 4 hour point which would most likely be lunch time, the face changes to angry emotion and it suggests that the user takes a break and watches a funny animal playlist or to request interaction with another user using built in request feature. Then at the 6 hour mark the emotion changes to sad and the user is requested to take another break and listen to some new music. These can all be changed to suit the user/company. To make sure the user sees this change in emotion the RGB led strips on either side will flash on and off and the vibration motor will be turned on.
There are also cloud storage features of this device which makes use of the AWS S3 service, this is where all of the device's requests to the user are logged for future use.
If the user is in a meeting or has a particularly busy day so they would not like to be interrupted they easily mute the device with a press of the middle button which will change the RGB leds to red signifying it is muted.
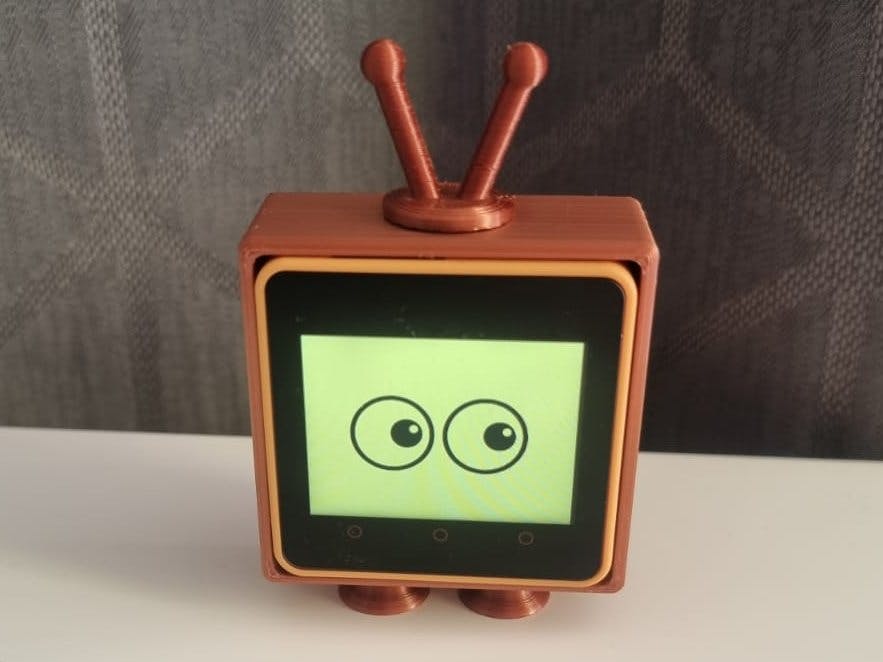
This is all encapsulated inside a custom 3d printed case which gives the Core2 for AWS IoT EduKit a more friendly appearance. The design of the case can be customised to make the Desk Buddy more individual to the user.
Lets get into actually making the Desk Buddy!
Uiflow setup:To start making the project, the first thing you need to do is setup the uiflow software. Uiflow has 2 different versions, a online and a desktop version which can be found here and here. I personally prefer the desktop version because there is no worries of losing my code if my internet stops working for some reason.
1. You will need to download UIFlow-Desktop-IDE and M5Burner from this link where they should both be located on the right of the webpage
2. Once these are both setup and installed you can launch M5burner, this will be used to erase the current firmware on the device and install the uiflow firmware onto it. This will allow the uiflow ide to run programs on the device. When M5burner is open you can plug in the device into your computer with a USB-C cable and make sure it is turned on by holding the power button which is located next to the power port on the device until you see the screen light up.
3. You can now select the correct port of your device by changing the COM in the top left. Then you can download the uiflow firmware which is in the middle of the picture and it is the only one which is compatible with this device. Once it is downloaded you can press burn, it will then ask you for some wifi credentials which will be used if you decide to use the web version of uiflow. Then, when you click start, the burning procedure will start and the firmware will be written to the device. There should not be any error messages and it should say burn complete like the picture below.
4. Once the device is booted into the new firmware you can press on the flow button in the middle of the screen where you can decide whether you will use usb or wifi to program the device. From here on I will use the usb and the desktop app. So make sure you have a usb-c cable and plug it into your computer and the device.
5. Now uiflow is setup for programming to the device in either micropython or blocky. I have used micropython in this project as I am more familiar with python over c++ which is another language this device can be programmed with by using the arduino IDE.
IFTTT setup:In this project I have used IFTTT, this stands for If This Then That. It works with things called applets which consist of something that can be triggered and then something which is activated when this is triggered. I will be using this to allow the Desk Buddy to send notifications to my phone with links to different activities it suggests for me to do. Within IFTTT I have used the webhooks service which means the notification can be activated to a HTTP post request to a specific URL and I'll get into this later.
1. To start setting this up, you will need a IFTTT account which you can create here.
2. In this project I will be using IFTTT to send my phone 6 different notification which can all be triggered at different times, unfortunately only 3 of them are included in the free plan so I have had to upgrade to the pro plan which is only £2.90 a month. I tried to find a different service such as integromat.com which offers similar services to IFTTT but they only allow 2 different notification for free and then it cost $9 a month which is roughly £6.60. So I decided to keep with IFTTT
3. In order to use the webhooks service to activate the applet from the Desk Buddy you will need to get your own personalised token which you will add into the URL variable in the code later. To do this, go to this link and search for 'webhooks', then you can click on webhooks and then settings towards the top right of the screen. From here you will see a URL which contains your own unique URL. If one doesn't appear you can press 'generate key'. Safe the part after '/use/' for later.
4. Now you are set to create your first applet, to start the process, you can press create next to your avatar in the top right, you can then press on the If This box.
5. From here you can search for webhooks and then press it.
6. We are going to be using the 'Receive a web request' option which means that it will be triggered whenever the specific URL receives a request.
7. I am going to call my first applet 'sleepy' so I will enter it into the event name box. Then I can press create trigger, this will finish the process of creating what triggers the event. You can now press the Then That box which will let you create the action which will happen when the trigger is triggered.
8. You can then search for notifications, this is a service which is provided through the IFTTT app on your phone so make sure you have got it. This can be found under the name IFTTT on the play store and the app store. From here you can select 'Send a rich notification from the IFTTT app' This will allow the notification to contain links to websites.
9. From here you can set everything about the notification, for the applet I am creating, I am going to have use parameters below.
10. You can now press create applet at the bottom of the page and you will be given an option to give it whatever name you want. I left it default. To create all of the applets needed for this project, this process (steps 4-10) will need to be repeated another 5 times to create a total of 6 applets. For the links in the notification and to make sure the webhooks is triggered by the same URL you can use this google sheets document which contains a link for the notification and the applet name so you can easily copy and paste these details.
11. Once these have all been created the setup with IFTTT is complete and as long as you are signed into the app on your phone you will receive the a notification on your phone at the right time.
AWS IoT:The AWS services are important in this project, they will allow the Desk Buddy to receive requests from other devices which will allow different Desk Buddys to interact with each other.
1. To do this, you will need to add a device within the AWS management console which can be found here. If you don't have an account you will need to create one and add a form of payment which will allow you to access the free tier plan for a year. Once you are in your account, you need to make sure that your region is set to 'us-west-2', this can be found in the top right under the dropdown menu in the place name next to the support menu.
2. Now you can follow all of the 'Add a device' section in this m5stack.com tutorial. In this tutorial, you will create an IOT core device which will be the Desk Buddy.
In the tutorial you are asked to create a new policy but it doesn't actually give you the policy, so use the one below:
{
  "Version": "2012-10-17",
  "Statement": [
    {
      "Effect": "Allow",
      "Action": [
        "iot:*"
      ],
      "Resource": [
        "*"
      ]
    }
  ]
}
You can stop following the tutorial as soon as you have downloaded the certificate and private key for the device.
3. Now you have the certificate and the private key for the device, you can rename them to certificate.pem.crt and private.pem.key. This will them work in my code without having to change the file locations.
AWS IoT Rules & S3:AWS also has a service called s3, this is a cloud storage solution which I will be using to store whatever requests the Desk Buddy receives or transmits. It will be handy to have a record of what has been activated.
1. First in S3, a bucket is needed to be setup, this is basically a folder which will store all of the relevant data including timestamps and the action which occurred. To create one, you can go to this link and press 'Create bucket' this will then allow you to enter a name for the bucket, I went for 'Desk Buddy'. You should also make sure that the AWS region is set to us-west-2, this will allow all of the services to work seamlessly together.
2. From here you can just scroll down to the bottom of the page and press 'Create bucket'. This is because we are just leaving all the settings to default.
3. Now we can use IoT rules to create a rule whenever data is received by it for it to be put into the Desk Buddy bucket in S3 for us to access later. To do this, you can go to this link and click 'Create' in the top right. From here you can give it a name and a description. I called it 'Desk_Buddy_foward'
4. Now we need to setup the rule query statement. This is coded in IoT SQL but we won't need to get very complex as most of the code we need is already there. All we have to do is change it so it looks like the code below by changing
SELECT * FROM 'iot/topic'to
SELECT * FROM 'core2/msg'This will mean that anything on the core2/msg channel will be captured.
5. We can now add an action which is located just below where you entered the code. When you press it a menu with a lot of options will pop up, you will need to press 'Store a message in an S3 bucket'
6. From here you can scroll down and press 'Configure action'. In this page, you can then use the dropdown menu under 'S3 bucket' to select the S3 bucket you just created in step 2. The key will be the title of the file in the S3 bucket so I set it as
${timestamp()}This function:
Returns the current timestamp in milliseconds from 00:00:00 Coordinated Universal Time (UTC), Thursday, 1 January 1970, as observed by the AWS IoT rules engine. Supported by SQL version 2015-10-08 and later.
7. You will now need to 'Choose or create a role to grant AWS IoT access to perform this action.' I just pressed 'Create Role' where I created a role called 'datareceive', this role is required because the IoT rule service needs to have the correct permissions to access the data received and then to forward it to the S3 bucket. Below is my finished page on configuring the action.
8. The steps 3-7 now need to be repeated again but this time with the rule query statement 'SELECT * FROM 'core2/msg' instead which will make all of the requests received from the device forward to the same S3 bucket.
9. Now all of the AWS stuff is done, it is time for getting the main project onto the device and getting it connected to AWS.
Creating images compatible with the m5core2:Desk Buddy has quite a few different images which are used to represent emotion or just add something to a page. These images are what gives Desk Buddy its friendly appearance.
1. For the main eyes I have used this royalty free image from PWGWING. I have used this as the basis for any of the other emotions. To get this the correct size I created a new file in Adobe Photoshop with the dimensions 340 by 240 pixels, this is because it is the size of the display on the m5core.
2. I then imported the png I downloaded and used the magic eraser tool to remove the background. I then exported it to a png which I will then send to the device.
3. To create the other image of the eyes looking in the opposite direction I used microsoft paint as I couldn't figure out an easy way to do it in photoshop which i'm sure there is. Once in paint I could use the select tool and drag both of the eyes individually to the other side of the eye. As the pupil was still facing the wrong side, I needed to use the 'Flip horizontal' tool under rotate to flip the image. When that was done I had a correctly flipped image. Both of these images are used to create an animated home-screen.
4. However there is now the issue of a non-transparent background as paint just fills the back in with white. To bring it back I just opened the png in photoshop and used the background eraser to get rid of the background.
5. I then repeated that process for creating 3 more emotions for the Desk Buddy which were sleepy, angry and sad. You will get to see those in action later. There are also more images which are used to just add something else to the page, these include a stopwatch from here, a person walking icon from here and a coffee cup from here. These images are also all royalty free and all for non-commercial use.
6. The display on the device is quite small and the images you download have a high resolution. To get the images to fit onto the device I have used this image resizer, this is super handy because it lets me set the image size in pixels. For the stopwatch I used 83x94 which seemed a perfect size to fit into the corner of the screen without changing blocking the rest of the page.
7. Now that all of the images have been created it is time to put them onto the device's flash memory for so the program can use them.
Adding files through uiflow:The images from the previous step will need to be added to the m5core2, this can be done using the built in file manager in uiflow. The credentials for connecting to AWS will also need to be transferred to the device.
For use later, you will need to download these images from this link which is a link to my github where I have this project's files.
1. To add them you start by turning on the device and then connecting it to the computer using a USB type C cable. Once it is connected you can open uiflow and select the correct port and make sure it is connected by checking if it the text in the bottom left is green. To access the file manager you can press the icon in the top right which is the same as the one below. When you press it, you should get the image below that.
2. To add the images, all you need to do is press the 'Add Image' button and then add all of the images you downloaded from the github.com link before step 1. When that is done, the file manager should look like this
3. Now you need to add the files you downloaded from AWS IoT core, to do this just go to the certificate tab on the file manager and then add the files in the same way as the images. It should look like the picture below
4. Now you can close the file manager and go to the python tab on uiflow. This is where you can get my code from here and paste it in.
Adding IFTTT and AWS credentials:1. To get IFTTT working you will need to paste your webhooks token from earlier into the variable URL, replacing the word TOKEN on the 26th line. To get Wi-Fi working, you will also have to change 'SSID' to your network name and 'PASSWORD' to your Wi-Fi networks password.
2. To get your AWS IoT core working you will need your device data endpoint, you can find it at this link. However if this link does not work you can go into the IoT core main menu and then click settings in the bottom left. Below is my settings page
3. You can now click copy the value and paste is into the endpoint variable in line 27. This is all that is required to setup AWS so now we can get onto running the program on the m5core2 and transform it into a Desk Buddy.
Running the program on the deviceTo run the program on the m5core2 uiflow is used again, to do this all you need to do is make sure the device is connected and press the little download icon on the bottom row. You will then see an uploading screen on the device. It will then reboot and run the Desk Buddy micropython code straight away.
To make the Desk Buddy fit onto a desk much better I wanted to design and 3d print it a little case to make it look friendly and welcoming. To design this I have used Autodesk Fusion 360 which can be found here there is a free version of the software which is aimed at makers and is for personal use. I personally have the education edition which has a few more features but none of those were used in this design. You can find the fusion 360 files here in the Desk Buddy Github repository.
1. To start you will need to download the STL files from my Github or from the bottom of this page. There are 3 different STLs, the first one is just the main body which you can print laying down, then the 2 feet which can be printed base down without any supports and then the antennae which should be printed base down but with supports. When everything is imported into the slice, in my case I am using cura, the parts should be oriented like they are below
2. You can now press slice and I used the settings of
0.4mm Nozzle Diameter
0.2mm Layer Height
Supports on (for antena.stl and mainbody.stl)
10% infill density
Below you can see how the prints came out on my Ender 3 V2. I have used a bronze silk filament which I got from here. I have noticed this filament doesn't hide any imperfection so make sure you have your printer setup right before printing. Below you can see all of the parts printed before assembly
3. From the image you can see how the different parts friction fit into the others. To clean up the part I have used a deburring tool, this is simply a rotating blade on a handle. To use is all you do is run the blade along any edges of the part. This is super handy for getting rid of any stray filament. To start the assembly process you can push both of the feet onto the bottom of the print.
4. You can now add the antennae to the box by pushing it on in the same way
5. Now all you need to do is slide the m5core2 into the box which will complete all the making of the project, its now time to see it working
This is a video demo of the Desk Buddy in action, the video starts with seeing the animated home screen. You can then see the request a activity page, this is where different Desk Buddy's can communicate with each other and it will allow users to get a break from their work and to do something with another human. This works by publishing some text to AWS IoT MQTT and another device will be listening on that channel. You can next see the timer which is a simple timer controlled with 2 sliders, one for minutes and the other for seconds. When the timer is up the RGB leds strips on each side of the device flash and the vibration sensor is activated to get the users attention. Then you can see the stopwatch which is easy to interact with, only having a start stop and reset button. I then press the middle button, this acts as a universal mute switch which causes the RGB led strips to constantly show red which prevents the Desk Buddy from interacting with the user. This is shown by testing the timer again but this time because mute is activated there are no flashing leds or vibrations from the device. The next part of the video simulates when another device requests an action, you can see me publishing 'coffee' to the device which is when it goes to another screen where the user is alerted to the request. I also receive a notification on my phone from the IFTTT app which shows me where my nearest coffee shop.
Below is a video of the To-Do list function of the Desk Buddy which is where the user can press the record button and then they can play back the saved audio recording to see what they have to do. This has its own video because I forgot to include it into the main video.
Different emotions:Desk Buddy has 4 different emotions that will be activated at various points throughout the day, it was not possible to demonstrate all of these in the video above so here are some pictures of the device with all of the different emotions and the random piece of advice which is given to the user with them. The emotions other than the standard open eyes only stay on for 60 seconds and then the display defaults back to the eyes. To make sure the user doesn't miss the change the RGB leds will flash and the vibration motor will be enabled.
Here is the sleepy emotion, this is set to appear when the Desk Buddy has been on for 2 hours, you can see it gives the user some advice and in this case it is to do some yoga. There is also a notification sent to the users phone which links them to a yoga playlist.
This is the angry emotion, it is set to appear when the Desk Buddy has been on for 4 hours, this tells the user they should take a break and watch a funny animal playlist which has been sent to the users phone.
This is the sad emotion, it is set to appear when the Desk Buddy has been on for 6 hours, this tells the user they should take a break and listen to some new music.
Responses to different requests:The Desk Buddy can also receive requests from other devices which allow the user to interact with other users throughout the day. There are a few different options for the user, you have already seen the coffee request screen in the video and how it sends a relevant notification to your phone.
This is the first one, it is for when another user requests a walk, this will popup on the Desk Buddy and a link to a local park will be sent to their phone.
This one, it is for when another user requests to play an online game, this will popup on the Desk Buddy and a link to the best online games to play with friends will be sent to their phone.
This is meant to cheer someone up as you are sending a random joke to the other device. The random joke code is from here and I have only slightly edited it to make it work in this use case, there are many different combinations of jokes which can me made with this. I have had to add quite a few newlines to the jokes to make them fit onto the Desk Buddy's small screen.


_t9PF3orMPd.png?auto=compress%2Cformat&w=40&h=40&fit=fillmax&bg=fff&dpr=2)


Comments
Please log in or sign up to comment.