Hey readers, hope you are doing fine. Are you searching to make a light dimmer circuit? Well, you are at the right place In this article, we are going to teach you that how you can make a light dimmer circuit using an Arduino UNO. Using this setup we can control the brightness of any LED with the help of two pushbuttons only. All the necessary details regarding the project are given below. Please read the full article carefully, You can also read it on our website.
Working of the Light Dimmer Circuit?In this project, we are using an Arduino microcontroller to increase and decrease the brightness of the LED. There are two pushbuttons, you can press them in order to adjust the brightness of the light of the LED. One pushbutton is for increasing the brightness and the other is for decreasing it. Whenever you press a pushbutton the corresponding values are printed on the serial monitor screen and the brightness of the LED also changes according to it. You will need the following components for making it.
- Arduino UNO board
- LED and a 100-ohm resistor
- Two pushbuttons
- USB cable for uploading the code
- Jumper wires and a breadboard
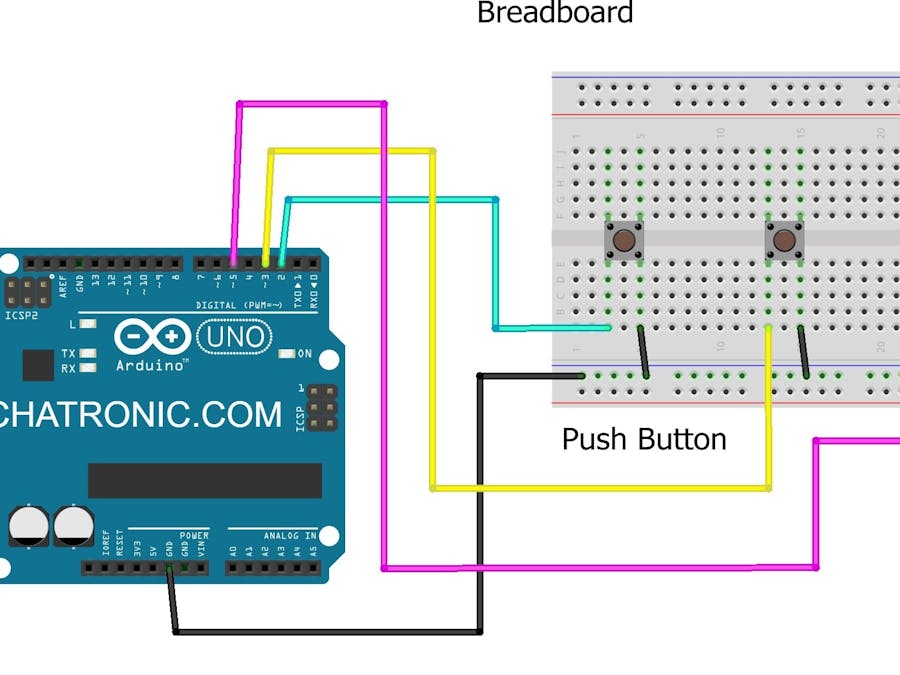
This is the circuit diagram for the project. Make the connections according to it.
Arduino light dimmer CodeNOTE: Copy this code as it is and paste it on your Arduino IDE software after it upload the code to the Arduino.
You can also check more such amazing tutorials on Arduino and Raspberry Pi.
HAPPY LEARNING!


_ztBMuBhMHo.jpg?auto=compress%2Cformat&w=48&h=48&fit=fill&bg=ffffff)


_3u05Tpwasz.png?auto=compress%2Cformat&w=40&h=40&fit=fillmax&bg=fff&dpr=2)
Comments
Please log in or sign up to comment.