Welcome to another new post. In this article, we are going to discuss that how you can make an obstacle avoiding robot using Arduino. Are you familiar with the words obstacle avoiding robot? So basically it is a robot that can move automatically in different directions with the help of an ultrasonic sensor. This robot can take its decision itself, if there is something in front of the robot it will change its direction. The robot first scans the left and right direction and it will move to the direction in which it finds more free space. For more information about this project visit the original post of this project also bookmark TECHATRONIC.COM as all my further projects and tutorials will be pre-uploaded there.
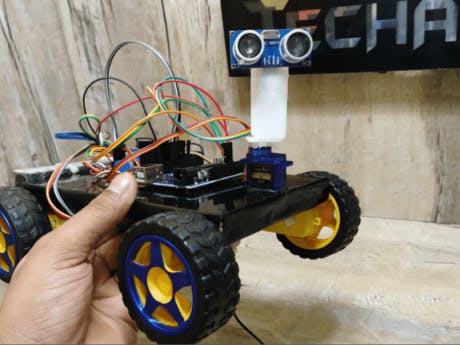
How does it work?In Obstacle avoiding robot we place an ultrasonic sensor that can scan for the obstacles and free path. It can measure the distance from the obstacle and send the signals to the Arduino. There is servo motor which helps the sensor to look left and right. For controlling the dc motor wheels we are using a L298N motor driver module. This robot can find its path automatically and keep moving till someone block its path. All the details and code for this project are given below.
Components Required for obstacle avoiding robot- Arduino board
- HC-SR04 Ultrasonic Sensor
- LM298N Motor Driver Module
- 5V DC Motors
- Battery
- Wheels
- Jumper Wires
Obstacle avoiding robot circuit diagram
Obstacle avoiding robot code :-NOTE: This is the code for the project, please upload it to the Arduino.
int duration=0;
long distance=0;
int firstduration=0;
long firstdistance=0;
int secondduration=0;
long seconddistance=0;
#include <Servo.h>
Servo myservo;
int pos = 0;
void setup() {
pinMode(5,OUTPUT);
pinMode(6,INPUT);
pinMode(7, OUTPUT);
pinMode(8, OUTPUT);
pinMode(9, OUTPUT);
pinMode(10, OUTPUT);
myservo.attach(3);
Serial.begin(9600);
}
void loop()
{
digitalWrite(5, HIGH);
delayMicroseconds(10);
digitalWrite(5, LOW);
delayMicroseconds(2);
duration= pulseIn(6,HIGH);
delay(100);
distance=duration*0.034/2;
Serial.println(distance);
if(distance<=20)
{
digitalWrite(7, LOW);
digitalWrite(8, LOW);
digitalWrite(9, LOW);
digitalWrite(10, LOW);
delay(300);
digitalWrite(7, LOW);
digitalWrite(8, HIGH);
digitalWrite(9, LOW);
digitalWrite(10, HIGH);
delay(350);
digitalWrite(7, LOW);
digitalWrite(8, LOW);
digitalWrite(9, LOW);
digitalWrite(10, LOW);
myservo.write(0);
delay(500);
digitalWrite(5, HIGH);
delayMicroseconds(10);
digitalWrite(5, LOW);
delayMicroseconds(2);
firstduration= pulseIn(6,HIGH);
delay(100);
firstdistance=firstduration*0.034/2;
int first = firstdistance;
Serial.println(firstdistance);
myservo.write(90);
delay(500);
myservo.write(180);
delay(500);
digitalWrite(5, HIGH);
delayMicroseconds(10);
digitalWrite(5, LOW);
delayMicroseconds(2);
secondduration= pulseIn(6,HIGH);
delay(100);
seconddistance=secondduration*0.034/2;
int second = seconddistance;
Serial.println(seconddistance);
myservo.write(90);
delay(500);
if(first < second ) { digitalWrite(7, LOW); digitalWrite(8, HIGH); digitalWrite(9, HIGH); digitalWrite(10, LOW); delay(500); } else if(first >   second  )
{
digitalWrite(7, HIGH);
digitalWrite(8, LOW);
digitalWrite(9, LOW);
digitalWrite(10, HIGH);
delay(500);
}
}
else
{
digitalWrite(7, HIGH);
digitalWrite(8, LOW);
digitalWrite(9, HIGH);
digitalWrite(10, LOW);
}
}
You can also watch the video tutorial of this projectHAPPY LEARNING!


_ztBMuBhMHo.jpg?auto=compress%2Cformat&w=48&h=48&fit=fill&bg=ffffff)


_3u05Tpwasz.png?auto=compress%2Cformat&w=40&h=40&fit=fillmax&bg=fff&dpr=2)
Comments
Please log in or sign up to comment.