


Hardware components | ||||||
| × | 1 | ||||
Software apps and online services | ||||||
 |
| |||||
| ||||||
Rotilio, my dear it's cold today? Sir, it's 18° C, the Spitfire it's waiting.
Rotilio Maker can be your faithful butler, in a click.
Now we'll discover how to do that and at the same time learn how to compile a firmware from a web page, flash this firmware over the air, configure the WiFi communication of a shield with a native app, send message to a "social" starting from an hardware input.
So, coming back quickly to Rotilio Maker.
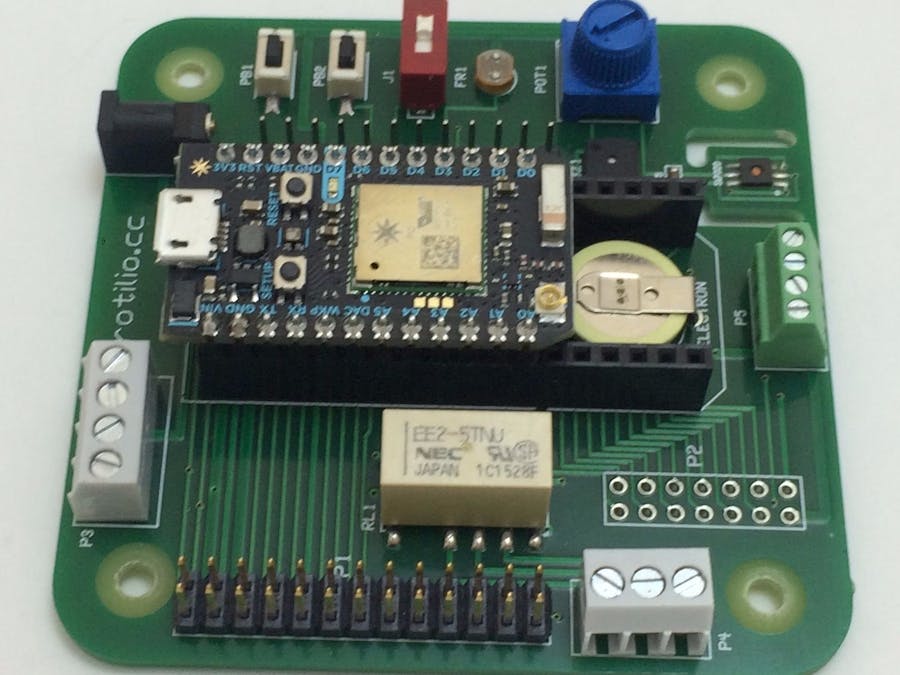
Rotilio Maker made by Techmakers is an open source hardware and software platform with WiFi and mobile connectivity, Arduino compatible FreeRTOS Particle.io chip.
The Rotilio Maker with Photon on board is named "WiFi" version.
The Rotilio Maker with Electron on board is named "Cellular 3G" version.
For this IoT project we choose as hardware the Rotilio Maker "WiFi".
The shield indeed is delivered with a default firmware that can exploit the on board sensors and input sets and the Particle cloud services (see Particle tools and feature documentation).
The Rotilio Maker on board sensors set is:
Temperature1 - Si7020 (I2C - D0&D1) - precision 0.1°C Umidity - Si7020 (I2C - D0&D1) - precision Temperature2 - MS5673 (I2C - D0&D1) - precision 0.1°C Pressure/Altitude - MS5673 (I2C - D0&D1) - precision 1mBar Photoresistor (FR1) - Resolution 12 bit (A1)
The Rotilio Maker on board input set is:
Trimmer             - Resolution 12 bit (A2)
Button P1           - Resolution 1 bit (D2)
Button P2           - Resolution 1 bit (D6)
Switch              - Resolution 1 bit (D5)
This project will use the Rotilio Maker Temperature1 sensor, and the Button P1 as input.
In addition to the hardware provided by Rotilio you'll need first to start:
- to create your personal account on Particle (click here)
- install Particle mobile app on your mobile device from App Store or Google Play(i.e.:click here )
- create your personal account to IFTTT (click here)
- have a Facebook account
- have a WiFi connection
Configure and flash the Photon
Put the Photon of the Rotilio Maker shield in listening mode (click here)
Open and access to the Particle Mobile App with your credential and give the necessary input to the listening Photon (waiting for your WiFi connection credentials).
Set the name for your photon (in this example "miomio") .
At this point you need to flash the Photon with the tutorial's firmware.
You can find the full firmware for this Rotilio Maker tutorial in the Techmakers GitHub repository ( publishTemperature.ino ).
Access to the Particle IDE (click here ) and create a new app with new build page( click here )
You can give your app the same name "publishTemperature" of the Techmakers's file you find in the GitHub repository.
In the firmare, respect the original one, we have added a function named publishTemperature
void publishTemperature(String temperature){
   Particle.publish("publishTemperature",temperature,60,PRIVATE) ;
}
This function contains a publish with the same name publishTemperature that manage a variable named temperature as his output for the cloud.
Linking this function with the use of the Rotilio Maker button 1 we made the connection between the physical world and the Particle cloud:
publishTemperature(String(temperature));
In this line we passed on the firmware the global temperature variable where is stored the Rotilio Maker Temperature 1 value
Now it's time to flash the Photon over the air with the new sketch : first choose your Photon from the Particle Device list (near the Photon device name wi'll appear a yellow "star" icon) then click the "flash" icon.
If the Rotilio Maker's Photon is online the compiled firmware ( operation made automatically by Particle IDE when you save the sketch) will be transfer to your Techmakers device.
Connect your device to a social with an IFTTT receipe
By now we have the Rotilio Maker able to publish his temperature.
To make this code useful now we connect the Particle Publish with the publication of a post on our Facebook account.
To do this we use IFTT services.
So connect to IFTT (click here) and create a new recipe (click here).
Click on "this" word and choose the channel typing particle on the input form.
Then click on the Particle icon and choose "New event published" as trigger.
Now we need to configure the trigger. IFTTT need to know the name of the publish you want to trigger (publishTemperature) and the device where the event is published (miomio).
Clicking on "Create the trigger" IFTTT ask you what is the other side of the integration.
Click on "that" and then IFTTT propose you all the possible integrations.
Search for Facebook channel integration option and click on Facebook Pages.
Then create a status message clicking on the related link.
And as for the trigger complete the "action" configuration. Choose EventContents ingredient for transfer the output of Particle Publish to your Facebook page.
Now you have completed the configuration.
A status message on your Facebook account with the temperature measure will be generated thanks to the two "cloud" services (Particle/Facebook) integration linked for you by the IFTTT recipe every time you click in button 1 on the Rotilio Maker electronic shield.


Comments
Please log in or sign up to comment.