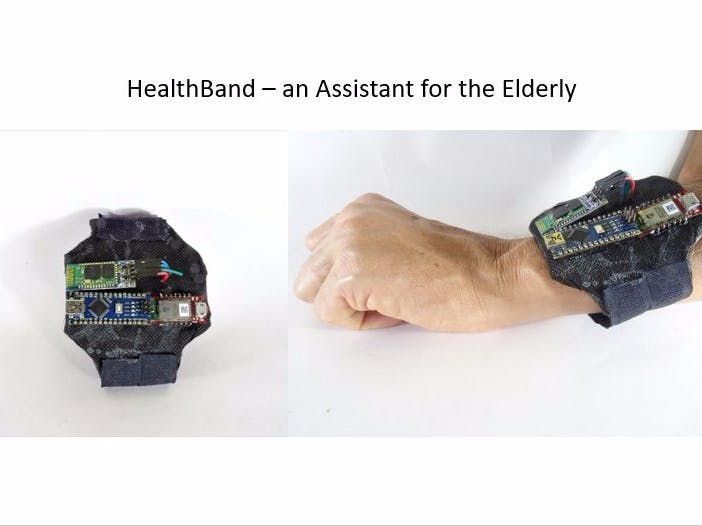
Is your loved one old and living alone? No need to worry. Using Infineon's DPS310 pressure sensor we developed a virtual assistant that neatly fits around your arm in the form of a band, which takes care of this time consuming job leaving your love ones is safe hands!
"The elderly currently represent about 14.5 percent of the U.S. population, and by 2030 there will be about 74 million older individuals. As healthcare costs escalate and pressures are placed on healthcare institutions to provide adequate care, new solutions to managing senior health are imperative."
After a quick search and having seen the shocking numbers this is our attempt to help the elderly!
THE STORY
It's been a few years since my grandma has been suffering from the early signs of Alzheimer's and unfortunately her condition seems to be deteriorating. This resulted in series of unexpected problems such as
1) wandering off to work (even though she was advised not to)
2) skipping her meals or sometimes having double meals
3) not doing her exercises
All this due to the lack of memory and also her unawareness of her condition.
This led to my mother needing to be with her almost the whole day long, seven days a week. This task proved to be very tiring and time consuming. That was when we got the idea to make a virtual assistant that could monitor my grandma's behavior and activities, and if needed could also alert a family member in case of an emergency. Giving my mother a break and at the same time keeping the patient in safe hands!
COMPONENTS IN THE SYSTEM / CONCEPT
Although this system focuses mainly on the issues faced by an Alzheimer patient we have inculcated many other systems in our project that impacts the lives of all elders helping them to cross their daily life's obstacles independently.
One of the main features of Infineon's pressure sensor is its size! This makes the key component portable and super versatile. In the heart of our system we have the Arduino Nano which is then connected to the DPS310 pressure sensor via the I2C bus. Actions and Behaviors will be coded to simulate the live motion of the patient. Using these graphs or values we determine the state of the patient and alert a member in case of an emergency. The data generated will be then represented on a small app using Blynk.
This whole system will be integrated into a compact yet good looking wearable band, blending this technology seamlessly into the patient's life.
FUNCTIONS AND CAPABILITIES
Here are the main functions and movements that our band will be able to analyse/detect :
Fall - studies show that the biggest issue with elders are of them losing balance and falling down. Often patients are helpless and it's only after sometime that help comes. This could be easily avoided with the Health Band by the detection of a sudden drop in pressure. Once detected a message is automatically sent to relatives, for aid preventing the injury to worsen.
Exercise - for old people it can be rather hard to get them to exercise, or go for a walk even though this will keep them fit and healthy. We figured that a way to motivate them could be by showing them the number of steps taken or in how much time they have walked for, so that they have something to push them to exercise.
And in my grandma's case the doctors have told her to walk around 1000 steps she is willing but she loses count. A counter helps her too!
Once the Health Band detects a "wave" motion it deducts that the patient has begun his/her exercise. Crest to crest or trough to trough marks one cycle. As steps are taken the number of cycles are generated and then displayed, making your very own step counter.
Fever - this one is pretty straight forward the sensor also gives the temperature. The band being in contact with the arm gives the live temperature of the patient. Any spikes or drops will be alerted again automatically via message to relatives.
State - tells the relatives the live state of the patient. For example if the Health Band detects not much changes of pressure the patient could be sleeping.
We have three states : Sleeping, Awake and Exercising. ( that said we have not perfected this function yet as sometimes we received wrong "states". We also plan to add more states)
CIRCUIT
Infineon's powerful DPS310 sensor can be synced using Bluetooth to an app. The app generates live visual representations of the sensor. Although it was useful it had its limitations for our concept.
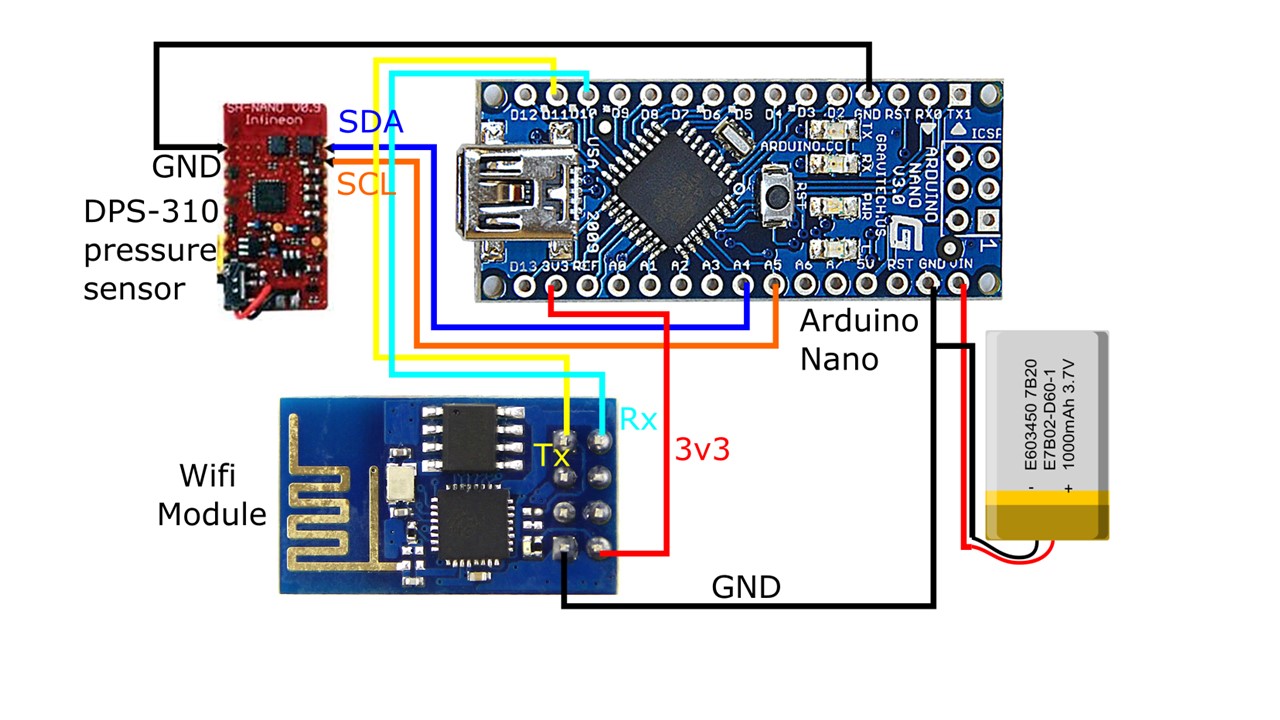
So to tap into the sensor's data stream we connected an Arduino Nano, via the I2C bus. This allowed us to compute the data making it possible to deduct various scenarios that the patient was in.
Once we got that bit sorted out we connected the Arduino to a ESP8266 WiFi module giving it the means to communicate with a mobile app.
SETTING UP
Before setting up everything you will need to add pins to the sensor. Snip two lengths of seven pins and solder them on. You could use a breadboard to make things easier.
- DPS310 Pressure Sensor to Arduino Nano (I2C)
NOTE : the orientation of the sensor is as depicted in the picture
Pin 1 (SDA) on sensor => Analog Pin 4 on Arduino
Pin 2 (SCL) on sensor => Analog Pin 5 on Arduino
Pin 8 (GND) on sensor => GND on Arduino
- Arduino Nano to ESP8266 (WiFi module)
NOTE : the orientation of the module is as depicted in the picture
Pin 1 on WiFi module => Digital Pin 11 on Arduino
Pin 2 on WiFi module => Digital Pin 10 on Arduino
Pin 7 (GND) on WiFi module => GND on Arduino
Pin 8 (Power) on WiFi module => 3v3 on Arduino
MAKING THE BAND
All the components being small neatly fits on your wrist. To make the actual band we used Canvas and Foam to embed the components. And then Velcro to form the straps.
To make your DIY Health band start by cutting foam the width of your hand. Then arrange the various sensors, and cut out the final size. Round the edges to give it a neater look. Press pins into the foam (giving it protection and grip), and embed the battery into a small slot.
Now flip the Band and solder the connections, the pins should just be sticking out...Do a test run to see if everything is working.
Add Velcro strips to make straps. Wrap the band in canvas and stick it with hot glue, this gives a neat finish and feel!
As we don't have a 3D printer we plan to upgrade this prototype in the future with a 3D printed on that will have perfect slots for all the components giving an ergonomic design to our Health Band!
***We will update this project, when we print our final 3d printed model, with pictures and print files***
CODING THE VARIOUS ALGORITHMS
Before we start programming our system there are certain libraries that you will need to install for the program to function. The libraries that you will need to download are:
- Wire library ( Usually comes pre-installed, this is responsible for the communication between the Arduino Nano and DPS310 Pressure Sensor) https://github.com/PaulStoffregen/Wire
- DPS310 Pressure Sensor library https://github.com/Infineon/DPS310-Pressure-Sensor
- Blynk library ( for the Arduino Nano to be able to communicate with the Blynk cloud) https://github.com/blynkkk/blynk-library
Once you have downloaded each of the libraries the installation for each follow the same process: open the Arduino IDE and head to sketch (top of the window). Then from the drop down list click on include library. Next click on add .ZIP library. Now navigate to wherever you have stored the files that you downloaded and click open. Repeat the process for all three libraries.
Now you can try downloading the trial code and check whether it compiles. Upload it to your Arduino Nano and make sure your getting live data by opening the serial monitor (depicted by the monitor icon on the top right corner of the IDE).
If that works well go ahead and upload the main code, you can then start building your app.
BUILDING THE APP
To connect to the internet we use a pre-built platform called Blynk, which can be downloaded from the android play store, link below. There are countless examples on how to use the app with the Arduino which are all available by heading to files in the Arduino IDE, then examples and under the Blynk list.
Link to blynk app: https://play.google.com/store/apps/details?id=cc.
We used the App to make representations of the data in a user friendly manner.
Select Arduino Nano as your micro controller and as ''connection type'' WiFi . You will then receive a mail of the "auth token" which you need to input in the code, (mentioned in the code).
We added several widgets such as a Gauge to represent the live temperature, a Value Display for the step counter and an LCD Display showing the present state. These are the basic building blocks you can add many more functions for other specific cases.
CONCLUSIONS, SUCCESSFUL ON THE WHOLE!
The project had some errors and misreadings. One was the body temperature. read by the HealthBand was 36° Celsius (wrist temp) while the medical grade thermometer read it as 36.8° Celsius (armpit temp).
Our algorithms for the steps proved to be giving wrong counts at first but after several attempts of modification it worked rather accurately. Another problem was in the state function. We added more variables and statements to make it further understand other states.
In the end, we were able to fix the problems by re-calibration and the HealthBand successfully gathers the data needed. My grand mom has been without an assistant for the last two weeks and the Band has worked out great!
As per now the fall or fever messages haven't been tested as there has not been any such situations but theoretically they work!
This has been a great project and can be implemented rather easily, we hope this band can save lives and keep old people in safe hands!


Comments