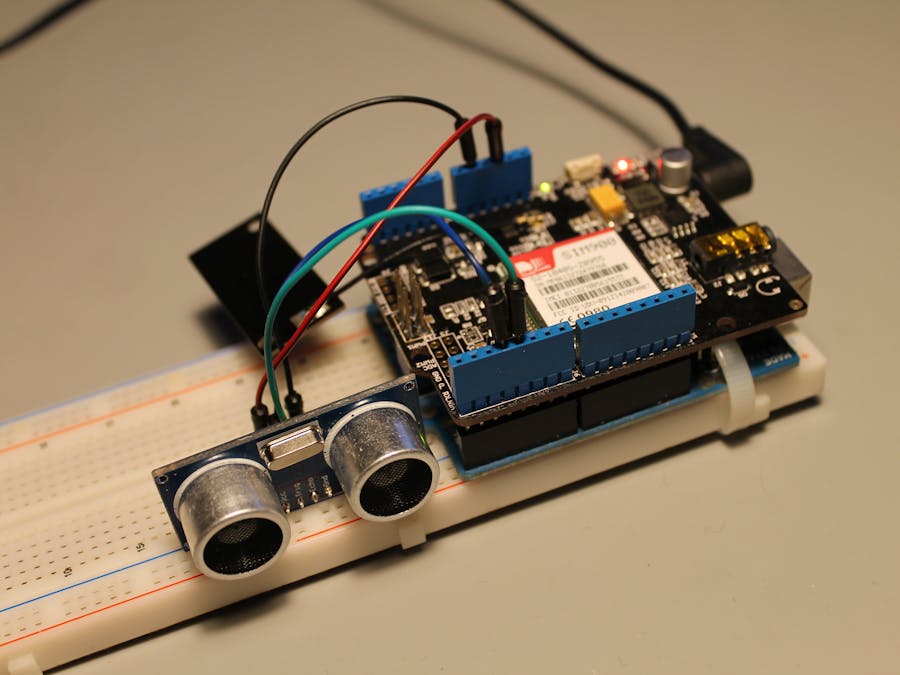
For the Christmas Holidays I will travel to my parents house and due to some recent home invasions in the neighborhood I have decided to leave behind a DIY Alarm System with some things that I had lying around.
This project consists in an Arduino Uno with the SeeedStudio GPRS Shield V2.0 connected to an ultrasonic sensor HC-SR04.
The idea is behind this is very simple, when the ultrasonic sensor detects a difference in the distance that is measuring, I will get a call on my handy. I can then place a call back in order to "rearm" the system.
Gathering the ComponentsYou will need to have:
- 1x Arduino Uno
- 1x GPRS Shield (It is also possible to use other GSM shields available in the market)
- 1x Ultrasonic Range Finder HC-SR04
- 1x Power supply 12V@2A (It recommend to use an external power supply capable of providing 2A to avoid problem with the GSM shield)
- 1x Breadboard
- Some wires
Place a SIM card without PIN CODE in the GPRS Shield.
Place the GPRS Shield on top of the Arduino UNO.
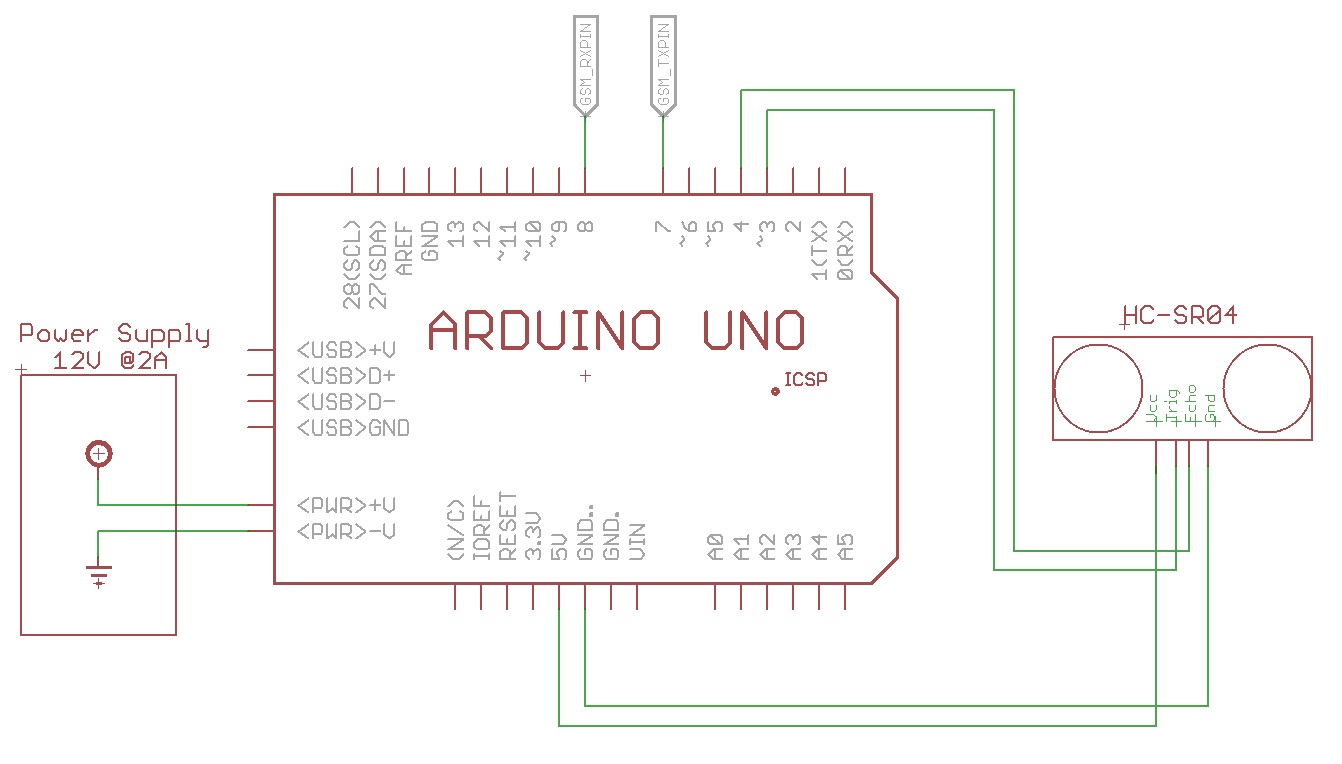
Define pins 7 and 8 as the communication pins in the GPRS Shield, by changing the two jumpers to the left side.
Connect the VCC and GND in the HC-SR04 to the 5V and GND pins in the Arduino.
Connect the Trig and Echo in the HC-SR04 to the pin 3 and pin 4 pins in the Arduino.
I using a SIM900 library. It is available for download here. Once you install the library in the correct Arduino folder you may need to change somethings.
Setting up the communications pins.
The GPRS Shield V2.0 uses pins 7 and 8 on the Arduino. Open the GSM.cpp file of the library with a text editor. Change the #define _GSM_TXPIN_ to 7 and #define _GSM_RXPIN_ to 8.
//De-comment this two lines below if you have the
//second version og GSM GPRS Shield
#define _GSM_TXPIN_ 7
#define _GSM_RXPIN_ 8
Save the file.
Debug Mode
Open GSM.h file with a text editor. Turn off the Debug Mode in the library in the following code line by commenting it.
GSM_ON
On the same file, you will need to change the GSM_ON pin to pin 9.
// pins definition
#define GSM_ON              9 // connect GSM Module turn ON to pin 77
//#define GSM_RESET         9
Comment all the other pin 9 #define statements.
Save the file.
Download the Arduino code
Get my code from the code section of this project. After downloading replace the "XXXXXXX" in the code by your phone number.
char user_phone_number[] = "XXXXXXXXXXXXX"; //DEFINE YOUR USER CELLPHONE NUMBER
Compile and Upload.
Note: Make sure that the phone number that you insert is equal to the one displayed in the Serial Monitor when you make a call.
ATTESO: Your_Phone_Number_to_insert_in_the_XXXXXXX
Open a Serial Monitor window
After upload, open a Serial Monitor window in the Arduino IDE. The program will start to display first the attempting connection with the GPRS shield.
When the Shield is ready, you still can have the message, Waiting for Network Registration
. If this appends you will have to wait for a few minutes in order for the Shield connect to the GSM network. The green LED will be fast blinking during this period.
Test it
When the program is running pass your hand in front of the HC-SR04. You should get the message Movement in the serial monitor and a call on your handy.
Place a call to the your system number and the alarm should "rearm" again.
Pros and ConsI still have not performed a long test run on the system, but I already notice that sometimes the measurements displayed can present a problem if you are measuring long distances.
Future updates:
Probably an PIR sensor will get better results for this project then the ultrasonic sensor.
An output circuit (relay or MOSFET) should be also included, this would allow me to connect a siren or to activate any other system remotely.
Please write me if you found any mistake, if you have any suggestion/improvement or questions.
Thanks for reading.
Hugo Gomes


_ztBMuBhMHo.jpg?auto=compress%2Cformat&w=48&h=48&fit=fill&bg=ffffff)


Comments
Please log in or sign up to comment.