


Hardware components | ||||||
 |
| × | 1 | |||
| × | 1 | ||||
 |
| × | 1 | |||
 |
| × | 1 | |||
Software apps and online services | ||||||
 |
| |||||
I'll be upgrading some test equipment and need to update the display module on the front of a chassis. The upgrade will boast a larger display than what is currently used and a will also include touchscreen functionality. Although the test equipment will be using an FPGA dev board to control the screen, we'll get started with a Raspberry Pi running linux first to get a better understanding of how to use the display.
Raspberry Pi Configurationssh into the Raspberry-Pi from a linux terminal
ssh <user>@<raspberry-pi_ip-address>enable SPI
raspi-confignavigate to interfacing options
locate the SPI kernel module and enable it. Restart the pi
sudo shutdown -h nowDownload the source files from:https://github.com/Bridgetek/EVE-MCU-BRT_AN_025-Example-RPi/
Extract the files with your favorite.zip extractor.
use SCP from a linux terminal to send the files to the PI
cd /Downloads
scp -r ./EVE-MCU-BRT_AN_025-Example-RPi-main <user>@<raspi_ipAddress>:/home/<user>
be sure to update the <user> and <raspi_ipAddress>
Modify the source and compilessh into the raspberry pi again
ssh <user>@<raspi_ipAddress>Modify the source file in EVE-MCU-BRT_AN_025-Example-RPi-main/lib/eve/ports/eve_arch_rpi/EVE_Linux_RPi.c
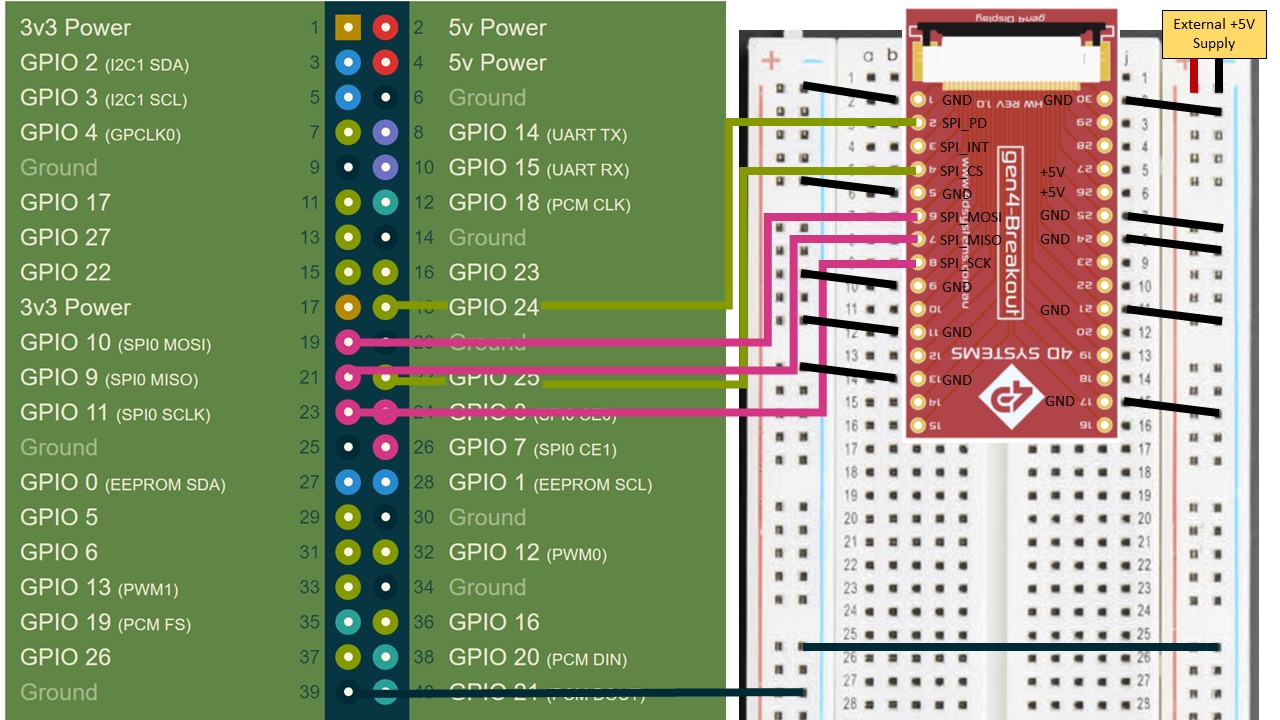
nano ./EVE-MCU-BRT_AN_025-Example-RPi-main/lib/eve/ports/eve_arch_rpi/EVE_Linux_RPi.cNotice the pin configuration in this file, it uses SPI bus 0 but not the traditional SPI_CE0/SPI_CE1. The CS pin is set as GPIO25 (Pin 22) and PD pin as GPIO24 (Pin 18):
printf ("J8 Pin 19 - MOSI (SPI0_D1)\n");
printf ("J8 Pin 21 - MISO (SPI0_D0)\n");
printf ("J8 Pin 23 - SCLK (SPI0_SCLK)\n");
printf ("J8 Pin 22 - CS (GPIO25) - Note this is not the SPI0_CS0 pin\n");
printf ("J8 Pin 18 - PD# (GPIO24) - Powerdown pin\n");This same file checks to make sure we're using the right thing. Although, the file they provided actually checks to make sure we're using spidev1.0 even though it instantiates spidev0.0 first. This might be an oversight by the developer, but we'll comment this section of the code out and maybe save it for another day. Add the /* */ comment brackets to the outside of this if-statement as shown below:
/*
if (spiHandle == -1)
    {
        printf("Please make sure /dev/spidev1.0 is enabled. The raspi-config\n");
        printf("configuration tool can enable \"SPI\" under the section\n");
        printf("\"Interfacing Options\". \n");
        exit(-1);
    }
*/
Compile the code by navigating back to the project root directory and execute the makefile by typing 'make'
cd /home/<user>/EVE-MCU-BRT_AN_025-Example-RPi-main
makeRun the executable file. sudo permission is required to set GPIO directions
sudo ./EVE-MCU-BRT_AN_025-Example-RPi-mainThe display should now be active and show the calibration screen
Follow the on-screen directions to calibrate the screen
Also take note of the config.bin file which is created after the display is configured for the first time. The file will store configuration settings for the display so that calibration does not have to be done each time


Comments
Please log in or sign up to comment.