Hi, I am Vishal Soni.
By the way, subscribe to my YouTube channel for more projects like this. I also update my upcoming projects on Instagram.
buy me a coffee! ☕: Donate
I make lots of projects with limited resources, So this time I made a “Batuni - The Talkative Messenger Robot”. Batuni is the hindi word that means Talkative.
Why This is Messenger Robot:-This Robot has a Bluetooth module, which can be connected to a smartphone then any word or sentence sent by that smartphone will be converted into text to speech.
To make Simple and easy to make I decided to make it in arduino but the output is not good as google tts running in ESP32, but this is due to limitation of arduino. Arduino makes this text to speech by speech synthesis.
Speech Synthesis :-Speech synthesis is the artificial production of human speech. A computer system used for this purpose is called a speech computer or speech synthesizer, and can be implemented in software or hardware products.
This speech synthesis was famous in Atari Game devices, which produce game sound based on speech synthesis.
Electronics
- Arduino nano
- PAM8403 Amplifier
- Speaker
- Bluetooth module (RYB808L_lite or HC-05 )
- 27k resistor (2)
- 330 Ohm resistor
- 10nf capacitor (2)
- 10uf Capacitor
- LED
Tools
- Printout of ROBOT on glossy sheet
- Hot Glue Gun
- Paper Cutter
- Wires
- Solder iron & wire
- Laptop
- Wire and zero PCB
- Spray paint (black matt)
I know at first look it looks like the robot will do anything, but nahh, the robot is made out of a hard sheet.
To make This robot first you need a printout, download the printout from my githubpage from the link given below, And take this printout on a glossy paper so this would be easy to fold and make shapes out of it.
Github link :- https://github.com/vishalsoniindia/Talktive-Messanger-Robot-with-arduino/raw/main/Talkative_messanger_robot_cutout.pdf
This Robot was made to move Arms, legs and head. But we will not make it like this, To keep things simple I will straight, and stick all parts with white glue. So cut the robot part out of the sheet as given below. The Paper cutter and Scissor can be used to cut out perfectly.
As you can see in the image this is all cutout which will be needed to make this robot. Take a piece of cutout and fold it on every corner, I know every person is smart they can do it easily.
In the image below the head is folded for reference, the white part at the corner is to put glue to hold the boxy parts.
As in the image above, the head is folded at each corner to make a boxy shape, now glue it with white glue which makes it stable in shape. But before gluing things, just change the face with normal paper printout, or butter paper because we will put LED inside the face so paper can defuse the light.
The final look is shown in image, do this with all the parts which make the whole robot. Be gentle with boxes otherwise the shape can be damage.
In the image above you can see all the boxes are ready, after this the hole at the center of the robot is made to insert the LED in the head, which glows while talking.
The LED will Stay in the head and the wire of the LED will come out from one of the legs, which will go inside the PCB.
Installing The LibraryI searched a lot to find Perfect TTS library for Arduino,
I found two libraries Talkie and TTS.h
Talkie is not a TTS library, there are fixed words or sounds which can be stored before uploading the code.
TTS.h is perfect TTS but the sound of this library is not good due to some limitation of arduino, but this is what I found for arduino.
Download the folder from my githubpage,
Extract the folder, in the folder you will find TTS_ library Folder, Copy the folder and paste it in the path This PC > Documents > Arduini >libraries
There are more examples if you want to try it yourself.
Github :- https://github.com/vishalsoniindia/Talktive-Messanger-Robot-with-arduino
Upload The CodeIn the same folder which is downloaded from my githubpage, Find the Code folder and open the code in arduino IDE.
Connect the arduino with PC and Select Correct board “which is arduino nano” and correct port (Can be found in device manager).
After Selecting Correct Settings, Hit on upload, Once you see the Done Uploading, Now we will Solder the circuit.
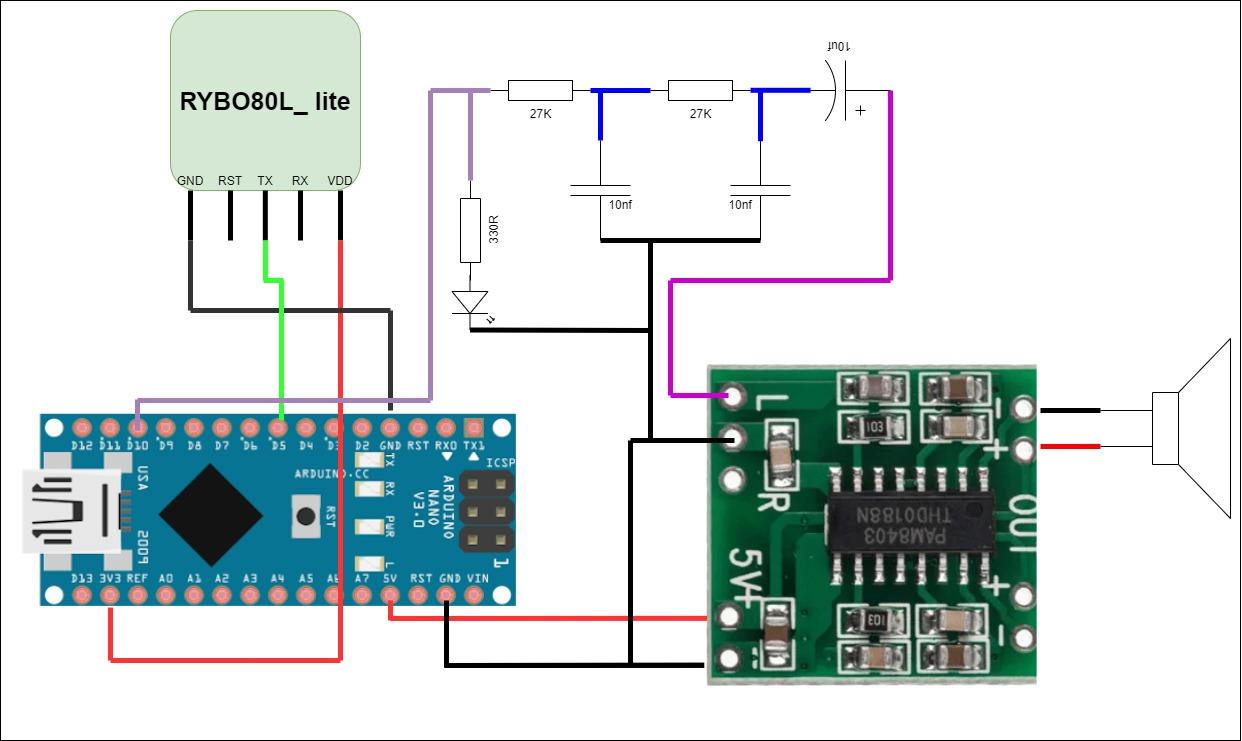
CircuitConnect the circuit diagram as shown in image. Test the circuit on the breadboard once it works fine connect it on zero pcb.
As you can see in the circuit there is an arduino nano connected with a bluetooth module, bluetooth module takes command from the smartphone and converts it into text to speech. The speech sound goes to the PAM8403 through a RC filter circuit.
I am using ReyaxRYB808L_lite you can buy it from the link given below or check their website. They have many modules that can be useful for your future projects.
Reyax official Website :-https://reyax.com/products/ryb080i_lite/
Purchasing Link :-Amazon: https://www.amazon.com/REYAX-RYB080I_lite-Bluetooth-Module-CC2640R2F/dp/B07NB7FK6M
Cpark Solution (REYAX Indian Distributor) :https://www.cparkb2c.in/product/ryb080i_lite/
If we look at it’s data sheet, it works on 1.8 to 3.8v, so we will connect this module to 3.3v of arduino nano.
The voltage logic level on RST, TX, RX are also 3.3v so please use a voltage divider while transferring anything to bluetooth (ON RX PIN). I am Using TX pin so there is no need for a voltage divider.
Connect this circuit diagram on zero PCB and test it, also connect the robot too to see the LED blink in robot’s head while talking.
I have got a Cardboard box to pack everything inside the box, this box will hold electronics. The Hole in the box is for speakers and to program arduino.
Paint it with spray paint, Trust me the black matt paint looks cool with every project. Before painting the box please shake the spray paint and after use of spray paint spray it upside down to release paint prom nozal.
If you don’t have spray paint then paint it with normal paint which is available.
As in the image I have a fixed speaker and pcb with hot glue. Now we can stick a robot on it.
Before fixing the robot make sure the LED wire are connected to the PCB and glue the robot on the BOX.
At the END it looks like this, the black box contains all the electronics and there is a usb port outside to power the arduino, but a battery can be used to make it portable.
Find the Android APK file in the same folder which you have downloaded from my githubpage.
Follow the steps to use the app.
- Install the app and open it.
Turn on device
- Turn on device
- Click on connect button in the app
- Click on REYAX bluetooth name
- Now send anything the ROBOT will speak.


Comments
Please log in or sign up to comment.