


Hardware components | ||||||
| × | 1 | ||||
| × | 1 | ||||
 |
| × | 1 | |||
| × | 1 | ||||
 |
| × | 1 | |||
| × | 1 | ||||
Software apps and online services | ||||||
 |
| |||||
 |
| |||||
In this tutorial I will be sharing how to use ESP8266 to get data like Temperature, Pressure, Climate etc. And YouTube data like Subscribers & Total view count. and display the data on Serial monitor and display it on LCD. The data will be fetched online so no additional sensors are needed for this one. Website used here is RemoteMe.org. Check out the previous tutorial about RemoteMe here if you haven't already.
So lets get started...
Step 1: What You Need :-For this tutorial all you will need is a microcontroller, it could be Arduino or raspberry pi or as I have used ESP8266. I have used the Node MCU which is based on ESP8266, If you are using arduino, you will need ESP WiFi module.
Hardware Components :-
- NodeMCU or Arduino (If you are using arduino, you will need this module) or Raspberry pi
- LCD display. x 1
- Breadboard. x 1
- Momentary Switch x 1 ( Push Button).
- 220 ohm resistor x 1.
- 10k ohm potentiometer x 1 (optional).
Software :-
- Ardunio IDE.
- RemoteMe.org (Sign up).
In this step we will set up variables which will send data to our microcontroller. First head to RemoteMe.org and follow the steps :- (Refer the images above for better understanding)
On the website, head to "Applications" and create an account if you don't already have one. Next, goto "Variables" ( It is on the Left side in the menu). In the Variables option there will be an empty page, with "Add" option on top right corner. Click on that. A pop-up will appear.
- In the pop-up fill the name of the variable. It depends on what you want (Subscriber Counts, View Counts or Weather Info).
Now select server type "Remote", the Group depends on what you want YouTube or weather data.If you select "YouTube", You will need channel ID which you can find on YouTube, Just go to YouTube and search the channel you want, Open it and copy the code in URL. ( Check the images for reference)
- Now in the Remote Mode option select what you want Subscriber count or Views count. And submit the data. It will create a variable. Similarly make more variables for other data you want.
Check out the pictures for details, to get more information.
Step 3: Setting Up Device on RemoteMe :-Once the Variables are made, head to the "Devices" option. It is just above "Variables". Here you have to create a new device.
- To create new device, Select the option on top right corner.
- Select "New Network Devices" from the drop-down menu. A pop-up will appear.
- First select the type of device you are using. (For Arduino and NodeMCU, select arduino)
- Name the device something like YouTube/Weather, whatever you want.
- Give a device ID, it can be anything but for first device give '1'.
- Now submit. A new device will appear.
- Click on the burger menu on the device. (Represented by 3 horizontal lines) and select "Code Generator Wizard".
- Now choose Variables, Select all and click on Next.
- Enter you WiFi name and Password. In the Token Menu select token. Click on Next.
- Turn On the debug option and Click next.
- Here you can see the code for Arduino. It will be automatically generated and you can download it.
Move on to the next step.
Step 4: Coding :-The code downloaded can be now uploaded to the Microcontroller. For the code to work you need some libraries which you can install from Library Manager.
To Install Libraries :-
Goto >> Sketch >> Include Library >> Manage Libraries.
- In the search bar enter the name of the libraries. (ESP8266WiFi, ESP8266WiFiMulti & RemoteMe)
- Install the Libraries.
Now you can upload the code and open Serial Monitor to watch the data.
Below I have provided a code which is edited a bit to make the results more presentable. You can download the code, add your WiFi name & password in the required fields. Also add the Device ID which is used on the previous step ('1').
To add token manually goto RemoteMe >> Applications >> Tokens. Copy the Token and paste it on the code. Upload and check the Serial Monitor for results.
NOTE :- To program ESP boards with arduino IDE, you have to setup the IDE which if you have no idea about, you can check this tutorial.
Step 5: Displaying Data on LCD :-Now that you have successfully displayed data on 'Serial Monitor', You can move on to display the data on a LCD screen so the project can be more portable.
Follow the steps carefully :-
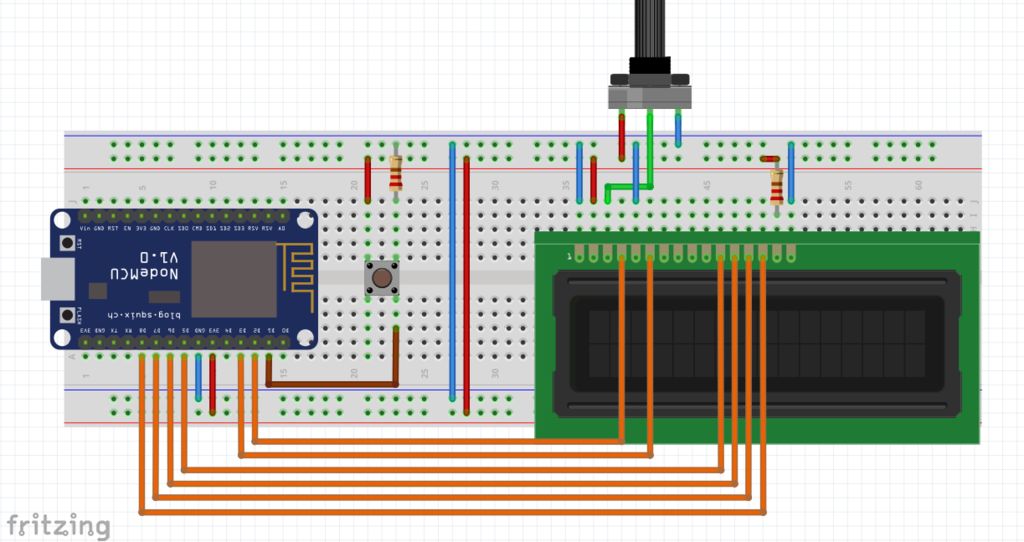
First place the NodeMCU board (ESP8266) on a breadboard, Connect its '3.3v' to the '+ve' rail of the breadboard and 'Gnd' to '-ve' rail. Connect a push button next to the MCU and connect its one pin to '-ve' rail of breadboard through a '220 ohm' resistor. And connect the same pin to 'D2' pin of the MCU. Connect the other pin of the push button to '+ve' rail of the breadboard. Now connect the LCD on the breadboard and follow the connections carefully.
- VSS >> -ve rail of breadboard.
- VDD >> +ve rail.
- V0 >> Middle terminal of potentiometer. (connect other two terminals to -ve and +ve)
- RS >> D2
- RW >> -ve rail.
- E >> D3 of MCU
- D4 >> D5
- D5 >> D6
- D6 >> D7
- D7 >> D8
- A >> +ve rail of breadboard through a 220 ohm resistor.
- K >> -ve rail
I know this is a bit confusing but check out the pictures to get a better idea.
With that been done, the connections are ready, Now just have to upload the code.
The code needs to be edited in order to work with LCD.
Let's edit the previous code :-
#define WIFI_NAME "WiFi Name"
#define WIFI_PASSWORD "WiFi Password"
#define DEVICE_ID 1
#define DEVICE_NAME "Device Name"
#define TOKEN "Add Token"
#define btn D1  //Declare a button variable for push button
#include<RemoteMe.h>
#include<RemoteMeSocketConnector.h>
#include<ESP8266WiFi.h>
#include<ESP8266WiFiMulti.h>
#include<LiquidCrystal.h> //including library to use LCD
LiquidCrystal lcd(D2, D3, D5, D6, D7, D8); //mapping LCD pins to ESP's pins
/* Variables to store data from RemoteMe */
int16_t i, i1, i2, temp, pres;
int32_t subs, views;
String hr; //Only needed if you want to display time.
long lastDebounceTime = 0, debounceDelay = 50; //To eliminate button bouncing.
ESP8266WiFiMulti WiFiMulti;
RemoteMe& remoteMe = RemoteMe::getInstance(TOKEN, DEVICE_ID);
void onSubscribersChange(int32_t i)
{
    subs = i; //Storing subscriber data in variable 'subs'
}
void onViewsChange(int32_t i)
{
    views = i; //Storing views in variable 'views'
}
void onWeatherChange(int16_t i1, int16_t i2,String s1,String s2)
{
    temp = i1; //storing temperature
    pres = i2; //Storing Pressure
}
/*New functions to display the stored data*/
void youtube()
{
  //Display YouTube info.
  Serial.printf("Subscribers : %d\n", subs);
  Serial.printf("Views : %d\n", views);

  lcd.clear();
  lcd.printf("Subscribers : %d", subs);
  lcd.setCursor(0,1);
  lcd.printf("Views : %d", views);
  lcd.setCursor(0,0);
}
void weather()
{
  //Display weather info.
  Serial.printf("Temparature : %d °C\n", temp);
  Serial.printf("Pressure : %d Pa\n", pres);
  lcd.clear();
  lcd.printf("Temperature : %d", temp);
  lcd.setCursor(0,1);
  lcd.printf("Pressure : %d", pres);
  lcd.setCursor(0,0);
}
void setup()
{
    Serial.begin(9600);
    lcd.begin(16, 2);
    pinMode(btn, INPUT);

    WiFiMulti.addAP(WIFI_NAME, WIFI_PASSWORD);
    while (WiFiMulti.run() != WL_CONNECTED)
    {
        delay(100);
    }
    remoteMe.getVariables()->observeInteger("Subscribers" ,onSubscribersChange);
    remoteMe.getVariables()->observeInteger("Views" ,onViewsChange);
    remoteMe.getVariables()->observeSmallInteger2Text2("Weather" ,onWeatherChange);
    remoteMe.sendRegisterDeviceMessage(DEVICE_NAME);
    Serial.print("Connected...");
    lcd.print("Connected...");
}
void loop()
{
  int btn_state = LOW; //button state is initially set LOW
  static int flag = 0; //flag is set 0

     btn_state = digitalRead(btn); //button input is read.
     if((millis() - lastDebounceTime) > debounceDelay)
     {
       if((btn_state == HIGH) && (flag == 0)) //if button is pressed & flag is 0
       {
         weather(); //show weather data
         flag = 1; //set flag to 1
       }
       else if((btn_state == HIGH) && (flag == 1)) //if button is pressed & flag is 1
       {
         youtube(); //show YouTube info
         flag = 0; //set flag to 0
       }
       lastDebounceTime = millis();
     }
    remoteMe.loop();
}
So after the changes are made, You can upload the code to the board and you should see "connected..." being displayed on LCD as well as on the Serial monitor.
Download Code From Below :-
Step 6: Testing :-Once the code is up and running, you can test if everything works fine.
When the ESP board is connected to the network, LCD will display "Connected..."
Pressing the button will display Weather (Temperature and Pressure info), pressing again will display YouTube Subscribers and Total views.
You can edit the code to display other information like Time, weather condition etc. as well.
Hope you like the post, If you have any questions or face any problem, you can let me know in the comment section. I will reply as soon as possible.
Thank You.


Comments
Please log in or sign up to comment.