- PetrFriend Alert Vest
PetrFriend alert vest for small animals implementing Kemet products.
By James Fleit 2020
Building a PetrFriend implementing Kemet Products
This is the main documentation to PetrFriend on how to build this pet alert vest, device. I am using common easily available parts, which makes the PetrFriend alert vest easier and quicker to build.
The origin of this project is that I have a neighbor who harbors my cat. I do not know which neighbor this is so I am am building this vest to notify these people to provide safe return , notification of my cats location. Ideal integration is bullet proof and light weight; this is my version.
Quick Overview of the build process to follow.
Prepare vest mounting surfaces Assemble Hardware ..TEST Mount and secure in vest.. TEST
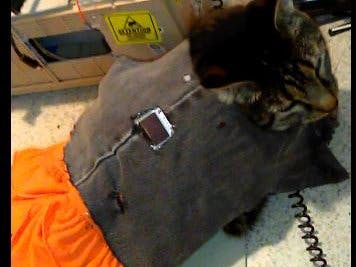
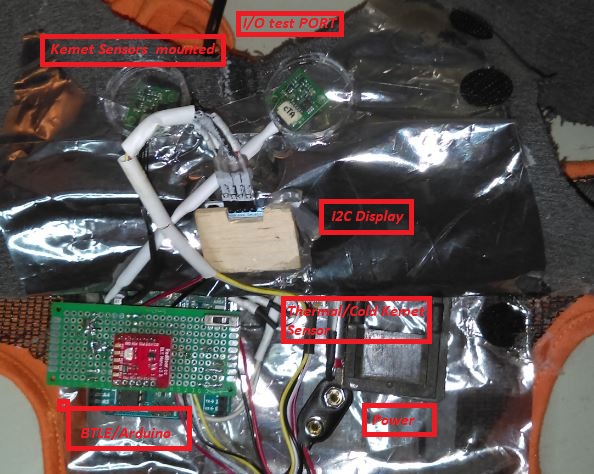
Vest preparation and mounting consumed a lot of time, and size varies depending on the type of hardware integrated into the vest. I modified a basic cat tutu purchased from the pet store. This vest is modified with two Kemet Pryo Sensors mounted near the top on either side to provide better angular detection. The two sensors ideally, depending on code, add some redundancy and false-positive correction over a larger area. Your vest may vary depending on your specific hardware and software integration. Additionally a Kemet thermal zero degree reed switch is also integrated into the vest as an environmental cold check.
Hardware
Bill of sale at end of this document, most technicial datasheets are available for the listed parts from DigaKey.com
1) A Vest, as above, I chose a cat-sized tutu cut it up, and added Velcro straps, and balsa wood slats for rigidity, encased in a static bag jean cover for some weather resistance. Display and two main sensors protruding.
Pictured below left to right
2) Standard Arduino UnoR3 for main device with the BTLE5 on the RedBear for a wireless alert, Note: OEM (Original equipment manufacturer) hardware is the best choice for working code and shared libraries. Smaller integration desired using only a RedBear device but the Arduino device is more universal.
3) Kemet Thermal reed Switch. TRS3-0MCR01V axial 0°C ±2.5°C .
4) 2 Kemet Pryo Sensors: 1)SS-430 60 DEG @2Meters, 1)KEM_SE0208_SS PIR2019 and wired connectors.
The 6 Inch wired connector: 05SR-3S works great to attach the sensors.
5) Choose A I2C 4 pin interface Display, OLED is smaller, lighter, grove LCD more readable, less flexible.
6) Standard Seed temperature sensor for baseline temperature checking.
Additional parts are header pins and a small breakout board ( Picture 1 ) to mount all your parts on, and for ease to disassemble and attach to the Arduino. A 9v battery connector, wires, breakout boards, heat shrink and a soldering iron all available through any IoTMaker space online.
Picture 1
Build Build Build
This build followed strict static electricity mitigation because Colorado is dry and static central so to avoid any anomalies with OEM parts, I recommend building at a static-free workstation.
Picture 2
START
I started by building a basic parts schematic below and designating hardware I/O pins locations and power on the breakout board. Following your schematic, line up the header pins on the breakout board to the Arduino for the desired I/O pins needed and soldering them in place from the top (pictures 3+4). Picture 3 using digital pins 4,6,7 . Picture 4, Power and Ground plus analog inputs A0 and A1. Digital 5 pin can be used to signal Redbear for wireless omitted here but newer Arduino's coming w integrated BTLE5.
Pictures 3 and 4
All the device's wires except the display are hardwired and fed through from below leaving the traces and test points on the top of the breakout board for ease in troubleshooting/access (pictures 5+6 ). Picture 5 is mounted breakout board and major components attached. Soldering the wires from underneath makes it easier to attach the wires and components to the breakout board. The wires can then be easily routed to either end for a cleaner appearance.
Top assembled view picture 5 and the bottom wiring view when removed picture 6
Constant hardware and code checking is necessary as you attach each device. Final product should have sufficient wire to place devices easily with some motion flexibility. Solder in 9v power connector, connect 9 Volt battery , go remote ! test
Final Assembly
After code testing and hardware assembly, it's time to fit it all into the vest. I cut a small porthole in the vest for loading and testing once all the parts are incorporated. I've used black engine RTV gasket sealer for glue and water proffer to seal some parts in the final design. I tried to make it somewhat rugged.
Here is my layout.
Totally assembled and tested, your Alert vest should look something like this. The vest's bulkiness is proportional to the hardware used. Setting the code to alert when both sensors go off definitely cuts down on the false positives. Covering and protecting the sensors is a good option but calculating the reflectivity losses would require more testing.A Bigger antenna on the BTLE would be nice also.
Final Part: strap it on a betatest cat and go test.
Note : no animals were harmed in the making of this vest, disturbed and irritated but not harmed.
Video
Schematic of PetrFriend Alert Vest
The Code below.
Note : This is the basic proof of concept code, no fluff. You may want to remove some of the test printlns in final. I wanted a summer /winter switch. All code logic depends on HW, check signs, and pull up down resistors. Like more cool display alerts but this is simplest easy to follow code. The BTLE wireless Redbear integration with broadcast HOME( SHADOWCAT) alert is trivial integration, omitted as newer Arduinos and boards have better BTLE integrated.
// delclare all I/O
#include <SPI.h>
#include <Wire.h>
#include <Adafruit_GFX.h>
#include <Adafruit_SSD1306.h>
// include all drivers for display
Adafruit_SSD1306 display = Adafruit_SSD1306(128, 32, &Wire);
int detector1 = 7; //Main sensor1 of activity to alarm on
int detector2 = 4; // Main sensor2 of activity to alarm on
int Ecold = 6; // winter , too cold switch
int GroveTemp = A0; // relative degrees check
int sensorValue = 0; // variable to store the value coming from temp
void setup() {
// initialize all Parts:
pinMode(GroveTemp, INPUT);
// initialize the COLD SWITCH DRIVER as an output:
pinMode(Ecold, INPUT);
// initialize MAIN people activity SENSOR as a input:
pinMode(detector1, INPUT);
pinMode(detector2, INPUT);
// initialize serial port out for testing
Serial.begin(9600);
// SSD1306_SWITCHCAPVCC = generate display voltage from 3.3V internally at port
display.begin(SSD1306_SWITCHCAPVCC, 0x3C); // Address 0x3C for 128x32
// Since the buffer is intialized with an Adafruit splashscreen
// internally, this will display the splashscreen.
display.display();
delay(10);
}
void loop() {
// winter/summer switch omitted
// code for always winter, check cold sw.
if ( Ecold==LOW ){
Serial.println("not that cold");
// check the temp
sensorValue = analogRead(GroveTemp);
// cold freezing around 240 number actually
// <value changes due to testing temp ranges
}
if (sensorValue < 499 ){
Serial.println("Normal operating temperature");
delay(100);
// stabilize ?
}
// its coldish out check the emergency cold breaker
else {(digitalRead(Ecold) == HIGH )
Serial.println(" ECold Switch tripped");
//code here for display too cold alarm,
// Enble BTLE, SSID... trivial code
}
} // check the sensors for activity
if (digitalRead(detector1)and digitalRead(detector2)== HIGH ){
Serial.println(" both sides activated");
delay(1000); // stabilize ?
// Enble BTLE wireless, HOME ID alert... trivial code
// Clear the buffer.
display.clearDisplay();
display.display();
// display ALARM Catch cat
display.setTextSize(1);
display.setTextColor(SSD1306_WHITE);
display.setCursor(0,0);
display.print("Catch this cat NOW: ");
display.print("DO NOT FEED THIS CAT ");
display.print(" ");
display.println("CALL #)#@#&%^%*");
display.println(" HOMEID ShadowCat ");
display.setCursor(0,0);
display.display(); // actually display all of the above
delay (10000);
// Clear the buffer.
display.clearDisplay();
display.display();
}
} // end of main
Bill of Sale listing
A small animal vest : 10 $
Standard Arduino UnoR3 : 10 $ Redbear : 30$
Kemet Thermal reed Switch. TRS3-0MCR01V 12.81$
Kemet Pryo Sensors: #1 SS-430 60 DEG @2Meters, 16.54 $DigaKey
#2 - KEM_SE0208_SS PIR2019 and wired connectors. ( free HW )
- 6 Inch wired connector: 05SR-3S : 1.42$ DigaKey
- I2C 4 pin interface OLED Display 30$
- Grove Seed temperature sensor : 5$
- Misc HW, wires solder , mounting boards :10$


Comments