I have been wanting to develop a quadruped from long time ago. I find them really cool, challenging and I think they can adapt better for certain terrains or situations.
Of course they have pros and cons:
Pros
- Can be an all-terrain robot
- Can be better in rough terrains
Cons
- They are more expensive to make(motors and hardware for their control are usually the most expensive part)
- The way they walk has to be told explicitly and it is harder to configure than in a robot with wheels
I wanted to tackle the cons of it, not an easy task but challenges are fun!
My fist try some time ago was this one:
It failed mainly because of it motors and size. The servos where not powerful enough to lift it all(the battery was too heavy) and the ADSN 3080 sensor(we will talk about it later) was too close to the floor so it couldn't acquire the data properly.
I had that project abandoned to focus on other areas, then I saw this challenge and I though it could be a great opportunity to make a better and improved one with better "brain".
Currently it is a working software project going towards being a full working software-hardware platform.
Objective- Educative platform
I think robotics is a great tool for education.
It can teach team collaboration(different skills are needed, design, software, hardware...) and also different parts of engineering.
Because of the different parts involved in robotics you (as a teacher) can focus of the part of interest: protocol communications, AI, motor control, HDL, design, data acquisition, distributed systems, ROS(to implement)...
Also I think the project is great for this purpose because it is open source so you can learn how it is build and build on top of it.
- Research platform
One of my favourite fields of AI is Reinforcement Learning, so all examples I see usually use Gym environments. Some of them perform great tasks but they are just in virtual world. I wanted to change that creating this platform, making accessible to anyone(specially students) with a low cost in materials.
Of course there exist projects where they transfer the learned behaviours from simulation to real world in research but expensive(and sometimes too big) robots are used.
Here are some amazing projects on RL for real life robotics:
Democratize robotics:
Robotics is a very expensive field
https://www.hebirobotics.com/robotic-kits?utm_source=robots.ieee.org a single actuator starts at $3,000 USD. I don't mean they don't worth it, they are a great engineering product(?)
Hardware used- Jetson Nano
The Nvidia Jetson Nano is a great choice for this project for two main reasons:
-Due to it focus to be used for researchs it the best option. For simplification let's say it is a low power Nvidia's GPU, that is great because it means it runs CUDA. Every AI frameworks interfaces with CUDA for acceleration purposes so in this robotic project won't be important the framework(difference to others boards which use just one framework or an own API) you are comfortable to use for AI, in research is used Caffe, PyTorch, Tensorflow...
-CUDA itself, for robotics timing is an important factor. With CUDA you can easy paralelize multiple or even hundred (128 tasks in Jetson Nano) and is relatively easy to use(simple tasks). I thought using it for parallelizing Inverse Kinematics algorithms but I decided to not take that approach. Finally I wanted to use it to compute the needed speed for each motor but I did not have time to do it.
- Arduino Mega
This will be needed because it capacity of IO pins. The important for us is that it has 54 digital input/output and 4 UART. It is based on ATmega2560 microcontroller. I have not tested it but maybe an Arduino Due which has the same form factor(?) as the Arduino Mega but is better equipped with an ARM Cortex-m3 microcontroller which runs at 84 MHz.
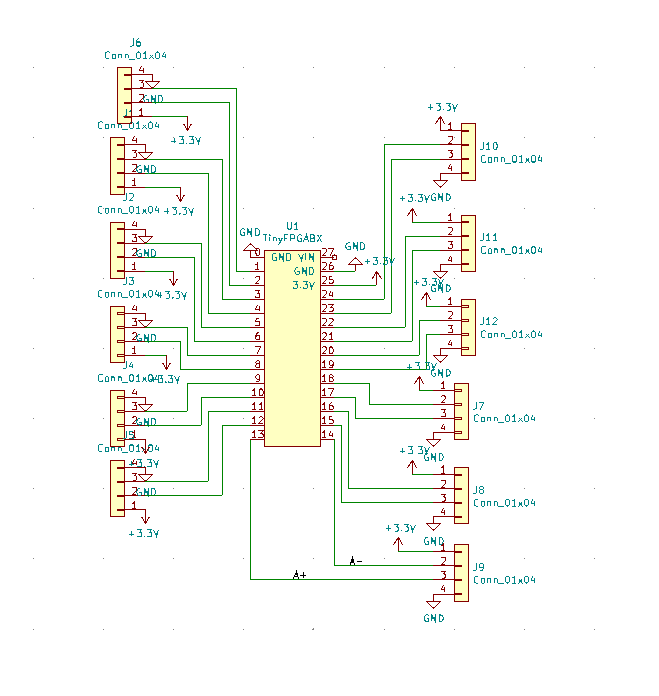
- TinyFPGA BX
This board is based on Lattice Semiconductor’s iCE40 FPGAs.
For programming it I use APIO which is a tool that makes it very easy to run the open source FPGA toolchain and program the design onto the FPGA board.
Sensors used- ADNS 3080
This sensor is a mouse sensor. Is this quadruped a weird user interface experiment? No. It will be used to measure the movement in the plane.
This is needed because RL uses rewards to tell if the agent is performing well to do the task. In the virtual world one of the rewards is given by movement towards +X, we have to recreate this or capture the info in the real world.
The sensor is not used as in mouses. It has a lent and my module can get good measure at about 16-17 cm.
The sensor itself in a simplified way works by making photos and applying optical flow algorithms.
- MPU6050
We will use this sensor to get the robot position Roll and Pitch so we can feed our model with quadruped's state and also set the ADNS 3080 perpendicular to the floor plane.
- Rotary Encoders
There is one rotary encoder by dc motor. They are used to measure with high precision the motor movement. Why do we want high precision? Because the robot in the real life has to be "the same" as the one in the simulations, in simulations the ordered angle is done with precision so we need the same in real life.
For more details click here.
GymAccording to OpenAI website "Gym is a toolkit for developing and comparing reinforcement learning algorithms"
It is very easy to install and use:
For installing you just need to do
pip install gymNext code is like a Gym hello world using the CartPole environment!
import gym
env = gym.make('CartPole-v0') # It's defines wha env to use
env.reset() # It restars the state of the env
for _ in range(1000):
env.render() # It shows the env
env.step(env.action_space.sample()) # take a random action
env.close()
As you can see you just have to worry about the algorithm, it is a great tool and I wanted to created something based on that so I created a custom environment for my Quadruped!
It was easy following this guide https://github.com/openai/gym/blob/master/docs/creating-environments.md the hardest part was to choose the right rewards.
PyBulletFor simulating the enviroment(which has to be close to the real world I used PyBullet which is a module built on top of Bullet Physics SDK. Bullet is a Physics simulator created by Erwin Coumans.
The API is well built so it is easy to use and has a good documentation and community
It has functions to work with robotics, like reading an URDF file and controlling it
URDFThis means Unified Robot Description Format, which is an XML format for representing a robot model.
At first I found it confusing how to build all by hand, I designed the pieces with bad choices for the axis given so I had to tweak them manually in the file.
Also you have to specify the rotations and axis directions one by one.
The basic thing to know are:
- Link: A link is an element which describes a rigid body with an inertia, visual features, and collision properties.
Here is an example of the body described in URDF:
<link name="base_link">
    <inertial>
        <origin xyz="0.0 0.0 0.016" rpy="0.0 0.0 0.0"/>
        <mass value="0.075"/>
        <inertia ixx="695485120.0" ixy="-2435146.5" ixz="-281720.625000" iyy="695484992.0" iyz="-28171          4.906250" izz="1298574464.0"/>
    </inertial>
    <visual>
        <geometry>
            <mesh filename="package://URDF_Quadruped/STLs/Cuerpo.stl" scale="0.001 0.001 0.001"/>
        </geometry>
    </visual>
    <origin xyz="0 0 0" rpy="0 0 0"/>

    <collision>
        <origin rpy="0 0 0" xyz="0 0 0"/>
        <geometry>
            <mesh filename="package://URDF_Quadruped/STLs/Cuerpo.stl" scale="0.001 0.001 0.001"/>
        </geometry>
    </collision>
</link>- Joint: The joint element describes the kinematics and dynamics of the joint and also specifies the safety limits of the joint. A joint has a parent and a children. There are different types, for my model I will just use revolute and fixed.
Example of a Joint described in URDF:
<joint name="knee1" type="revolute">
    <origin xyz="0.00635 0.0 0.197" rpy="0.0 3.14 0.0"/>
    <parent link="femur1"/>
    <child link="tibia1"/>
    <axis xyz="1.0 0.0 0.0"/>
    <limit effort="0" velocity="1.0" lower="-1.57" upper="0.8" />
</joint>You can see the pieces below this page and you can download them all in the Github repository.
I printed all pieces with a layer height of 0.3mm except the gears which I used 0.2mm, motor fittings will need a bit of sanding I made the fitting a bit small because motors have to be tight.
Gears holes were the most difficult part. I tested a lot of different hole measures and D shapes to make it fit well without having to force it to fit.
I recommend you to make good cable management and measure really well its lengths.
Try to use self-locking nuts or it will fall apart soon!
Installing and Using Quadruped EnvironmentInstall Gym:
pip install gymDownload my GitHub repository and use:
pip install -e gym-quadrupedThen in the python script to get the environment:
import gym

env = gym.make('gym_quadruped:quadruped-v0', visualize=True)
In the repository there are already made scripts for training. "train.py" and "behaviorCloningPretrain.py"
Behavior CloningThis technique is used to do transfer learning and then train as normal. This is good for saving time and costs.
I took an approach to this because if you think in the problem (12 motors and 180 degrees of range) the combinatorics are huge. So I though about creating an artificial "expert" to advance a bit in the training process and avoid random movements of the robot.
First we need to generate the expert dataset.
python3 behaviorCloningDataset.pyand then pretrain with it and continue with real training.
python3 behaviorCloningPretrain.pyThis is a difficult task I've been training and tweaking rewards over 3 weeks. Setting the rewards and goals is a difficult task, many times it performs okay according to the rewards but not to the objective you thought it would get with the goals. (By the way this video is kind of related about bad chosen goals and it's great)
I hope I get results soon, I will try two different strategies:
- More layers
The NN given by stable baselines are quite simple so I will try to implement my own NN models based on the algorithms
- More input information
I'm thinking about given it points when the feet touches the floor(it is something close to walking).
For doing this I will have to change the design in the URDF file and process each foot as an independent Link.
In the real model I will have to add weight sensors and it seems like a big redesign.
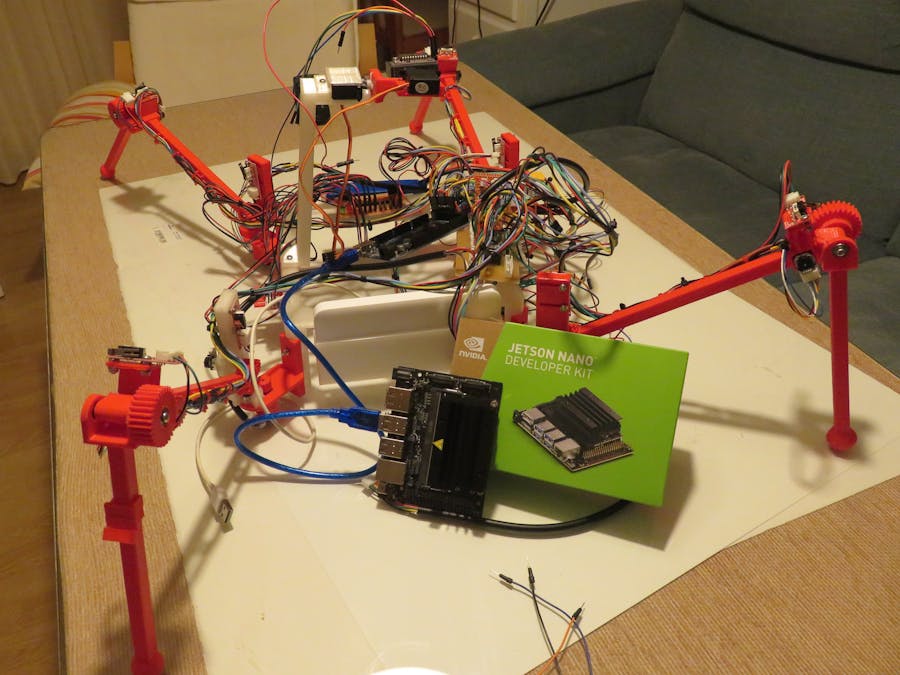
How does it works?"Don't call it monster, call it "early prototype", sounds cooler" told me one proffessor so, that thing above is the early prototype of motor controller.
- Jetson-Arduino communication
They will be connected by USB.
I'll show you sample code(not full sketch so it won't work, to look full code see in GitHub) for using PySerial in Nvidia Jetson Nano.
import serial # Library needed to communicate with arduino

ser = serial.Serial('/dev/ttyACM0', 9600)
print(ser.name)

def anglesToArduino(angles):
    ser.write(b'\x01')
    for angle in angles:
        ser.write((angle).to_bytes(1, "big"))
    ser.write(b'\x02')
And for Arduino
void loop() {
    if(Serial.available()){
        comCode = Serial.read();
        if(comCode==0x00){
            retJointStates();
        }else if(comCode==0x01){
            setJoints();
        }
    }
}

void setJoints(){ // 0x01
    digitalWrite(LED_BUILTIN, HIGH);
    int angle;
    delay(200); // need to wait to get full array without any problem
    if (Serial.available()>11){
        for(int i=0; i<12; i++){
            angle = Serial.read();
            jointCommand[i] = angle;
            jointStates[i] = angle;
        }
    }
    if(Serial.available()){
        if(Serial.read() == 0x02){
            digitalWrite(LED_BUILTIN, LOW);
        }
    }
}- Arduino-FPGA communication
Currently there is a module for Serial transmitting in the FPGA so there is no bidirectional communication. Arduino communicates with a High/Low signal. The protocol is very rudimentary.
- FPGA-encoders
This is the module used to read the rotary encoders.
module rotaryEncoderCounter(input CLK, A, B,
output [4:0] counterWire);
reg [3:0] counter;
// Internal variables
reg [1:0] A_State;
reg [1:0] A_Last_State;
assign counterWire = counter;
always @(posedge CLK) begin
    A_State <= A;
    if (A_Last_State != A_State) begin
        if (A_State != B) begin
            counter <= counter - 1;
        end
        else begin
            counter <= counter + 1;
        end
    end
    A_Last_State <= A_State;
    end
endmodule
For those unfamiliar with Verilog, it is a Hardware Description Language. You can set modules which are pieces that work independently, for this reason FPGAs are great for doing time critic task(if you read 12 encoders with a microcontroller you will loose steps).
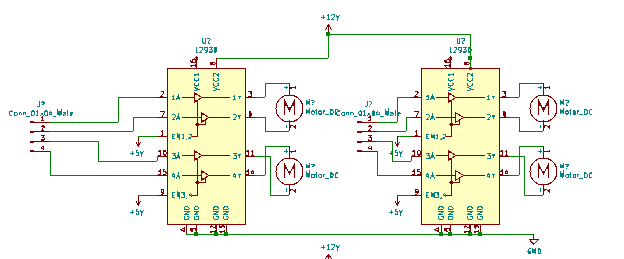
- Integrate motor drivers in a PCB and update the current IC LD293(?) which does not have PWM control so you only can control the motors at full speed. Instead would be interesting an IC similar to DRV8833 which comes in a smaller package.
- Replace TinyFPGA with a larger IOs CPLD/FPGA and move all Arduino tasks to it. This in a PCB could be much lighter and smaller which is great for design and quadruped ability.
- Perform some modifications in the 3D design, it is okay right now but some iterations after some use would improve it and make it more robust and efficient in manufacturing.
- Add different environments with different objectives to Gym. Also adding goal oriented exploration to support HER which is the RL algorithm which gives better results for robotics.
- Have a reliable(?) source for the rotary encoders, lower resolutions would be great.
- Change serial by SPI which is synchronous and can be more customizable.
- General upgrades for software and protocols.
- Add ROS.
As you can see there still a lot of work to do, but those changes will lead to a robust product
Fails and lessonsBe careful choosing the rewards for an RL agent. At my first attempt for training I knew that it probably wouldn't work because it is a hard task.
At my first try of creating an environment I failed tremendously (I tried to assign rewards for 2048 game but I did not succeeded training an agent on this probably because rewards, short terms actions affect a lot to the future).
I left it learning all the night and when I woke up it improved a lot in rewards and when I deployed it I saw I created a quadruped that rather not to life in that cruelty environment. Penalizing rewards were so high that the most optimal way was to not let the time run and suicide itself(when its knock over the env resets) when starting.
I spent a lot of time crimping wires and soldering protoboards (a lot means some more than a week) and in a time constrained project you can't afford to loose so much time. The lesson here is that it does not matters how simple is your design, if it is big it won't scale well(in my case with motor control board, simple logic design but hard to solder in a protoboard) so it is better to design a PCB and order it(even if the minimum is 5 boards and you don't need much it's okay). Related to crimping wires, even if you find expensive buying crimped or custom wires it is not I wish I buyed them custom.
Don't always trust suppliers, I ordered the motors directly to a motor fabric because in aliexpress(which are retailers) did not give the specs properly(measure units did not even had sense) and the information was messy. So I went to alibaba. The specs were clearly and the ones that were not he told me by message. I found out that the PPR were not okay and I sent a message to him, he did not even answer me back. So sometimes is better to pay a bit more and have real support.
FAQs- Can I use servos instead of DC motors?
- Yes, I used encoders with DC motors for two main reasons, they will be more precise than most servos in a cost/effective way. Also I wanted to learn about FPGA for time critical task and PCB development
- Does it takes much to print?
- I did not print all pieces at once because I made a lot of different designs. But it could take 2 days or less. I think that a smaller design could be interesting to avoid large printing time if you consider this a good option let me know in the comments.
- Do I need a high end PC for training?
I don't think so, the Neural Networks used for those task are so simple, you may need a good GPU in case of using images as inputs.
But if you want results and you train from scratch may be needed. I couldn't get results with not much time. My first step will be parallelize many trainings and each epoch get the bests models and start from them.
AcknowledgementsNvidia for providing me the Jetson Nano with a very fast shipping!
Some professor that had help me a lot, they are great ;)
If you have any doubt or advice let me know in the comments please.
MiscellaneousI started a kind of build log here it has became outdated because lack of time but you can see how all started.
Would you be interested in a kit of supplies for this project? Let me know!


_wzec989qrF.jpg?auto=compress%2Cformat&w=48&h=48&fit=fill&bg=ffffff)


Comments