My initial goal was to know where my cat could be when we do not see him all day long. I wanted a module as small and light as possible, and a battery that takes at least 12 hours or more.
The simplest construction is to save a position (lat-long) every [n] -second on an SD card module, and when the beast comes home because he have to eat, get the list of points of the SD card and display its course on a map !.
Well, the module is still a bit too big to put around the neck of Kenzou the cat, but it is a simple project and fun to achieve with my great friend Espruino, this little wonder that allows to code JavaScript on a microcontroller so easily. ; -)
I use the GNSS module GG-1802 from U-Blox which embeds the circuit NEO-M8N, its particularity is that this module can also receive the European satellite constellation Galileo to hope to have a more accurate signal ??!.
Install and run U-Center soft (Unfortunately only available on Windows), connect the GNSS module to the UART-USB converter, open panel (from top menu) :
View > Messages View, and:
A - 1 ) Have the module listen to the Galileo constellation- Set module to use mode NMEA 4.1
Select : UBX > CFG > set NMEA to 4.1 - click "send button"
- Select: UBX > CFG > GNSS set Galileo Enable and don't forget to click on the send button at the bottom of the interface:
- Select: UBX > NAV > SAT -- right click and select "enabled" - click "send button"
- Select: UBX > NAV > SVINFO -- right click and select "enabled" - click "send button"
The GNSS give us NMEA standard data, we need date time, Latitude Longitude position, in a rate of every 5 seconds (default is every second, maybe to power hungry!).
To understand and configure the module in more detail, here is an excellent video from iforce2d.
- Change rate - select : UBX > CFG > RATE - set to 5000ms - click Send button.
- Get date/time and position data
- select : UBX > CFG > CFG -- select the 4 devices on right panel - click "send button"
- select : Receiver > Action > Save Config - done!
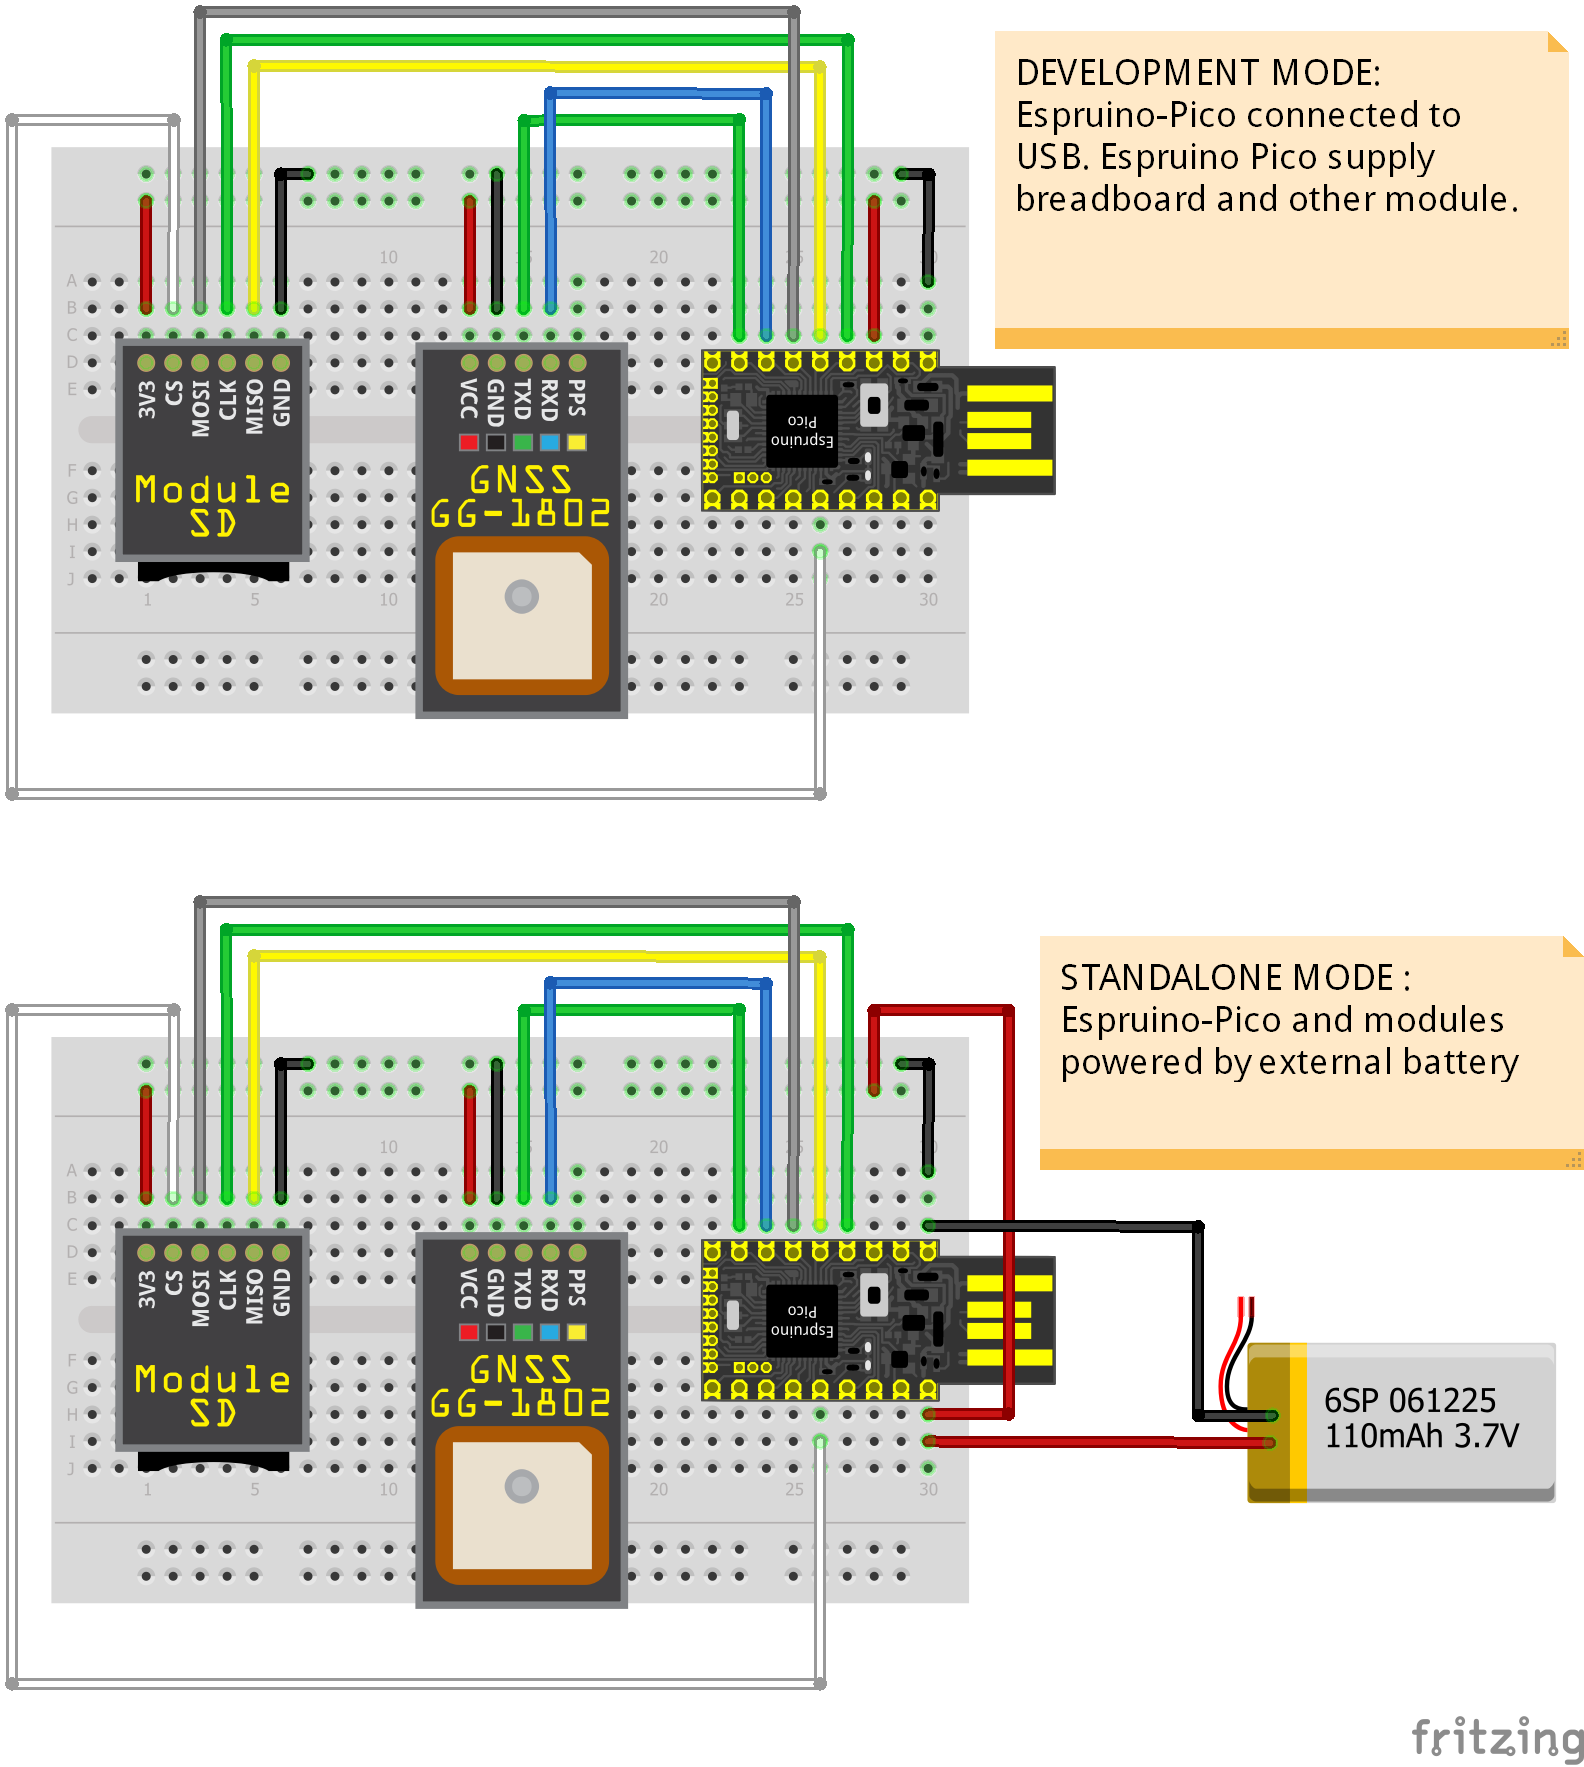
What the circuit does: The Espruino Pico listens to the GNSS position satellite data from the UBlox module, transforms it into human usable data, and then writes it to a simple text file of the SD module, line by line.
Espruino-Pico       SD card

B4  (MISO SPI-1)     MISO
B3  (SCK  SPI-1)     CLK
B5  (MOSI SPI-1)     MOSI
B10 (SCK SPI-2)      CS
3V3                  3V3
GND                  GND
Espruino-Pico       GNSS

B7 (RX - UART 1)     TXD
B6 (TX - UART 1)     RXD
3V3                  VCC
GND                  GND
To be able to program the Espruino Pico I use the Espruino Web IDE for Chrome, see this official page for further explanation.
I decided to configure the Web IDE in "Project" mode. This allows me, much like a Node.js project, to import into the project entry (right pane of the IDE) all my personal Javascript module. Once done, all you need to do is code in your favorite editor, and simply click on the "send to Espruino" button to upload the program.
It may not be the cleanest way, but I find it very practical.
- Settings > communications > Modules upload as functions
- Settings > communications > Save on Send > Direct to Flash
- Settings > Project > and set your root project directory
From now, the Web IDE will generate "modules" folder where I dev the main files of the application, a clean way to structure the code, instead of having a single very long script file.
A bit like the global Window object, when developing JavaScript code for a web browser. Once the modules are imported into the Web IDE entry point, they will be available in all other parts of the program.
C - 2 ) Entry point scriptsame code from above, I call it "entry-point" or index.js file.
const fs = require("fs");
const modBoardLed = require('mod-boardled');
const modGNSS = require('mod-gnss');
const modSD = require('mod-sd');

function onInit() {
   modSD.init();
   modSD.createNewFile("position-file.json");

   // modGNSS init method params :
   //-------------------------------
   // 1) Set the GNSS to write data or only console.log on the IDE
   //    modGNSS.MODE.DATA       // write data
   //    modGNSS.MODE.DEBUG      // log data
   //-------------------------------
   // 2) Set local time offset based on UTC global time (set to 2 - French summer time)
   //-------------------------------
   // 3 & 4 ) callbacks when satellite data available or not

   modGNSS.init(modGNSS.MODE.DATA, 2,
       //--- On Fix
       function (data) {
           modBoardLed.signalOnFix();
           modSD.writeData(data);
       },
       //--- On Search
       function () {
           // to improve ! led flash strangely
           // modBoardLed.signalOnSearch();
       }
   );
}
- fs is like Node.js, use to manage files
- modBoardLed is a very simple module, only here to blink red or green led on the Pico board.
- modGNSS, where I parse the "raw" NMEA data from the GNSS module
- modSD, responsible for writing data on the SD card module.
Those 3 JavaScript module are attached to the project.
D - Take a walk, generate an GPX file and display your route on a mapD - 1 ) Connect our module in Standalone modeNo USB cable connected from Pico to our computer to take the road! The Pico will be powered by a Lipo battery or a power source that you want (3.3V). The connection differs a bit, see the official page for more details.
Everything is ready, as soon as our circuit is powered, the script creates a text file and will write our position every 5 seconds when it is available.
D - 2 ) Generate an.GPX fileAt the end of our walk, we have a text file consisting of a succession of data lines as below :
...
{"latitude": 44.064498,"longitude": 5.045635,"elevation": 90.4,"time": "2019-05-30T19:39:22.000Z"}
{"latitude": 44.064507,"longitude": 5.045687,"elevation": 100.1,"time": "2019-05-30T19:39:27.000Z"}
{"latitude": 44.064492,"longitude": 5.045685,"elevation": 102.4,"time": "2019-05-30T19:39:32.000Z"}
...
One of the file formats for displaying a route in a map is the .GPX format, the next step is to create this type of file with our data.
There are a lot of resources to reach our ends, I chose to stay in JavaScript and use the Node module gps-to-gpx ;-)
Install Node.js on your computer.
Create somewhere on your computer a directory and open a terminal from here, then :
- Copy the raw position txt file generate from our little module in this folder.
- In the same folder copy the gps-to-gpx.js and package.json file
- Open the gps-to-gpx.js file to modify some path and wording (the file content comments where to)
- Install script dependencies, for that, just run:
npm install
executede script, just type:
node gps-to-gpx.js
Tada!, you should see brand new.gpx file according to the name you set in the gps-to-gpx.js file.
D - 3 ) Display your route in a mapMost mapping applications can display a path in .gpx format (like Google Map). We will go to opentopomap site, simple and effective :-)
Click on the upper left gpx button to import the.gpx file, and see your route !
Below, my little walk to go to my fruit and vegetable market:
How cool is coding using JavaScript on a microcontroller?
The presented circuit is a start, we can imagine reduce this size by welding the components directly on a real PCB, add a wireless communication module...


Comments
Please log in or sign up to comment.