Watch this video for a brief overview:
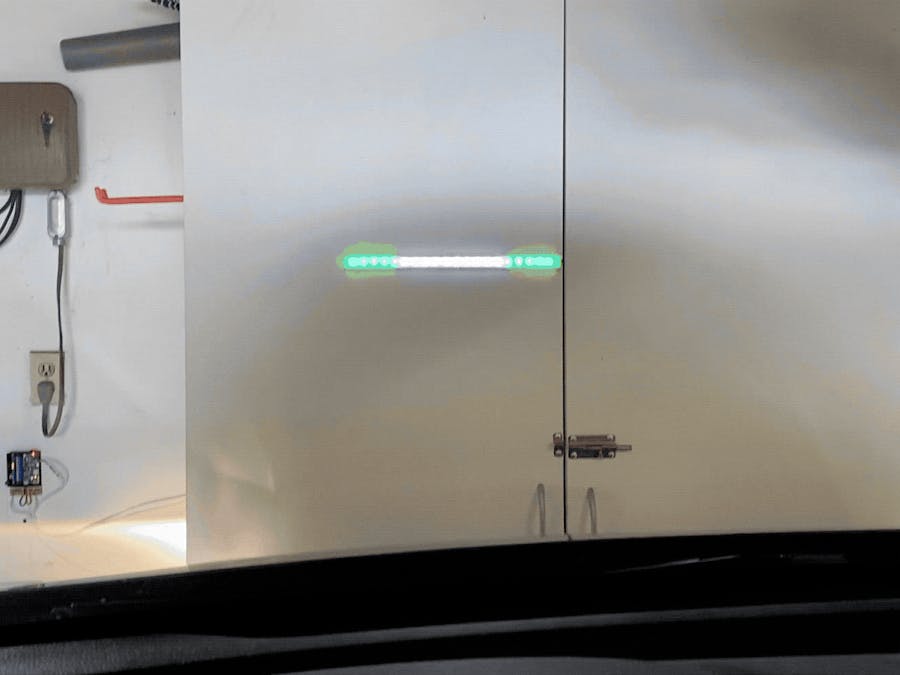
Our garage does not have a lot of depth, and has cabinets at the end the further reduce the depth. My wife's car is just short enough to fit, but it is close. I made this sensor to simplify the process of parking, and to ensure the car was fulling in the garage before going too far and hitting the cabinets.
Once it was designed, I decided to power it with solar panels because I had a good spot to put them, and my plan is to expand this system to power more things in the garage in the future.
Supplies:3D printed enclosures and LED diffuser
Arduino Nano, Breadboard and Jumper Wires
Solderable Breadboard, 2 wire connecter, 3 wire connector, 4 wire connector
14500 Lithium Ion batteries
Double Sided Tape, Liquid Electrical Tape
3d printer
*all links are affiliate links
Step 1: Building the Circuit + CodeDownload and install the arduino sketch. Found here: Parking Sensor Sketch
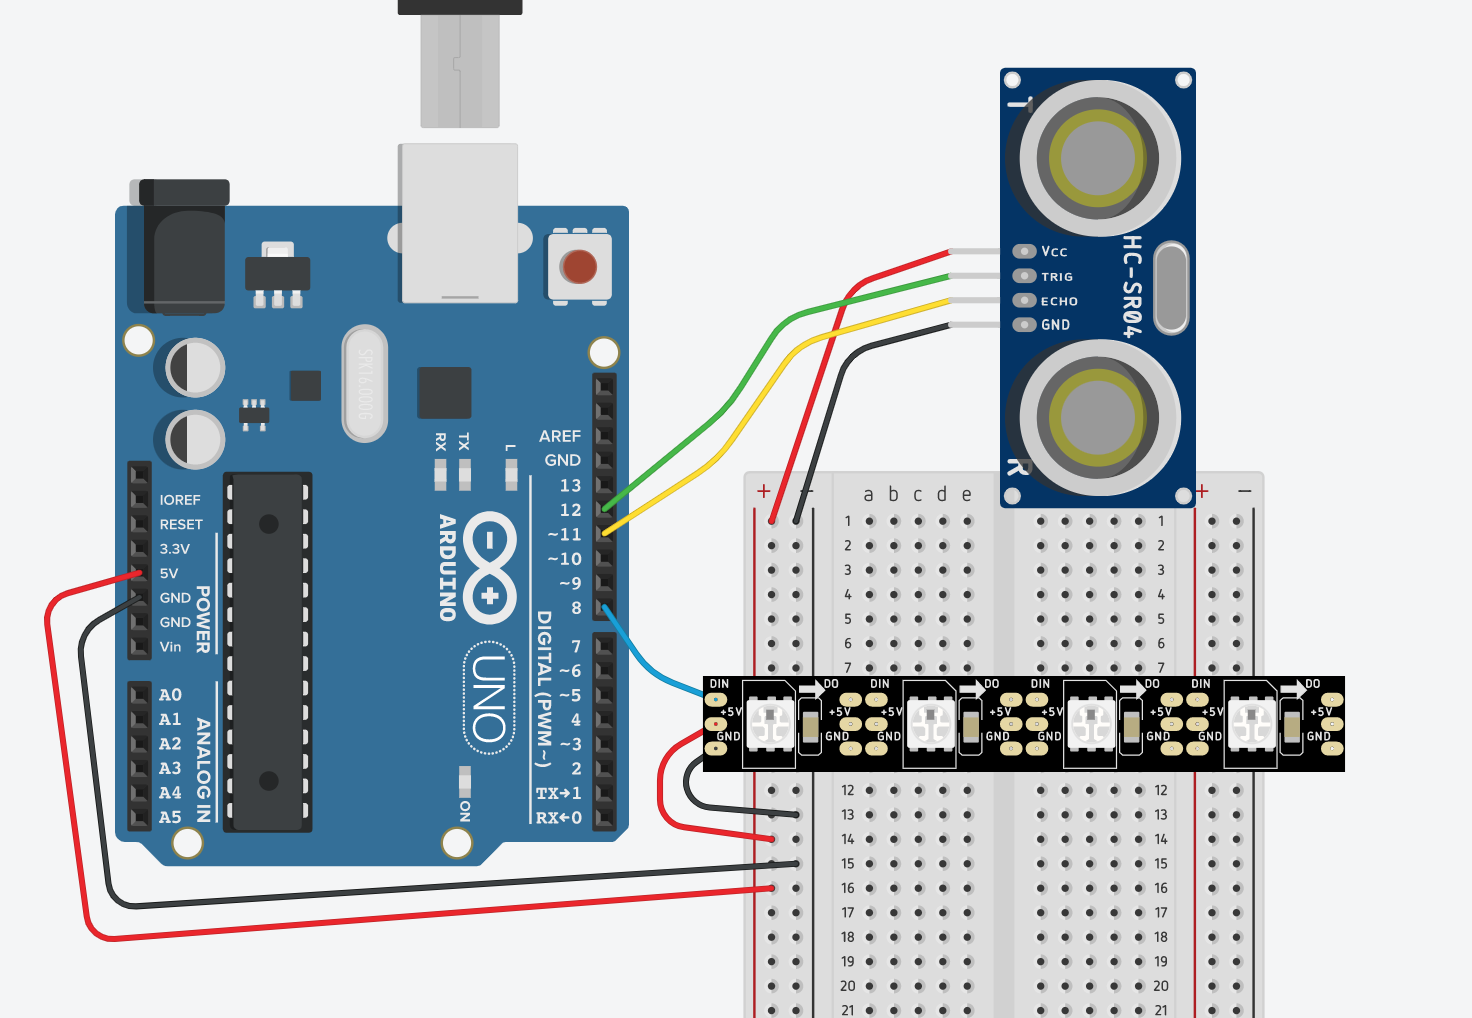
The circuit consists of an ultrasonic sensor, an arduino nano, and a WS2812B 5V addressable LED strip. I initially was concerned about using the ultrasonic sensor because the surface of the car is not flat, but after initial testing, it did not appear to be a problem.
Connect the following to the specified arduino pins (or change them in the code on lines 5-7):
LED strip -> pin 8
Ultrasonic Sensor Trig -> pin 12
Ultrasonic Sensor Echo -> pin 11
To adjust the code to match your application, you can change the following lines of code:
9: This is the number of cm, at which the lights turn on
10: this is the threshold to let you know you are close
11: this is the number of cm that lets you know you are a safe distance away
12: at this distance, the lights begin to turn purple, letting you know to stop
13: at this distance, the lights start to flash, letting you know that you are too close
Some other numbers to adjust:
15: This is the number in seconds to wait after car stops moving before the lights turn of and the Arduino enters low power mode.
17: This number represents the amount of fluctuation in distance that is allowable before the sensor registers movement and turns back on.
I utilized the "Low Power" library to put the Arduino in a sleep state when it was not in use. This Sparkfun guide provides an overview of how it works, and you can download an install it here: Low Power Library. What I found was that the library interfered with the serial monitor, so you would not be able to use it while also including and using the Low Power library.
Step 2: Soldering the CircuitTransfer the circuit components to the prototype board and solder in place. Solder a 4 pin JST connector for the ultrasonic sensor, and a 3 pin JST connector for the LED strip. I added a 2 wire JST connector to 5V and ground in order to power the components and arduino externally.
Step 3: Installing Ultrasonic SensorBreak off a 4 pin piece of the female header strip, bend pins and solder to a 4 pin connector, so that you can slide it onto the ultrasonic sensor. Paint with liquid electrical tape.
Mark up the locations for the sensor and the LED strip on the cabinet where the detector is going to be mounted. Tape the 3d printed ultrasonic sensor mount to the chosen location with double sided tape. Drill holes into wall in order to feed wire through.
Step 4: Installing LED StripCut an LED strip to a length that works for you. (Mine was 20 LEDs long, and was spaced at 60 LEDs/m). Solder a 3 pin connector to the input side, and paint with liquid electrical tape.
If you place the LEDs as is onto the wall, the pixels have a limited viewing angle, and so a lot of the light gets wasted. You can see the difference in the picture above. The cover I designed to diffuse the light has a thickness of about 0.5mm, which seemed to be provide the optimal balance between brightness and amount of diffusion.
Pick the spot you want to place the LEDs. Ideally, they should be centered in front of the driver, close to eye level from the driver's seat. Slot the two back pieces of the holder together, slide LED strip into holder, remove adhesive from back of the LED strip, and press into place. Slide the covers onto the holder and use double sided tape to mount to the location you have selected.
Note: the sketch is programmed for 20 LEDs, so if you use a different amount, remember to change the number on line 5 to reflect that. If you use an odd number of LEDs, it is set up so that it will still work as expected.
Step 5: Installing Arduino and Hooking It All UpUse two M3 screws and nuts to attach the solderable breadboard to the enclosure, slide the connectors through the openings on the side, and screw the lid into place.
Pick a convenient spot to attach the enclosure near the LEDs and the ultrasonic sensor, and add a screw so that you can hang it in place using the keyhole mount. I placed directly next to the ultrasonic sensor so that I could avoid having to make a four wire extension for the sensor.
Attach the sensor and the LED. Use 3d printed wire brackets to help with the wire management, and to prevent wires from being able to move too much.
Step 6: Adding Solar PanelsI decided to add solar power to this project so that I did not have to worry about batteries, and so I didn't have it constantly plugged into the wall. The solar set up is modular, so I plan to do more garage projects that will draw power from it, and I can improve the solar panels or the charge controller and battery as needed.
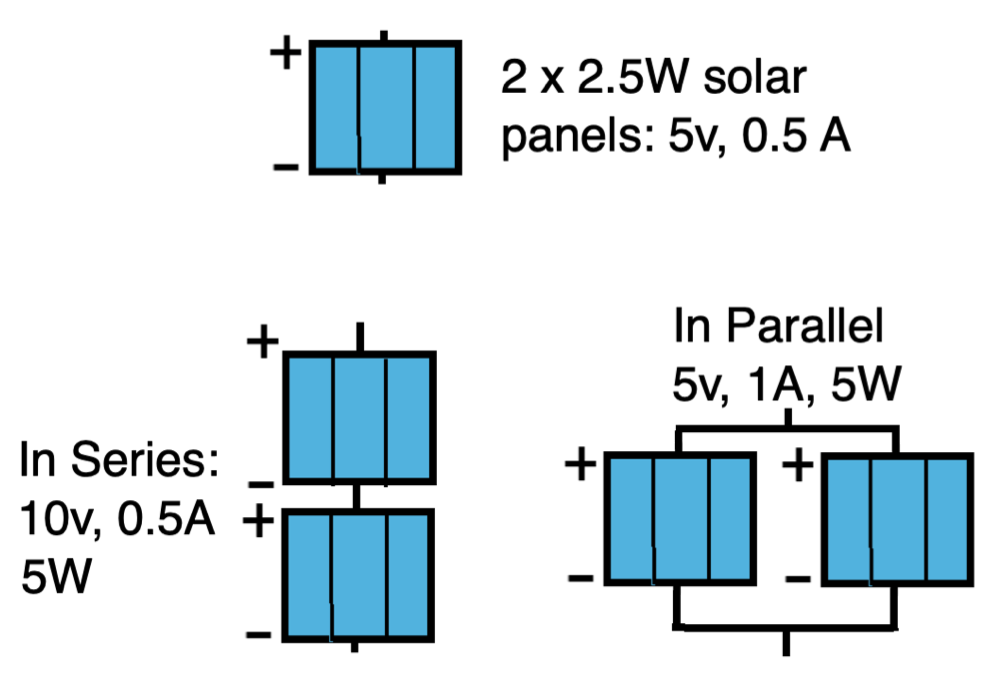
The solar power manager used in this project requires a minimum voltage of 6v, and a power of at least 5W in order to charge the battery. The tricky thing about small solar projects, is that the lithium ion batteries need at least 1 amp of current in order to charge. In this case, I had two 5v panels that were rated at 0.5 A each. Because the power manager needs at least 6v, the panels have to be wired in series, adding their voltage together. In this arrangement, the current stays at 0.5A, but because the power provided by the combined panels is 5W, when the charge controller drops the voltage, it will have sufficient current to charge the battery.
Note: solar panel voltage fluctuates significantly throughout the day, and will peak at values higher than the rated voltage. For this reason you do not want to connect an Arduino or a battery directly to the panel.
Use wire to solder the panels in series, and add a 2 pin JST connector so that you can easily connect and disconnect them from the power manager. Find a flat surface that gets lots of sun to mount the panels. For me, I had a spot where I could easily tape them down using double sided tape. I cleaned the surface first, then taped the panels down. The hold seems strong enough, but time will tell if this is sufficient to hold up to some of the strong winds we get around here. I used zip ties to keep the wire in place as it feeds back into the garage.
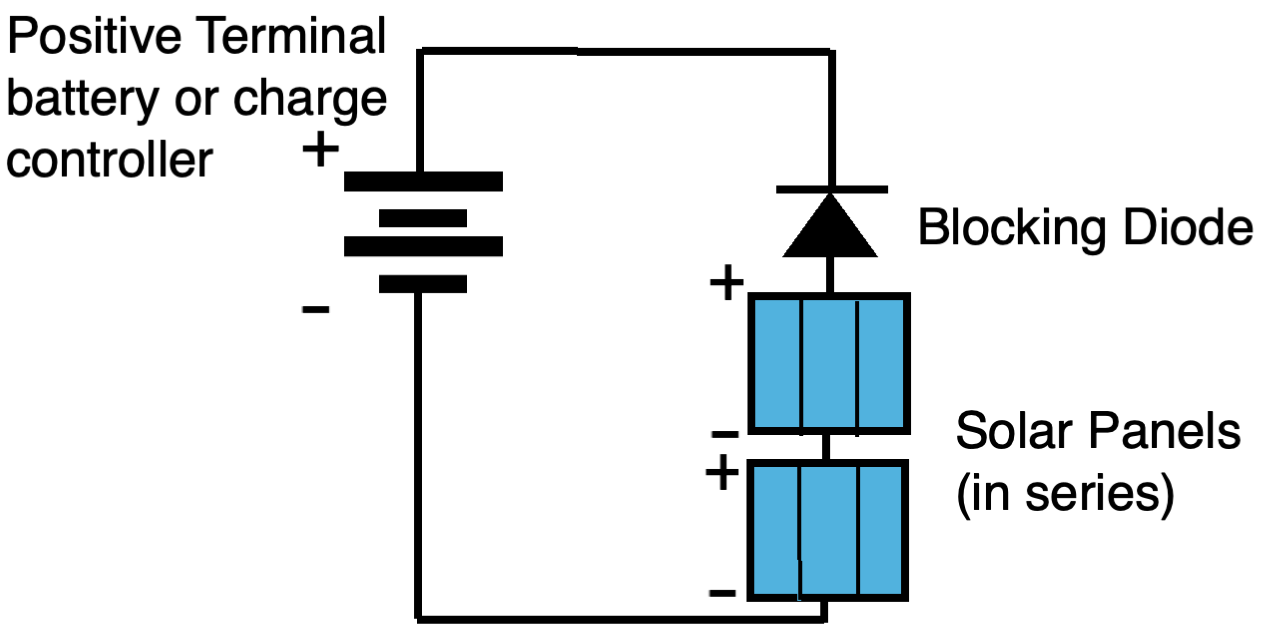
Many electrical generators can also be used as a load when a voltage is applied to them. In the case of a microphone, it can be used as a speaker. A generator can also function as a motor. An LED can be used to measure the presence of light. If a voltage is applied to a solar panel, it will draw current, and I believe it will emit light (not sure what frequency). In a case like this, a blocking diode needs to be installed somewhere in the circuit to prevent the solar panel from draining the battery when there is no sunlight present. I assumed the power manager circuit had this built into it, but after a few days of rain, the battery had been completely drained.
I used a diode that I found lying around, and soldered it to the end of the wire that would connect to the 5V terminal on the charge controller. If you solder to the same place, the end of the diode with the band should point towards the charge controller, and away from the positive terminal of the solar panel. This will block current from leaking back into the panel. I used a heat shrink solder wire connector to solder it in place, because I was installing mine after I had the system in place.
Step 7: Adding Solar Power ManagerThe power manager has options to connect using female jumper wires, or USB cables. Neither of those is particularly convenient for the distance I wanted to run the wire, so instead, I soldered wires to the underside of the board where the 5v and ground pins were connected.
Attach two 5 pin Wago lever nuts to the enclosure using double sided tape. This will allow for powering multiple devices from this power manager. It is capable of outputting up to 1A of current at 5V, so if your future applications will require more current than that, you should explore using other power managers.
On the back of the power manager, there are a series of switches, so that you can set the approximate voltage of your solar panels, so switch it to match the solar set up you are using. In my case, I set it to 9v, as the panels in the series arrangement are rated as 10v.
The power manager comes with standoffs, so remove two of them, and use those holes to screw the power manager to the enclosure using M3x8 screws. Feed the wires that are soldered to 5v and ground through the hole in the bottom, and clip them into the Wago lever nuts.
Find a good spot for the power manager, and add a screw to the wall. Use the keyhole on the enclosure to hang it in place. Run wire from the Arduino to the power manager, and clip into place using the 5v and ground Wago connectors. Be very careful not to attach it backwards, Arduino boards come with some protections, but you could potentially fry yours here if you wire the 5v pin in reverse. Use wire mounts to keep the wire in place along the wall.
Do the same with the wire coming from the solar panel. Be sure to disconnect the solar panels before you attach the wires to the input on the power controller, so you don't accidentally short them out or damage the board.
When finished, attach the cover to the enclosure, turn on the switch for the battery, and reconnect the solar panels.
Step 8: Testing It Out!It should all work at this point. Give it a spin with your car, make sure the distances are calibrated correctly for your parking situation, and enjoy! It is pretty satisfying to watch it work, and then turn back off when done. If you forget to add the blocking diode, you will notice some strange behaviors at times as the battery gets drained by the panels.
Thank you for reading, if you enjoyed this, please consider subscribing to my Youtube channel: More Than The Sum.
If you have any questions, please ask!


_3u05Tpwasz.png?auto=compress%2Cformat&w=40&h=40&fit=fillmax&bg=fff&dpr=2)
Comments
Please log in or sign up to comment.