


Hardware components | ||||||
 |
| × | 1 | |||
Software apps and online services | ||||||
| ||||||
| ||||||
About: Hello, the author of the project is an Application Engineer of Seeed Studio. It's great to share this project with the Hackster maker community. I hope you like Seeed Studio, a hardware enabler for IoT applications, which provides services that enable IoT developers to quickly prototype... More information about Seeed Studio »
This project shows how to upload images to the LCD display of your RePhone.
RePhone Kit Create is an open source modular phone kit that changes the way we put our phone into use. It provides a new form of phone customization, and the easiest solution to wearable/IoT development.
In the application provided in this project, two images are alternately displayed on RePhone every 1s.
Add TipAsk QuestionCommentDownload
Step 1: DEVELOPMENT ENVIRONMENTAs Arduino IDE for RePhone does not have a resource editor for us to upload images, we have to do it using the 【Eclipse IDE】
- Firstly please download the【Eclipse IDE for RePhone】
- Then install the 【LinkIt Assist 2502 SDK】
- It is OK we DO NOT flash/update the firmware if your RePhone works fine
Add TipAsk QuestionCommentDownload
Step 2: CREATE a NEW PROJECTOnce the development environment is all set up, open eclipse.exe, follow THE FIRST 4 STEPS in the instructions on the wiki: 【Create your first project:hello world】
Here I name the project as "Draw image on RePhone", double click "Draw image on RePhone.c" to open it.
Add TipAsk QuestionCommentDownload
Step 3: DOWNLOAD THE LIBRARIESMost of the libraries can be find in the 【RePhone Source Code】
Here we only use what is needed. 【Download the example code】 .
Unzip it and copy the following libraries to location of the project we just created, it should be at the workspace as...eclipse\Workspace\Draw Image on RePhone.
Add TipAsk QuestionCommentDownload
Step 4: RESOURCE EDITORLets create a new folder named "image" in the location of the project, in this folder we put in the images that we want to draw.
Do remember that the images has to be 240x240px, the format can be 24-bit bmp or JPEG(no sRGB).
Here I've put in the image 【1.jpg】 and 【2.jpg】
Now Open the resource editor in Eclipse IDE.
In the resource editor, we1. Select 【Image】
2. Set click on 【】to add new images
3. Set the 【path】 to the images
4. 【Save】 it
Now if you refresh the project, you should be able to see an update of the file "ResID.h"
Add TipAsk QuestionCommentDownload
Step 5: THE CODECopy the code in the "Draw image on RePhone.c.txt" file to "Draw image on RePhone.c"
The code line
lcd_image_draw(pic_number++);if(pic_number > 2)pic_number = 1;
is actually where we draw the images, the value of pic_number is initially set as 1, which represents the image Cat_1, in the program it alternates from 1 to 2 and 2 to 1 every 1 second.
Step 6: BUILD APPLICATIONClick back to Draw Image on RePhone.c and then click【Build Application】.
Add TipAsk QuestionCommentDownload
Step 7: COPY VXP FILEAfter successfully built the application, you should
1. find the vxp file in the location of the project : eclipse\Workspace\Draw Image on RePhone\ARM\Draw Image on RePhone_default.vxp
2. Copy it to your RePhone's storage mode, right in root location, a folder called【MRE】
3. Change the content of 【autostart.txt】to:
Add TipAsk QuestionCommentDownload
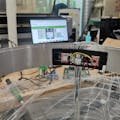
Step 8: TURN ON YOUR REPHONENow turn on your RePhone, you should be able to see your images showing on the screen.
Comments
Please log in or sign up to comment.