About: Hello, the author of the project is an Application Engineer of Seeed Studio. It's great to share this project with the Hackster maker community. I hope you like Seeed Studio, a hardware enabler for IoT applications, which provides services that enable IoT developers to quickly prototype... More information about Seeed Studio »
I always wanted to bulid a project that can control many nodes for Green house Irrigation System, but never found the right solution. The Wio Node is suitable for my project.
Wio Node is designed to simplify your IoT development, aims to make it easy to develop Internet of Things products and services. It is an ESP8266 based open-source Wi-Fi development board to create IoT applications by virtualizing plug-n-play modules to RESTful APIs with mobile APPs.
Compared to Wio Link, It's more small and cheaper. This product is suitable for application in the scenario requires a large number of sensors collecting data or somewhere is only need simple wireless input output.
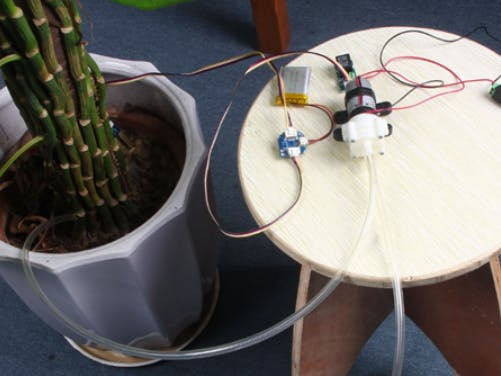
In this project, I connected a Grove – Moisture Sensor to Wio Node to measure the soil moisture as well as Grove – Relay to control a pump. I will run a Universal Windows Platform(UWP) app on Raspberry Pi3 to view the sensor values and control the pumps remotely.
Here is the video about this project.
Add TipAsk QuestionCommentDownload
Step 1: What Do We Need- Wio Node
- Raspberry Pi 3 Model B
- Grove – Relay
- Grove - Moisture Sensor
- 3.7V Battery
- Water Pump
- 12V Power adapter
Add TipAsk QuestionCommentDownload
Step 2: Wiring for Wio NodeNow, we should Connect Grove modules to Wio Node as the picture below shows.
Connect Grove – Moisture Sensor to Port1
Connect Grove – Relay to Port0
Add TipAsk QuestionCommentDownload
Step 3: Assemble Water Pump Circuit1. Select all parts required to build water pump circuit from this kit: 12V Water Pump,Grove-Relay,12V Power Connector, Power Cables.
2. Plug one red wire of water pump into positive terminal of power connector and fix it with screw.
3. Plug cable to relay's either J1 port and fix it.
4. Plug black wire of water pump into negative terminal of power connector and fix them.
5. Plug red wire of water pump into relay's another port of J1 connector.
6. Have a look at the completed connection.
Add TipAsk QuestionCommentDownload
Step 4: Setup for Wio NodeIf this is your first time to use Wio Series product you can put hand on http://iot.seeed.cc/index.html to get more info.
There is a video of how to get started on Wio Link. The Wio Node is similar with Wio Link.
Then following this guide and configure the Wio Node as the picture below shows.
Add TipAsk QuestionCommentDownload
Step 5: Setup for Raspberry Pi3I have been running Win10 IoT on Raspberry Pi, you can put hand on here to get started with Windows 10 IoT Core.
I assume that you are already familiar with Win10 IoT Core and set up the development environment. Don’t forget connect an HDMI monitor to the HDMI port on the board.
1. Download the code from Github.
2. Click “Download zip” button on right side of webpage to download all codes.
3. Decompress the downloaded zip files and remove “-master” in decompressed file name.
4. Launch IrrigationControlSystem.sln.
5. Change the Code
Change all the Uri in the code to your own, you can get it in your Wio APP.
Add TipAsk QuestionCommentDownload
Step 6: Deploy Your App.1. With the application open in Visual Studio, set the architecture in the toolbar dropdown. Select ARM.
2. Next, in the Visual Studio toolbar, click on the Local Machine dropdown and select Remote Machine.
3. At this point, Visual Studio will present the Remote Connections dialog. If you previously used PowerShell to set a unique name for your device, you can enter it here (in this example, we’re using my-device). Otherwise, use the IP address of your Windows IoT Core device. After entering the device name/IP select None for Windows Authentication, then click Select.
4. You can verify or modify these values by navigating to the project properties (select Properties in the Solution Explorer) and choosing the Debug tab on the left.
When everything is set up, you should be able to press F5 from Visual Studio. If there are any missing packages that you did not install during setup, Visual Studio may prompt you to acquire those now.
Add TipAsk QuestionCommentDownload
Step 7: The ResultIf you deploy your APP successfully on Raspberry Pi3, you can see the info as the picture below shows on LCD screen. And you can press the button to open or close the water pump.
This project is just a prototype, and the controlinterface is a little ugly. I will take some time to beautifies the UI, and displays the sensor data graphically.


Comments
Please log in or sign up to comment.