


Hardware components | ||||||
 |
| × | 1 | |||
 |
| × | 1 | |||
| × | 1 | ||||
 |
| × | 1 | |||
| × | 1 | ||||
Software apps and online services | ||||||
| ||||||
About: Hello, the author of the project is an Application Engineer of Seeed Studio. It's great to share this project with the Hackster maker community. I hope you like Seeed Studio, a hardware enabler for IoT applications, which provides services that enable IoT developers to quickly prototype... More information about Seeed Studio »
I believe that most of boys are desired to own a RC car and explore anywhere they want. Me too! So I thought of making one with my BeagleBone Green Wireless last weekend. But I faced some tough problems while making this and there was almost no tutorial for BeagleBone Web RC Car on the Internet. So I upload this instructable and hope it may help you to make your own RC Car.
Beaglebone Green Wireless is a board with Wi-Fi and easy-to-use GPIO. Therefore I decided to create a web sever on BBGW and control the car with a Web, which means that we don’t need to develop an Android APP for our smart phone, just connect to its Wi-Fi and enjoy this Web RC Car with kinds of smart phones, tablets or PC. What’s more, it’s convenient for us to extend new features on Web, such as streaming video, tracking, etc. Now Python seems the best choice for me, as BBGW supports programming with hardware in Python and Python-Flask Web microflamework is enough to create a web server.
Step 1: Things We NeedMaterials:
Motor Robot Car Chassis Kit with DC Motors
M3 nut and bolt
Jumper wire
In addition you will need the following tools:
screwdriver
Tape
Add TipAsk QuestionCommentDownload
Step 2: Configure the BBGWInsert the Motor Bridge Cape to BBGW, power Motor Bridge Cape with 9-12V Battery. Then plug in BBGW via USB, connect it to Wi-Fi and open the Cloud9 IDE.
Here is the guides:
http://wiki.seeed.cc/BeagleBone_Green_Wireless/#getting-started
After that, we will start an new terminal in Cloud9 IDE.
Add TipAsk QuestionCommentDownload
Step 3: Install Adafruit_GPIO Library for Pythonsudo apt-get update
sudo apt-get install build-essential python-pip python-dev python-smbus git
git clone https://github.com/adafruit/Adafruit_Python_GPIO.git
cd Adafruit_Python_GPIO
sudo python setup.py installAdd TipAsk QuestionCommentDownload
Step 4: Update the Firmware of Motor Bridge CapeDownload the code from Github:
git clone <a href="https://github.com/Seeed-Studio/MotorBridgeCapeFirmware"> https://github.com/Seeed-Studio/MotorBridgeCapeFi...</a>Navigate to “MotorBridgeCapeFirmware” and execute “make flash” command to flash the firmware
cd MotorBridgeCapeFirmware/ && make flashAfter a few seconds, you can see “Verification OK” information from the terminal Check if the firmware is flash well by execute following command
i2cdetect -y -r 2And If you can’t find the I2C address 0x4b, be sure that the P9_23 Pin is High, since the P9_23 is connect to Reset pin of STM32.
Add TipAsk QuestionCommentDownload
Step 5: Test Motor Bridge CapeThen please download the Motor Bridge Cape Driver Library from Github for a test.
cd /var/lib/cloud9<br>git clone https://github.com/Seeed-Studio/MotorBridgeCapeforBBG_BBB.git
cd MotorBridgeCapeforBBG_BBB
cp BBG_MotorBridgeCape/MotorBridge.py tests
cd tests
python DCMotorTest.py
If you can see the the red led and blue led of motor3 flashing in turn, it means that the Motor Bridge Cape works well.
Add TipAsk QuestionCommentDownload
Step 6: Install Flask and Flask-socketio<p>pip install flask</p><p>pip install flask-socketio</p><p>pip install evenlet</p>Add TipAsk QuestionCommentDownload
Step 7: Download the Web RC Car Code and Test<p>git clone <a href="https://github.com/jerryyip/bbgw_wifi_car.git"> <a> https://github.com/jerryyip/bbgw_wifi_car.git</a>...></p>cd bbgw_wifi_car/mywificar_v1.0/<p>ls
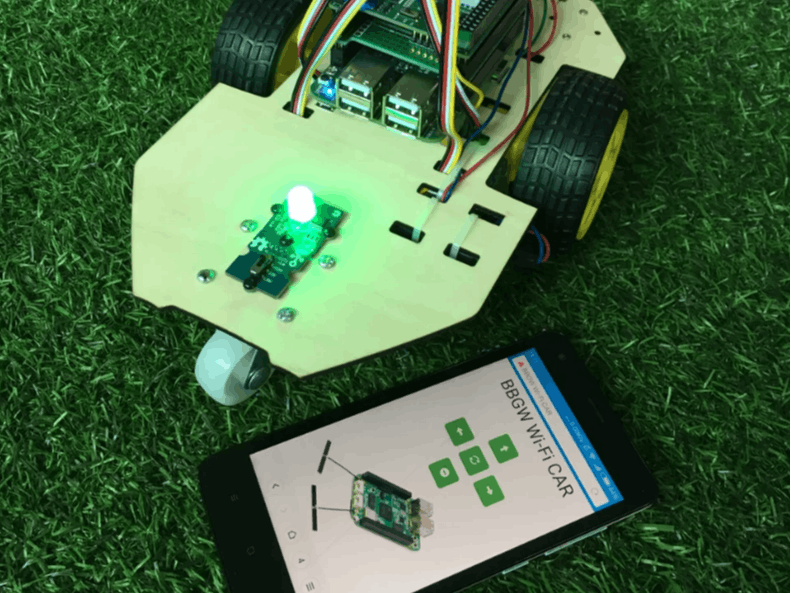
python app.py</p>Then type 192.168.7.2:5000 or [your BBGW ip addrees]:5000 in your browser to visit the remote control website.
Click the button to check if the web socket works well(each of your click will be printed in the terminal).
Add TipAsk QuestionCommentDownload
Step 8: Assemble and DebugNow it is time for assembling your Web RC Car! Power off the BBGW and Motor Bridge Cape, fix them on the top of chassis with tape or screw(here it is my upgraded Web RC Car in the picture with a DIY chassis and some grove modules, if you want to make one coooool chassis for your car, there is a CDR file attached at the following step).
And don’t forget to connect the DC motors to the cape. The motor on the left is connected to port 1 and the right motor is connected to port 4. I attach the battery at the back of the chassis and power the cape with a adapter and 2 jumper wire. After that, power the cape first and still plug in BBGW via USB. Open Cloud9 IDE again and run app.py. We are going to check out that if the motors works as we expect. All the action of the motors are defined in “mywificar.py”. If I need my car go straight on, I will turn the right wheel clockwise and turn the left wheel counterclockwise at the same speed, as the “goFront()” function. When you click the up arrow button in the website and the car doesn’t go straight--just circles, then you have to press the stop button and switch 2 wires in port 1 or port 4. Besides, “PwmDutyRight” and “PwmDutyLeft” are positively associated to the speed of the motor, try to increase them for a faster speed. After debugging, just rip out the USB and place your Web RC Car on the ground. Connect your phone to the Wi-Fi named “BeagleBone 05xxxxx” and visit 192.168.8.1:5000. Congratulation! Please enjoy the fun of DIY!
Step 9: Extend Patrol ModeNext, I am going to extent patrol mode for the car and make a cool chassis for it. For the patrol mode, we need 4 Grove - Line Finder sensor to recognize the trace, a Grove - Switch for mode selection, Grove - Chainable RGB LED for mode show(Red means patrol mode and green means RC mode) and Grove Base Cape for connection.
Grove Base Cape for Beaglebone v2.0
Grove - Switch
The code is in folder “mywificar_v1.1”. Please confirm all the Grove modules are connected to the right port as what I mark in “mylinefinder.py”, “myled.py” and “myswitch.py”.
Add TipAsk QuestionCommentDownload
Step 10: Set Auto RunFor convenience, we can set the program auto run when BBGW boot up. After that, we don’t have to plug in BBGW via USB and type command line in terminal.
Now create a file named “mycar” in /etc/init.d
cd /etc/init.d vim mycar//press “i” to insert in VIM and copy the following code
#!/bin/bash# /etc/init.d/mycarcase "$1" in start) echo "Starting mycar" python /root/bbgw_wifi_car/mywificar_v1.1/app.py & ;; stop) echo "Stopping mycar" # killall app.py kill $(ps aux | grep -m 1 'python /root/bbgw_wifi_car/mywificar_v1.1/app.py' | awk '{ print $2 }') ;; *) echo "Usage: sudo /etc/init.d/mycar start|stop" exit 1 ;;esacexit 0
cd /etc/init.d
vim mycar
//press “i” to insert in VIM and copy the following code
#!/bin/bash
# /etc/init.d/mycar

case "$1" in
    start)
        echo "Starting mycar"
        python /root/bbgw_wifi_car/mywificar_v1.1/app.py &
        ;;
    stop)
        echo "Stopping mycar"
        # killall app.py
        kill $(ps aux | grep -m 1 'python /root/bbgw_wifi_car/mywificar_v1.1/app.py' | awk '{ print $2 }')
        ;;
    *)
        echo "Usage: sudo /etc/init.d/mycar start|stop"
        exit 1
        ;;
esac
exit 0
Next,
sudo chmod +x /etc/init.d/mycarsudo service mycar start
sudo update-rc.d mycar defaults
sudo chmod +x /etc/init.d/mycar
sudo service mycar start
sudo update-rc.d mycar defaults
Now “/root/bbgw_wifi_car/mywificar_v1.1/app.py” will start automatically when BBGW boot up. What's more, you can start or stop this program with the following commands:
/etc/init.d/mycar start
/etc/init.d/mycar stop
Add TipAsk QuestionCommentDownload
Step 11: Extend Web Camera Video StreamingNow I am working at video streaming on BBGW. I manage to transmit a real time video on our remote control website. That must be more interesting and exciting! We will be able to explore this world with a whole new vision.
Mjpg-streamer is my choice, but there is an unstable delay when video streaming. If you have some good ideas or if you are interested in this, please don’t hesitate to let me know! Just post your comments! Thank you!
Comments
Please log in or sign up to comment.