

Hardware components | ||||||
| × | 1 | ||||
 |
| × | 1 | |||
| × | 1 | ||||
| × | 20 | ||||
| × | 1 | ||||
 |
| × | 1 | |||
Software apps and online services | ||||||
 |
| |||||
This piano is able to play any frequency in-between two keys. It is a touch-based keyboard that is able to detect multiple touches and measure the pressure of touching. In this tutorial, it only makes use of one-touch and one intensity. Making of it would require basic knowledge of Arduino for debugging.
Have a view of video for complete making in fast forward.
Features:
- A piano that takes input from the touch,
- Able to play any frequency in between two keys,
- Adjustable frequency range,
- The response of the piano should fast enough.
First, we break our problem into multiple smaller problems and then try to solve them one by one. In our case to make piano major tasks are:
- Measuring/estimating positions of touch: Here we do not need to have just one value of touch but we need to measure the position of multiple touches which also should be the analog value. so that we can take care of frequency which is in between to keys. This involves taking data from keys and also the processing of that data.
- Key and frequency calculation: After taking data from all keys, we need to map that value for a specific frequency. As we know increment of the frequency of piano is Geometric progression, which means you need to keep multiplying some factors to get the frequency of the upcoming key.
- Tone generation and rejection of noise(in data): After calculating frequency we need to generate the approximate waveform of that frequency. there is also some noise that may present during no-touch condition which needs to eliminate.
We are going to use capacitive touch for our purpose. here we will use an array of plates. we will use each of plate as the touch sensor.
The touch sensor is nothing but a capacitor sensor, we are somehow measuring the change in capacitance (which is a result of touching) using Arduino. There are two pins are used both are connected with a high value of the resistor. We turn ON pin to high and start the timer and see how much time it takes for another pin to go at a high state. This time which we call "rise time" depends upon the capacitance and also resistance. Here resistance is constant but capacitance varies as per touch.
In the image, we have taken around 12 keys for example. and touching somewhere between plate 6 and 7. As we need continuous data and not interested to know whether it is at the 6th or 7th key. We actually want to know the exact position of the touch in between 6-7. First, the key of max touch detected, and then the position is measured for the touch by using basic mathematics.
Image 1: http://playground.arduino.cc/Main/CapacitiveSensor...
Working 2: Determining Frequency & Tone GenerationAfter calculating the key number we need to calculate frequency associated with that key. The frequency of the key is in geometric progression. The function of it is shown in the image.
In the above function "n" is a number of keys. so adding a number of keys we can calculate the frequency.
Here we map key 1-18 (a board with 18 touch plates) to any keys we want. And as our device is analog no need to take the range of only 18 key but any range. For example, if you want to play on the 40th to 70th key on the keyboard that is mapped on 1-18. so left most part would play frequency of 40th key and the right part would play frequency of 70th key.
Here we would use direct tone function for frequency generation. It generates the square wave of a given frequency. for a better experience, we also can set a duty cycle for volume control as the pressure of touch.
for more reading related to piano key frequency: https://en.wikipedia.org/wiki/Piano_key_frequencie...
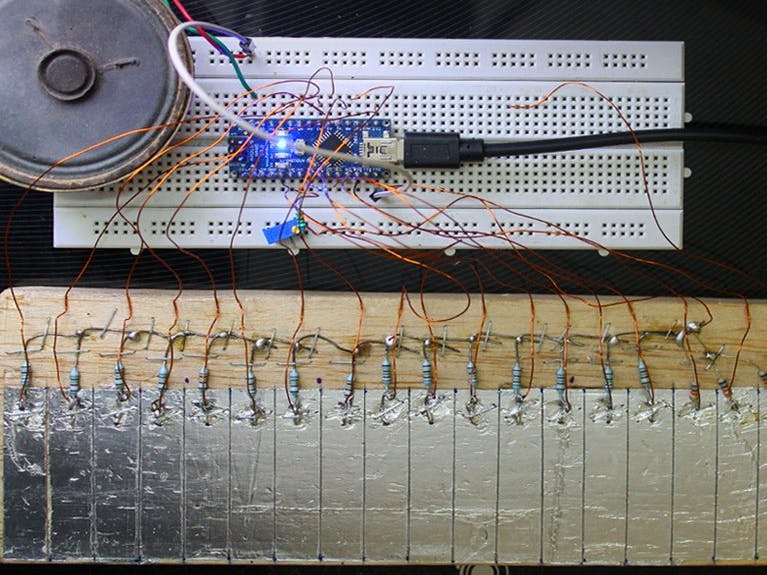
Making 1: Preparing BoardFirst, take a wooden block and stick aluminum foil on it. There aren't any restrictions on size. Remove extra foil from it and cut it to 30% of width as shown in the 4th image. this blank area will be used to stick resistors on it.
Now do marking on it at 12mm apart along the length. you can even try the lower size of a key for the better result. Cut these foil as per marking so that we would have separate plates which we will use as touch key/plates. Cover Al foil with plastic tape. So that you don't need to touch plates directly.
Important: all these plates (key) must be electrically separated from each other.
Making 2: Electric Connection- Check that all plates are separated from each other, they must be electrically insulated. all plate must check after every step,
- Now connect the 87K resistor to all plates and solder it properly,
- connect another end of the resistor to common and connect to pin 4. and take a wire from every plate (another end of the resistor),
- Connect pin 12 to the speaker.
Connection:
- KEY 1 TO A6
- KEY 2 TO 13
- KEY 3 TO A5
- KEY 4 TO A4
- KEY 5 TO A3
- KEY 6 TO A2
- KEY 7 TO A1
- KEY 8 TO A7
- KEY 9 TO 2
- KEY 10 TO 3
- KEY 11 TO 5
- KEY 12 TO 6
- KEY 13 TO 7
- KEY 14 TO 8
- KEY 15 TO 9
- KEY 16 TO 10
- KEY 17 TO 11
you can take your own combination but then arrange it such a way that value of 'i'th key in array x[i].
Making 3: Understanding Code:First, you need to install the CapacitanceSensor library.
float N_min=48; float N_max=70;
here the select range of key. for example in this code 48th to 70th is mapped on our board.
2.smoothing: this shows the value of smoothing. more value than a higher lag would be there.
int smooth=2;
3.Specifying capacitance value:
CapacitiveSensor   i20 = CapacitiveSensor(4,A6);
CapacitiveSensor   i13 = CapacitiveSensor(4,13);
.
.
.
CapacitiveSensor   i11 = CapacitiveSensor(4,11);
This section specify various pin as input where pin 4 in common transmitter pin.
4. Mapping values:
N_map();
map range of frequency as per N_min and N_max value on each plate.
5. Read value: Read_val() is a function that runs following code which takes value from each plate.
x[1] =  i20.capacitiveSensor(30);
x[2] =  i13.capacitiveSensor(30);
 ..
x[18] =  i11.capacitiveSensor(30);
6. key_calc():
this function reads the calculation of key as per min and max value of the key.
for(int z=1;z<19;z++)
{ if(x[z]>t1){t1=x[z];t4=z;}
this would detect the maximum value of touch.
kt=((x[t4-1]*N[t4-1])+(x[t4]*N[t4])+(x[t4+1]*N[t4+1]))/(x[t4-1]+x[t4]+x[t4+1]);
This equation takes 1 key forward and backward and take value from each and calculate the position of touch as per intensity.
7. freq_calc():
Now we need to calculate the frequency of that key.
float n;n=(key-49)/12;
freq=m*220*pow(2,n);
here, 'key' is the number of keys m= it is the value which only becomes 1 when the touch input is high enough. so without any significant kind of touch frequency value would be equal to 0.
Making 4: Uploading Code and DebuggingAfter uploading the code, it may or may not work properly. So here are some of the problems that I observed during this project.
- One of the most common problems is the loose connection between Arduino and the plate. You won't get continuous sound without proper connection.
- If two nearby plates are touching each other, it will have the same value of capacitance.
- The speaker you are using is not suitable for Arduino. so you need to use another speaker or an amplifier circuit.
Maybe, this piano won't work with battery due to lack of proper ground and work best if powered by the use of PC as it has a good ground.
How to detect the problem:
- you can turn on print_raw() and then touch all plates together to see which plate is not responding properly.
- you can also check all plates one by one by uploading different codes to it.
Limitations:
- The sound of this piano is not as good to hear as piano as it is a square wave wherein actual piano it as the combination of multiple harmonics.
- You can not play multiple keys at the time,
- The volume of the piano is not controlled by touch but remains fixed.
set key range and smoothness number as per your style, and locate various notes on it so that you can play any song you like.


Comments
Please log in or sign up to comment.