This is a continuation of Reusing PIXMOB Waveband Without Flipper Zero - Hackster.io. I decided to start a new project because I'm using WeMos D1 Mini (my favorite Development Board) with CC1101. That will be a lot easier for my fellow makers to work with. Reverse engineering has been completed by sueppchen, now it's time to use his library.
We're building a device to transmit signals that can be interpreted by PIXMOB Waveband. These signals will contain commands to control light effects. No app to install; we'll just use a web browser over Wi-Fi Access Point.
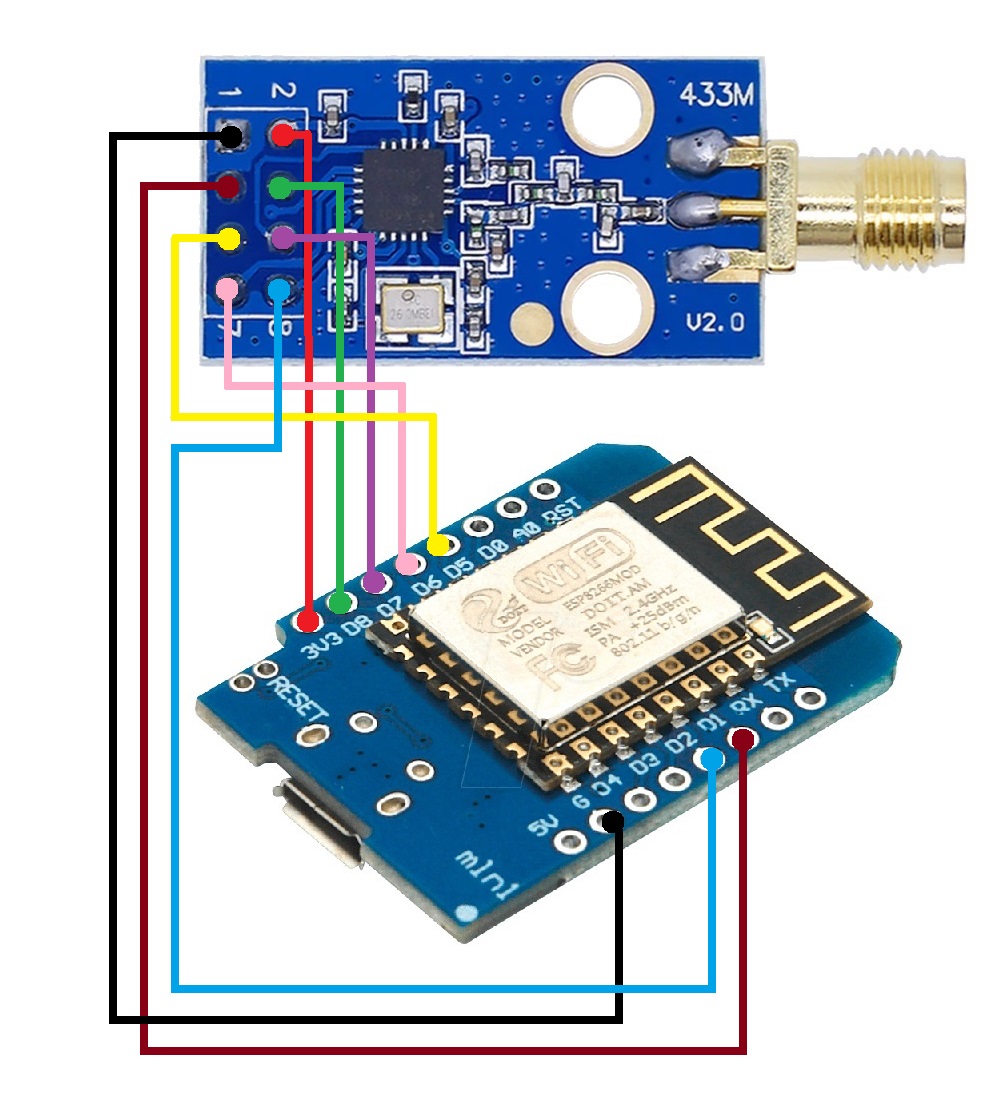
Wiring is easy once we find out how many pins we have on CC1101 board. We're using the 8-pin board on the left.
Next, we need to find the pinout of our board.
CC1101 runs on 3.3 V so there is no need for a level shifter when using WeMos D1 Mini. After connecting 3.3 V pin to VCC, GND of WeMos D1 Mini to GND of CC1101, and SPI pins of both boards together we need to find where to connect the remaining two pins of CC1101. We picked D1 for GDO0 and D2 for GDO2 based on SmartRC-CC1101-Driver-Lib/img/Esp8266_CC1101.png at master · LSatan/SmartRC-CC1101-Driver-Lib (github.com). GDO2 is not necessary for our project and if we need to use I2C, for let's say adding OLED display, we'll have to pick different pins.
Remember to add 915 MHz antenna or solder 8.2 cm wire before powering the device.
Just like we did in Replacing Raspberry Pi Zero W Gate Opener With XIAO RP2040 - Hackster.io, we packed the device neatly inside a Kinder Egg toy capsule which I acquired legally overseas. Why do I have to mention that? Here's why.
Do you have any vaping friends?
Get rid of them and find better friends. Before you do, make sure you get a used vape pen from them. Each vape pen has a perfectly good battery with a charger that end up in a landfill. We can use one of these batteries to power PIXMOB for hours and save 2 CR2032 batteries.
We're using VS Code to program WeMos D1 Mini. Arduino IDE can be used if we renamed main.cpp to a file name with.ino extension. We also have to make sure we're using the correct libraries listed in platformio.ini file. We copied pixmob_cement.cpp and pixmob_cement.h to the same location as main.cpp which is not the conventional method to get a library in Arduino IDE or PlatformIO.
We start the code by setting up WeMos D1 Mini in Access Point mode with PIXMOB as SSID (once connected, controls will appear at 192.168.1.1). Next, we specify D1 as the data pin, set the board SPI pins, and set the frequency to 915MHz. WebSocket server is configured next.
Before setup we saved the HTML page to be served in PROGMEM. This required less steps than using LittleFS. That page also includes JavaScript to allow the browser to communicate values with WebSocket server. Finally, we used the loop to send color effects.
Demo


Comments
Please log in or sign up to comment.