Weather Station everywhere
Introduction:
My project is based on The Internet Of Things with ESP8266
1- Moving Toward A Smarter Internet – The Internet Of Things
Imagine you are living in a world where millions and millions of objects has the super power to sense, communicate and share information – all interconnected over public or private Internet Protocol (IP) networks. These interconnected objects have data regularly collected, analysed and used to initiate action, providing a wealth of intelligence for planning, management and decision making - This is the world of the Internet of Things (IOT).
2- Benefits Of IOT:
The benefits of IOT are immense. In this practical world, you can integrate IOT into anything according to your creativity and need. Be it business conglomerates or an individual small home, the amount of benefit you can derive from IOT is enormous. IOT is the hot topic in the industry as well as house-holds because of its huge technical advancements and assistance in making our lives seamless and smarter.
3- Remote monitoring
Any place that has Internet facility can be monitored from all over the world through GPRS or Ethernet or wired connection.
4- Simplicity to access
Controls are available through mobile devices. Even apps can be developed to give users ease of access.
5- Applications of IOT:
IOT has a list of applications ranging from household things to heavy industrial machinery. There is no end to the usage of IOT in technology, business and personal lives.
Description:
1- The Chip ESP8266
(presently ESP8266EX) is a chip with which manufacturers are making wirelessly networkable micro-controller modules. More specifically, ESP8266 is a system-on-a-chip (SoC) with capabilities for 2.4 GHz Wi-Fi (802.11 b/g/n, supporting WPA/WPA2), general-purpose input/output (16 GPIO), Inter-Integrated Circuit (I²C), analog-to-digital conversion (10-bit ADC), Serial Peripheral Interface (SPI), I²S interfaces with DMA (sharing pins with GPIO), UART (on dedicated pins, plus a transmit-only UART can be enabled on GPIO2), and pulse-width modulation (PWM). It employs a 32-bit RISC CPU based on the Tensilica Xtensa LX106 running at 80 MHz (or overclocked to 160 MHz). It has a 64 KB boot ROM, 64 KB instruction RAM and 96 KB data RAM. External flash memory can be accessed through SPI.
2- Features of ESP8266:
· Low power 32 bit CPU(Tensilica Xtensa LX106 core)
· 802.11 b/g/n
· Wi-Fi 2.4GHz (WPA/WPA2)
· Networking protocol stack of TCP/IP
· Smart link functionality for both iOS and Android
· Supports Station/Soft-access point/soft-Access point +Station modes
· FCC, CE, TELEC, Wifi Alliance, and SRRC certified
· Deep sleep power is less than10 uA
· Power down leakage current less than 5 uA
· Wakeup and transmit package in 2 ms
· Standby power consumption is less than 0.1 mW
· Operating temperature is – 40 to 125 C
· 10 bit ADC integrated on chip Communication protocols like SPI, I2C and UART etc
· Operating voltage 3.3V.
3- NodeMCU
Soon after ESP8266 was launched NODEMCU came in picture. NodeMCU firmware’s first file was committed on 13 October 2014 on GitHub. NodeMCU is like a development kit for ESP8266. It is based on ESP8266 – 12. It has on board USB to serial converter. It can be powered by USB cable.
From the above image one can easily make out the ESP8266 board which is mounted on base board of NodeMCU. So NodeMCU is simply with two more major IC. These are CP2102 and LM1117, which are USB to serial converter and voltage regulator for 5v to 3.3V. It has PCB antenna along with two switches and LEDs. Features of NodeMCU are exact to that of ESP8266. It provides advanced API for hardware IO, which cuts-off the need to study hardware – So you do not need to study anything about the controller or its registers etc.
4- DHT11
We will install a Digital Temperature/Humidity type sensor, the old and good DHT11
Overview
The low cost DHT temperature & humidity sensors are very basic and slow, but are great for hobbyists who want to do some basic data logging. The DHT sensors are made of two parts, a capacitive humidity sensor and a thermistor. There is also a very basic chip inside that does some analog to digital conversion and spits out a digital signal with the temperature and humidity. The digital signal is fairly easy to read using any micro controller.
DHT11
Good for 20-80% humidity readings with 5% accuracy Good for 0-50°C temperature readings ±2°C accuracy No more than 1 Hz sampling rate (once every second)
- Ultra low cost
- 3 to 5V power and I/O
- 2.5mA max current use during conversion (while requesting data)
- Body size 15.5mm x 12mm x 5.5mm
- 4 pins with 0.1" spacing
5- Blynk
How Blynk Works:
- Blynk was designed for the Internet of Things. It can control hardware remotely, it can display sensor data, it can store data, vizualize it and do many other cool things.
- There are three major components in the platform:
- Blynk App - allows to you create amazing interfaces for your projects using various widgets we provide.
- Blynk Server - responsible for all the communications between the smartphone and hardware. You can use our Blynk Cloud or run your private Blynk server locally. It’s open-source, could easily handle thousands of devices and can even be launched on a Raspberry Pi.
- Blynk Libraries - for all the popular hardware platforms - enable communication with the server and process all the incoming and outcoming commands.
- Now imagine: every time you press a Button in the Blynk app, the message travels to the Blynk Cloud, where it magically finds its way to your hardware. It works the same in the opposite direction and everything happens in a blynk of an eye.
Features:
- Similar API & UI for all supported hardware & devices
- Connection to the cloud using:
- Ethernet
- WiFi
- Bluetooth and BLE
- USB (Serial)
- …
- Set of easy-to-use Widgets
- Direct pin manipulation with no code writing
- Easy to integrate and add new functionality using virtual pins
- History data monitoring via History Graph widget
- Device-to-Device communication using Bridge Widget
- Sending emails, tweets, push notifications, etc.
- … new features are constantly added!
Realization:
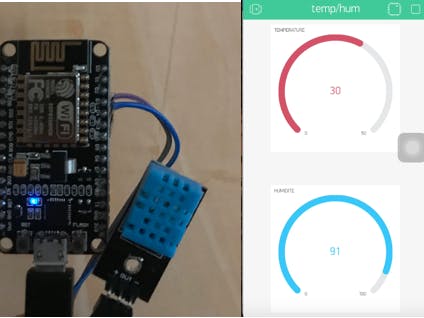
Right now this project strictly rotates around the idea of getting count on changing Temperature and Humidity.
Whenever we are out of our home environment, we are constantly worried about different miss-happenings, like fire, burglars, trespassers etc, we can use this project with little modifications so as to use anywhere we want.
Components Required:- NodeMCU (ESP8266) – Buy
- DHT11 – Buy
- Jumper Wires – Buy
- Blynk (Software)
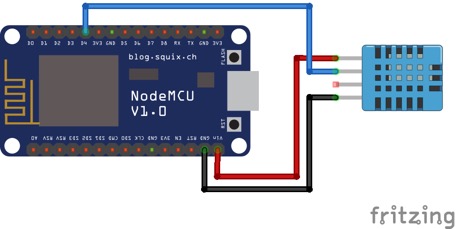
At first we need to establish connection between NodeMCU and DHT11 module and after that we need to create project in BLYNK.
Connections are as follows:
- Connect pin 1 of DHT11 module with Vin of NodeMCU.
- Connect pin 2 with D4 of NodeMCU.
- Connect pin 3 with Gnd of NodeMCU.
Setup in BLYNK Application:
- Create a New Project in BLYNK app.
- Write Project Name and Select NodeMCU from dropdown.
- An AUTH token will be sent to your registered email, note this down.
- Tap on the screen and add a 1 Gauges and 1 Graphs.
- Tap on the Widget and select the respective Virtual pins for temperature and humidity data (V6 for temperature and V5 for humidity).


Comments
Please log in or sign up to comment.